ADVENTUROUS TEACHING STARTS HERE.
First Day of School Lesson Plan for High School English: Setting the Tone
Here’s what we need to remember: the first day of class is the first chance to make an impression, to set a tone, and to signal to students the kind of atmosphere they can expect walking through your doors every day for third period. Once you know what you want your room to feel like and you can describe the kind of experience it will be for the learners in your room, it doesn’t matter WHAT you choose to do on the first day of school as long as it hits everything on your list.
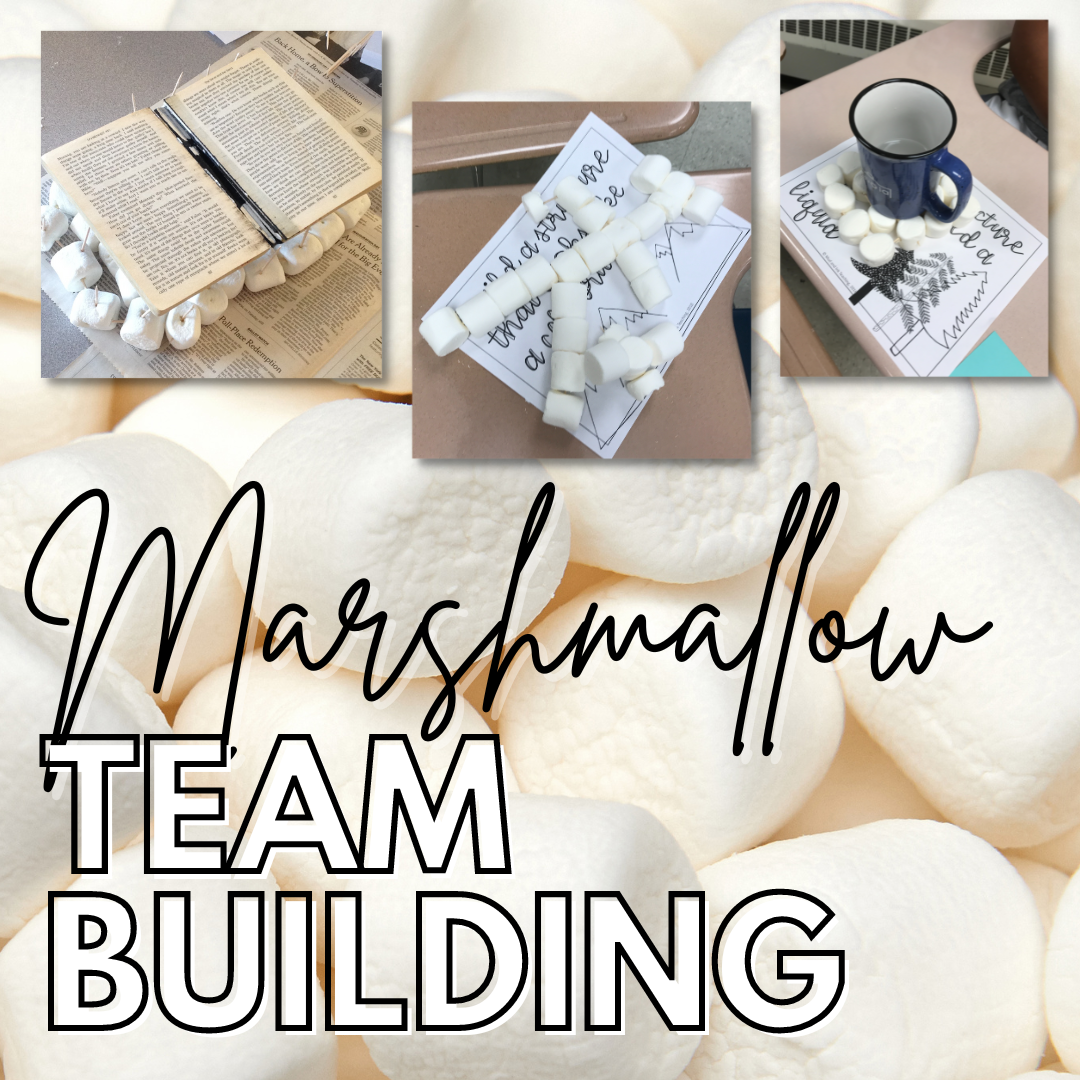
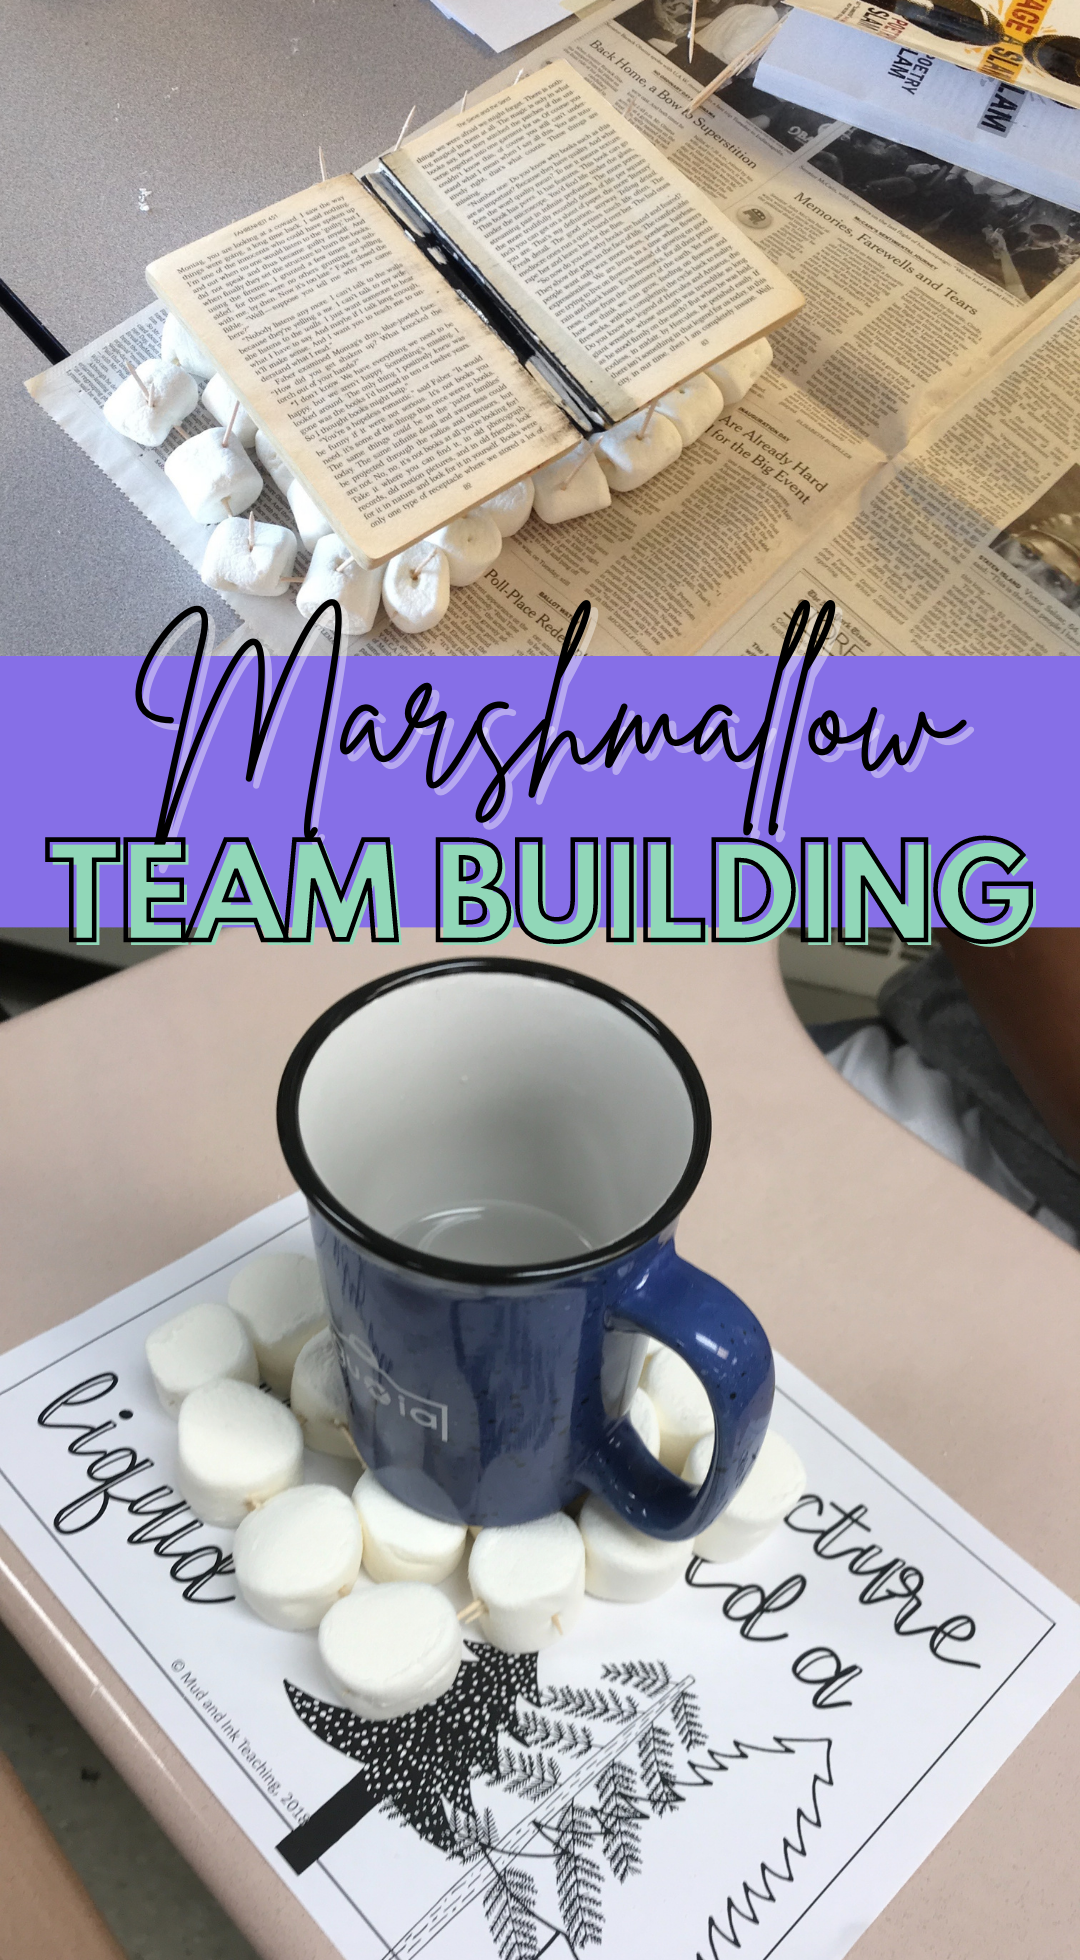
Twelve bags of marshmallows and two boxes of toothpicks.
Every year around August 15th, that’s what I’m walking out of the grocery store with in my bags. I remember one time I decided I didn’t need a cart -- I’ve got long arms, but let’s just say whoever saw me at Meijer on 11pm the night before school started that year probably had a pretty hilarious story to tell later.
One year, I had a teacher tell me that she took the LAST bags of marshmallows off the shelves of her local grocery store and heard a little voice behind her say, “Mommy, there’s no more marshmallows for our campfire!”. Oops.

Here’s what we need to remember: the first day of class is the first chance to make an impression, to set a tone, and to signal to students the kind of atmosphere they can expect walking through your doors every day for third period. Once you know what you want your room to feel like and you can describe the kind of experience it will be for the learners in your room, it doesn’t matter WHAT you choose to do on the first day of school as long as it hits everything on your list. Here are my two biggest goals for my classroom environment:
Voice matters — not just mine, but everyone’s. That includes using words that uplift one another and support the vulnerability it takes to grow as a learner, using our silence so that the voices of others can be heard, and using our words to grow into stronger communicators every day by practicing academic language and new vocabulary.
Decenter the teacher, decenter the text — A collective, vested community of genuinely curious and excited learners comes first. When I center questions and critical thinking, everything else follows right behind.
From here, we build. I go into a much more cohesive list and a reflection exercise for teachers over in my course: The First 10 Days. Here, we work side by side to develop your own goals for the year, classroom environment expectations, and so much more. This is your chance to learn from my many failures and take home exactly what I know will work so that you don’t have to waste your time wondering what will actually make you successful.

MARSHMALLOW TEAM BUILDING
On the first day of school, I have tried so many different activities, but I finally settled on my unicorn: Marshmallow Team Building. This is the activity I’ve been doing for countless years. There are many different variations on the activity, so whichever version you choose, you should be looking to get these things out of it:
Establish a classroom atmosphere of TEAMWORK: for the entire period, I only speak two or three times. When they ask questions, I simply point back at their group. From day one, my students know that here in this classroom, they’ll be solving problems together, not just asking me for answers.
It forces me to LISTEN. Since I’m not talking, I’m watching and listening intently. I’m getting a read on the room - who is stepping up to lead? Who is presenting creative ideas? Who is cooperating? Who is...not cooperating?
It makes kids smile. This is just plain FUN. No one expects to walk into their English class on the first day and be handed marshmallows and toothpicks!


THE LESSON PLAN
Let’s get you ready to tackle the first day of school with this layered and powerful activity. I have the whole thing laid out for you here to print-and-go, but if you’re looking for a bit more information, here is how the lesson usually goes:
PREPARE:
Presort your students into groups. My room is set up in tables, so I just create a seating chart ahead of time so students know where to sit.
Prevent messes: I usually put down some butcher paper or wax paper where the students will do their building.
Number the chairs in the room. It makes assigning seats so quick and easy!
TEACH:
Greet your students at the door with a big smile and a handshake or hi-five. It may sound silly, but this is a critical moment to make a first (and lasting) impression on your students. I ask them for their name, find it on my seating chart, and send them to their numbered seat.
When students walk in, they find their numbered seat and can see a single Google Slide at the front of the room. The slide usually says welcome, take a seat, and has a teamwork-related quote.
When class starts, greet them again. Do attendance again. Make an effort to learn names right away. As soon as that’s done, give them their directions
The directions are as follows:
You will have 10 minutes to complete the challenge that you are handed.
You should work together as a team with each member contributing his or her ideas.
When you think you’ve completed the challenge, raise your hands and I will come over to judge your work.
You must use ALL of the materials provided - no items can be left out!
I cannot help you at all during the time limit.
Your goal is to complete the challenge before the time is up!
Set the timer and let them get started!
FOLLOW UP:
From an informal debrief to a more formal written reflection, bring everyone back together again. It’s important to let the students share what they learned about themselves, wonder aloud about why on earth this was the activity their teacher chose for the first day of school, and to discuss how their teams worked together.
Like I stated earlier, there are SO MANY different ways to set up this lesson. My first day of school class period is usually only 18 minutes long, so we get in, get messy, and then they leave. And when they leave, I know that I’ve created a memory for them. I’ve created a memory that gives them an idea of what to expect for every day moving forward in my room:
Expect the unexpected
Take chances
You are valued; you are CENTER
Learning is messy
Things will be hard, but we’ll work together and have fun, too
For an entire in-depth walk through of my first ten days of school , I hope you’ll join me over in my course where you’ll have lifetime access to updates and materials. I hope you have the BEST school year yet and let me know how this activity goes for your students!
My co-host Marie Morris and I discuss this season of teaching at length on our podcast Brave New Teaching. This episode is a great place to start if you’re ready to dig deeper into the philosophical things you are thinking about as you’re starting a brand new school year. Join us!


A Valentine's Day Activity for Middle and High School: Boost Classroom Community with Warm Fuzzies
Fighting the Winter Blues
The winter months can be a bit of a drag for classroom teachers, and morale can really start to drop this time of year (for teachers and students). This is the perfect time of year to amp up your SEL practices and foster those student-teacher and staff relationships. Who doesn’t love a little fun in the midst of winter gloom? Building community in our classrooms is so important when we think about student buy-in, but that community also extends to the faculty and staff of the school as a whole. If you’ve been looking for an idea to brighten up your classroom and build a positive school culture, these SEL Warm Fuzzies have just what you need!

Step One: Get Your Materials Ready
This activity is SO simple and requires very little to set up, and you can easily adapt the set up to meet your needs. That being said, the first thing you need is a bag for each participant. Brown paper bags work great, but if you have something similar go ahead and use those! Students will be able to decorate their bags and add a personal touch.
Once you have the bags, decide on a place for these to “live”. A bulletin board works great! You’ll staple the bags there for all to see and leave them up as long as you like.
The next step is to ready your Warm Fuzzy slips. We have some templates ready to go! Just click here and print!

Step Two: Prep Your Participants
Give students time to decorate their bags. We all know that some of our students will write their names on the bags and be done, but some may want to spend some time making their bags unique. You can set some time aside for this, let them decorate once they finish ongoing assignments, or let them take the bags home to decorate!
Next, give students the Warm Fuzzy slips, and let them begin to write their notes. Encourage students to write several notes to different classmates, and remind students that the purpose of this activity is to build community and spread some joy around. You could require each student to write a minimum amount of notes, or you could have students write a note for each of their classmates. This depends on you and the amount of time you want to spend on this activity.
It might be helpful to have some sentence starters for kids who feel stuck on what to write. And remember, the more specific the message the more meaningful the impact! Tell students to think about what stands out to them about their classmates. Maybe it’s the thoughtful discussion points someone always has, or it could be the kind gesture of always having a pencil for someone to borrow. The possibilities are endless!
Step Three: Spread the Warm Fuzzies Around!
Now it’s time to deliver the notes! You can do this all at once or over time. Either way, at the end of the process each student should walk away with an assortment of notes making them feel all warm and fuzzy inside.

A Bonus IDEA
This activity is so versatile and is something you can do multiple times throughout the year (just be sure to keep the bags 😉). You could also do this with your teacher team, your department, or your whole faculty! Hearing from our peers about the positive things they see in us is always uplifting, and don’t forget to make yourself a bag even if doing this with your students! You’d be surprised at how much those sweet words can make a difference.
If you’re looking for something to help with teacher morale, whether at the team, department, or even whole school level, this is a great activity for faculty and staff. Community is so important for our classrooms, but it’s also beneficial to build community with other teachers and staff.
IS SEL AN IMPORTANT FOCUS IN YOUR DEPARTMENT?
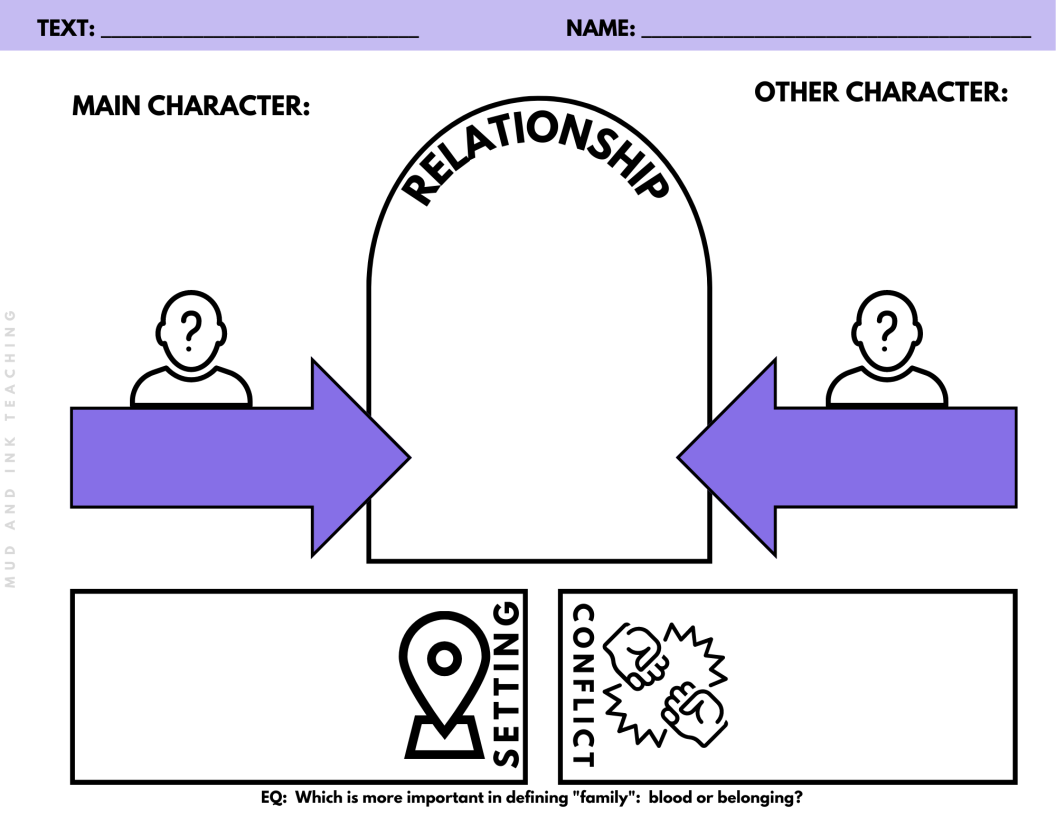
Then your next step it to check out my Essential Question Adventure Packs. Each pack is designed to support any classroom text that fits under the umbrella of each question — and it’s supported through an SEL focus. Here’s a peek at one of the latest packs: Why do relationships matter?
LOOKING FOR MORE LIKE THIS? HERE’S WHERE TO GO NEXT!
Add some new resources to your toolbox


10 Back to School Learning Station Ideas for Middle and High School
One of the best ways to start your back to school lesson planning is with a stations activity. Gone are the days of reading the syllabus out loud, and right in front of us are the days of interactive, meaningful, and focused activities. Get your students started in groups and take them through an orientation to your room, your expectations, and the school year ahead. Here are 10 ideas to get you started.
10 Back to School Learning Station Ideas for Middle and High School
For several years now, teachers have joined the mission to intentionally create a first day and first week of school that are reflective of the kind of classroom culture and environment that they want to create for the whole school year. Gone are the days of reading the syllabus aloud to students and droning on for days at a time. And one of the most popular ideas that has grown to replace these teacher-centered practices is the use of back to school STATIONS. It’s been a cornerstone lesson in my First Ten Days of School practice for the last decade.
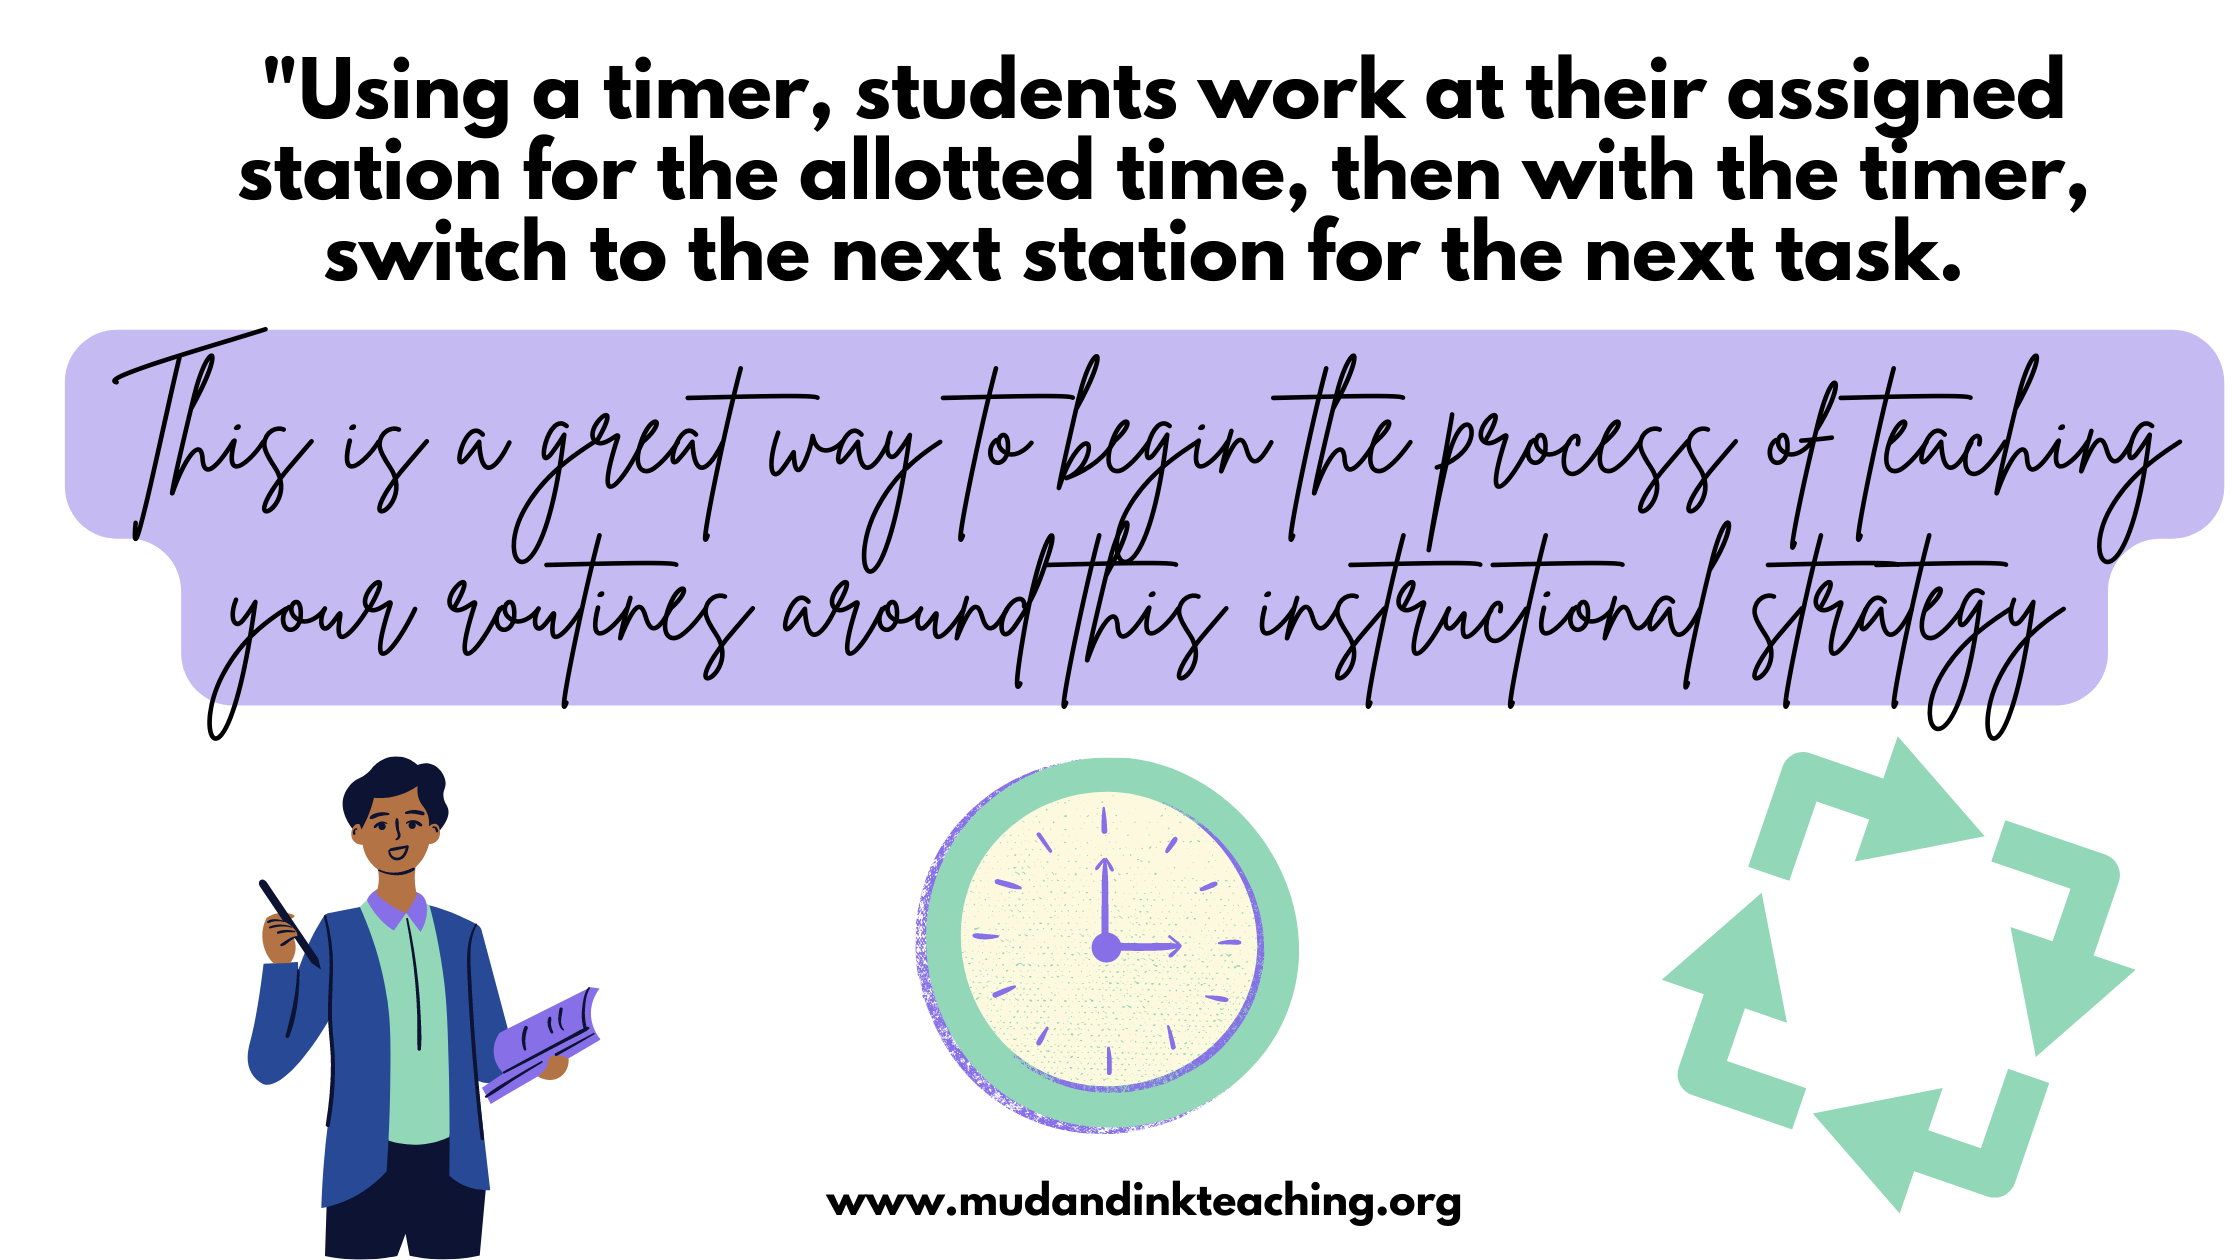
Stations as an instructional strategy is relatively straightforward. A certain number of tasks that take a similar amount of time to complete are predetermined by the teacher and become the “stations”. Then, students are broken up into the same number of groups as there are stations. Using a timer, students work at their assigned station for the allotted time, then with the timer, switch to the next station for the next task. This is a great way to begin the process of teaching your routines around this instructional strategy -- trust me, your October self will thank you for starting routine practice early and often!
With back to school season always having a slew of odd ball housekeeping tasks to accomplish, stations is a great way to keep the pace of class moving, get students out of their seats, and begin the process of getting to know each other based on the small group they’re moving.
Syllabus & Questions for My Teacher
After making the switch from a paper to a digital syllabus, I’ve been able to navigate getting the important information it includes in front of both students and parents. With a digital syllabus, I can “assign” looking through it the night before stations, and then, in this station, ask students to revisit the syllabus and on an index card, leave questions and comments for me at the station that I can answer FAQ style in upcoming days. You could also give the students at this station a syllabus “quiz” in the style of true/false or multiple choice.
A copy of my digital syllabus template is available inside my exclusive course for teachers: The First 10 Days: The Complete Back to School Toolkit.
Establish a “Brave Space”
Station time is also a wonderful opportunity to set up intentional experiences for students to see and participate in your classroom expectations. One simple, yet powerful, station idea is to use a section of your room close to a whiteboard (using my FAVE markers) or giant post-it, and write on the board BRAVE SPACE. Explain in the directions for students to write around the word with definitions and examples of what a “Brave Space” should look and feel like in the classroom. I make sure to take a picture of each class period’s answers to use later for debriefing and adding to my digital syllabus under my “Expectations” tab.

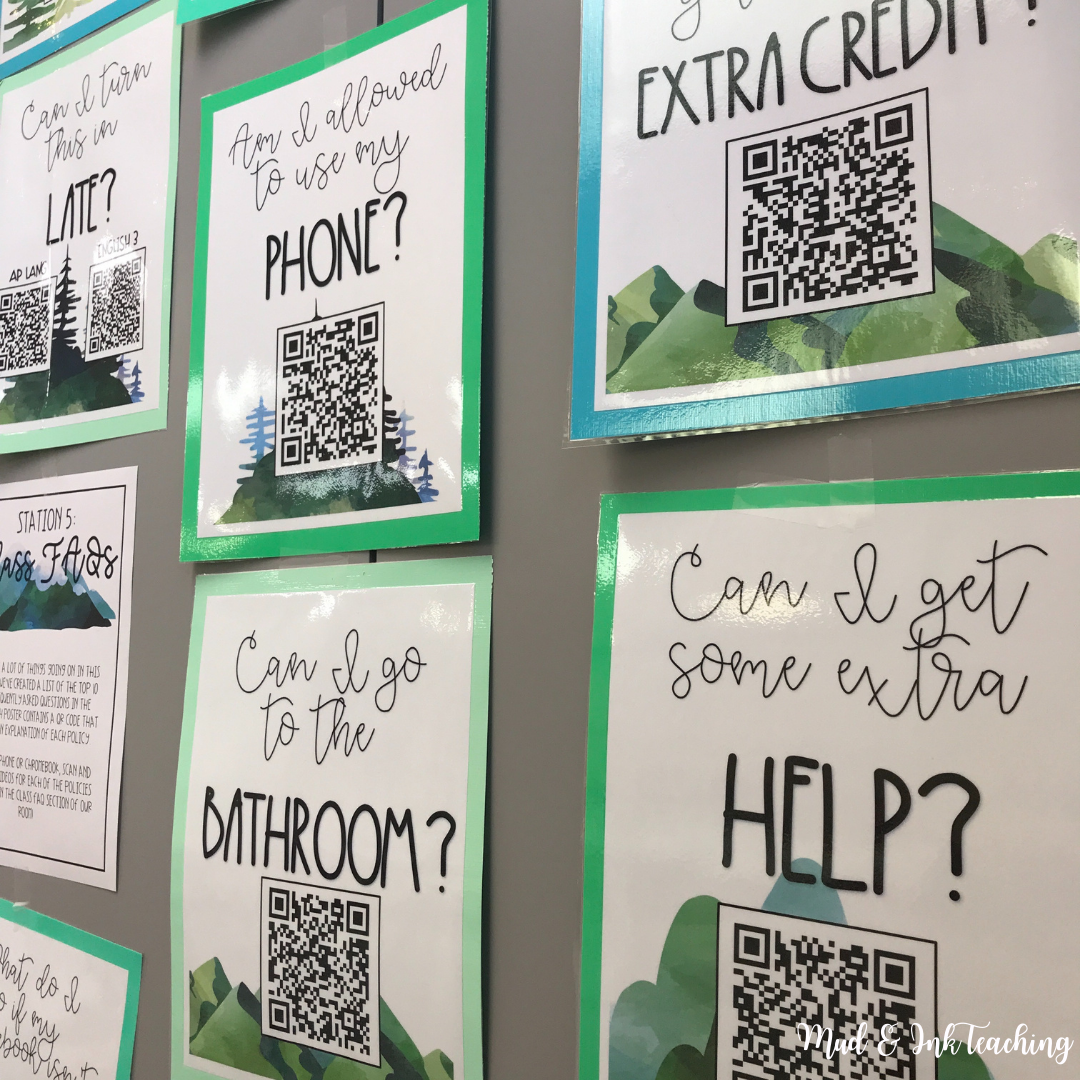
FAQ QR Code Classroom Management System
Another way to use your stations activity is to introduce your students to various functional spaces in your classroom and give them a chance to be oriented to how they work, I speak about this at length in episode 58 of the Brave New Teaching podcast as we discuss the importance of functional classroom decor. For me, one of the most important spaces in my room is my FAQ QR Station. This is the place in my room where students come to get their frequently asked questions answered…by a video, not by me. Because we can answer questions about late homework, going to the bathroom, and other policies for only so long before we want to pull our hair out, right? So instead of answering these questions again and again (in October and November, especially), the QR code does all the work for me! This is how I prioritize functional classroom design over splurging at the Target Dollar Spot all summer long..

All About Me Student Survey
At the start of the school year, there’s quite a bit of information that I want to know about my students. Some I want to learn through conversation, but much of it I want to have to refer back to as the year progresses and I see where students are finding strength and struggle. I designed an All About Me Student Survey using Google Forms that I’ve used for years and I use this station to give students time to fill it out rather than making it “homework”.
Student-Created Classroom Decor
Typically each year I try to make one of my stations artsy crafty. The quick little project is usually connected somehow to one or more of the following: my classroom theme, something bookish and Englishy, something connected to authors we’ll study, etc. I love doing these things, but don’t have a lot of original ideas of my own, so I scour the internet for ideas! Here are a few things I’ve done in the past that have been fun and great for a quick station:
Blackout poetry on a random dictionary page: cut into triangles and closepin them to twine for a classroom banner
Contributions to a door decoration
This wreath but with different clipart
A collaborative poster of different sorts

Six Word Memoir
These can be used ANY time of year, but at the beginning of the year, six word memoirs serve as a quick and easy way to get to know students AND see how their writing brains work. Narrowing down their life story to only six words offers powerful insight into how they see themselves and how they creatively and critically approach the writing process. Since the station time might be too short to fully think this out, you might ask for a draft at this station and revisit them for a final revision later in the week.
Create a name plate/Name voice recording
Learning student names is a paramount priority when beginning the school year, but also something that can be very boing for other students to watch us struggle through. Instead of going through the attendance roster every day trying to learn names, use a station to have students create name places and even record a sound bite of their accurate name pronunciation! I show you how to easily do this in this blog post. All you’ll need for the station is paper and markers for the name plate and a few chrome books with tabs open to Vocaroo.com.
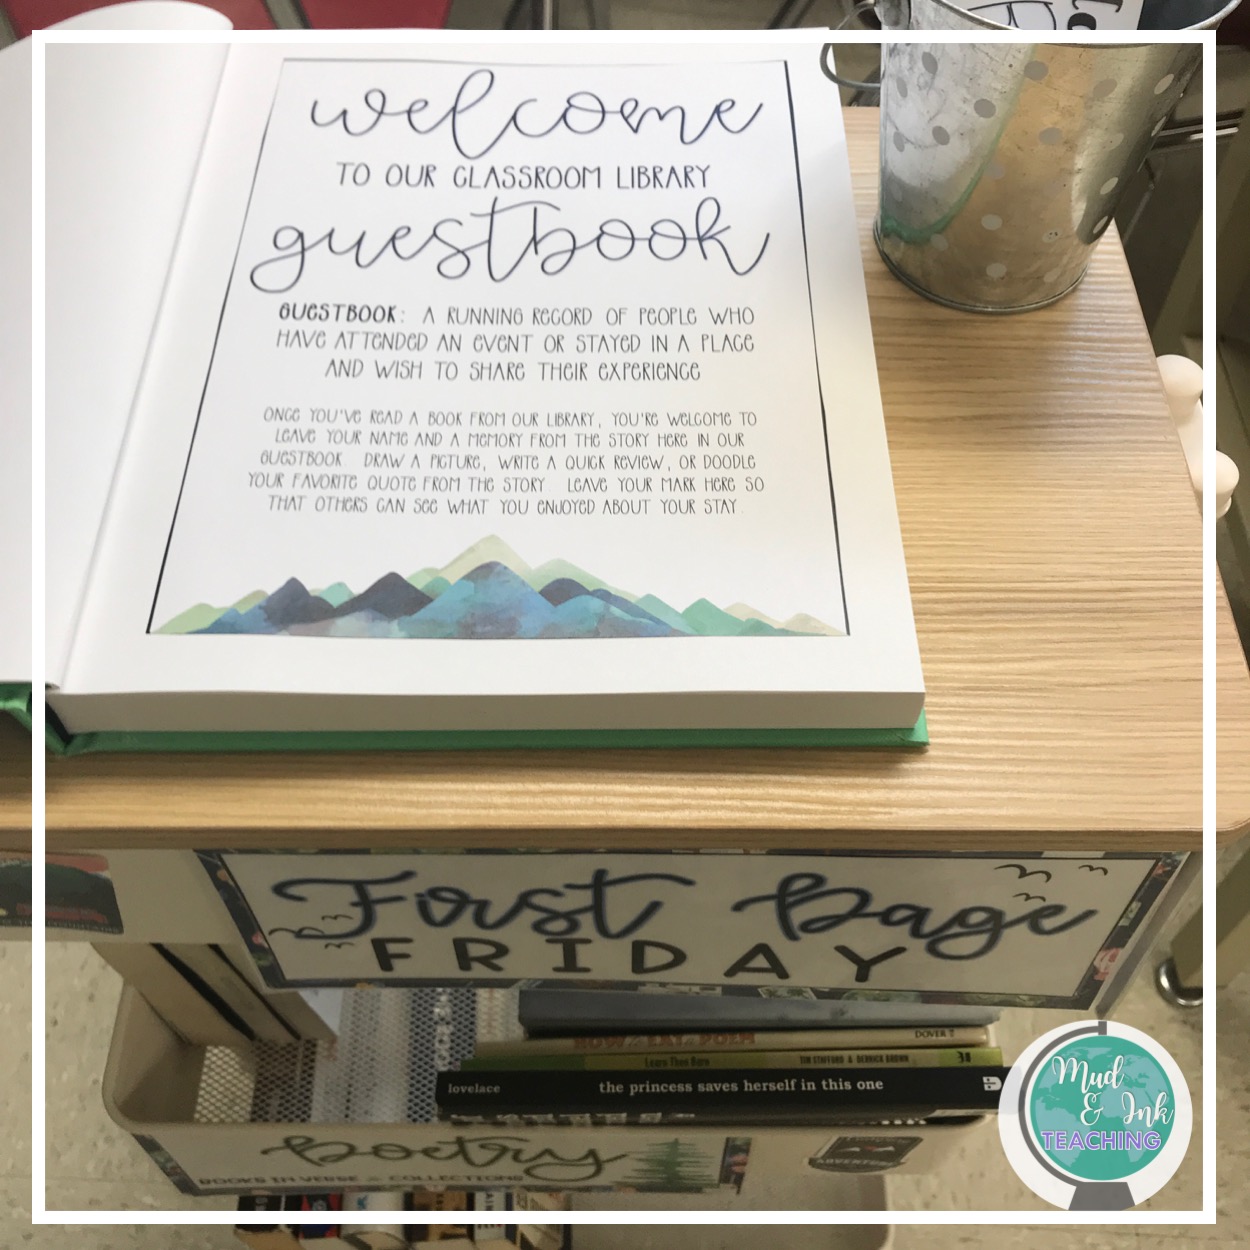
Classroom Library Tour
If you are an ELA teacher, another classroom space that you most likely need to share with your students is your classroom library. If you have a system for checkout and returns, if you have a routine associated with first chapter Friday, or just generally want students to begin perusing teh books on your shelves, make this an exploratory station! My classroom library is on a rolling cart: it’s a rotating “best of the best” system and the majority of my books are housed on a database that students access through QR code. Using this as a station during back to school give students a chance to explore that without a time-consuming overview from me and puts the ownership and focus back on the students as they begin that exploration on their own.

Take What You Need Station
Another classroom space that matters to me in the classroom is my Take What You Need station. This is an area by the front of the room that houses all of the little odds and ends of things that students are always asking for: breath mints, hand lotion, dry shampoo, gold star stickers, and more. I keep some coloring pages for students who need time to unwind when they’re feeling stressed, blank note cars to write a hand-written note to a friend, and more rotating goodies as needed.
Goal Setting
Fresh starts with a new semester are the perfect time for students to do some serious and some light hearted goal setting. I like using these one-pager templates as a station where students can do fun goal setting and add to the page as the semester continues. I have them choose three sections that are together, record the date, and share the goal. They can illustrate them as they like! As we move through the year, we revisit this template and add more and reflect on the things written at earlier stages in the semester.
I hope this year, back to school learning stations hit the trifecta for you: establishing routines, building relationships, and setting the bar for rigor. I’d love to take you through my full first ten days of school in my course when you’re ready. I’ve got every lesson, the philosophy behind each step, and a digital drop down lesson planning calendar all inside just waiting for you! Take a peek inside right here…
Happy back to school, everyone!

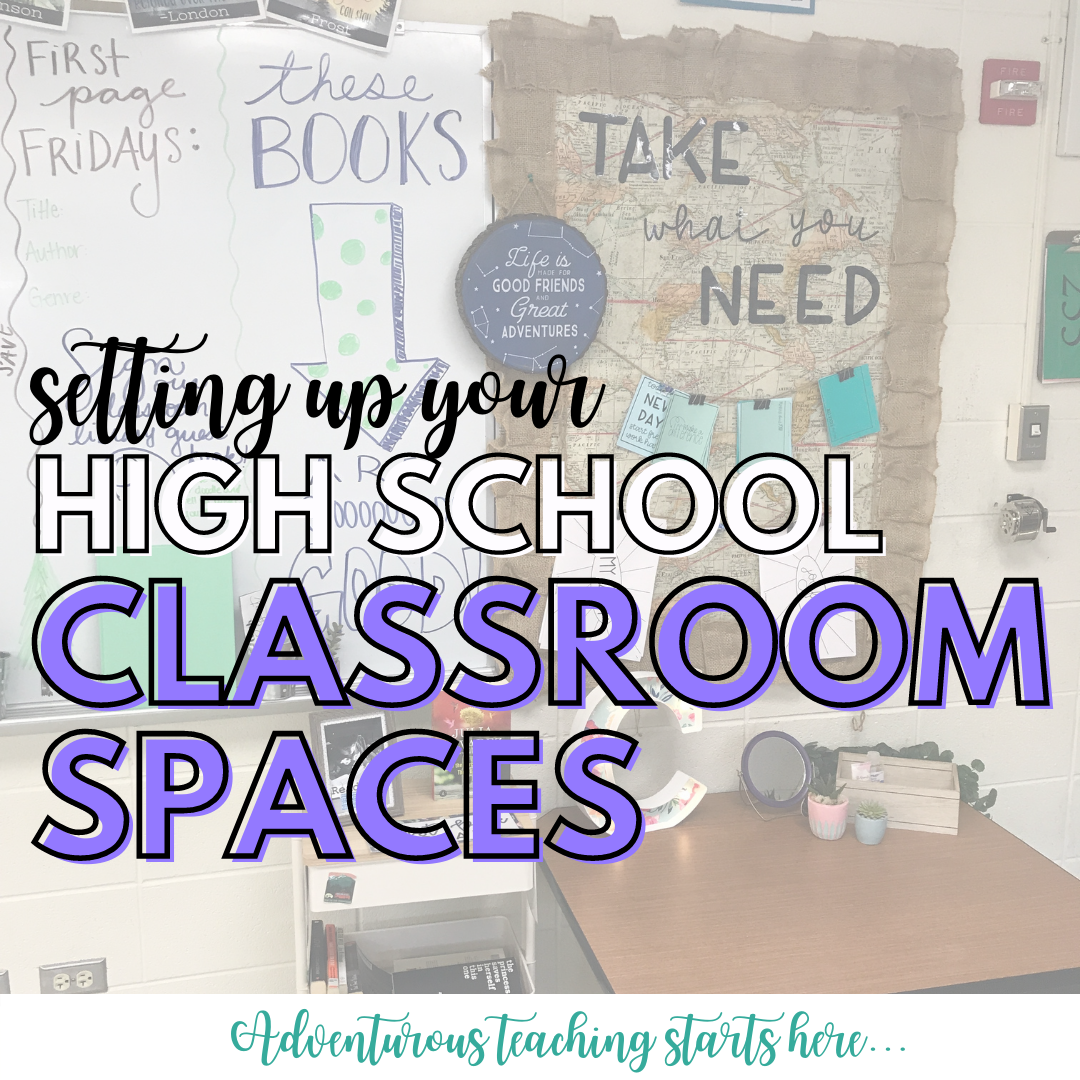
Setting Up Your High School Classroom Spaces
Decorating, organizing, and preparing your high school classroom spaces is critical for new and veteran teachers alike. Here are four ideas to get your classroom prepared to support and inspire your students and keep you motivated to deliver incredible lessons!
A high school classroom is a sacred, powerful space for both teachers and students. Whether you are setting up for the start of a new year or rearranging and rethinking the way things currently function, here are three key ideas to keep in mind.
1. Functional Spaces Over “Decor”
Filling up a cart at HomeGoods, Target, Amazon, or your local teacher store can be a tempting way to get your classroom ready for students to arrive or to refresh your space, but try to pick and choose carefully. After years and years and multiple classrooms, I’ve found that functional spaces that look pleasing are much more effective than decor alone.
TRY AN FAQ CORNER:
If you have a section of your classroom that needs some decor, why not kill two birds with one stone? Pictured here is my FAQ station: the place where students come for their most frequently asked questions. The two birds? A color-coordinated, on-theme wall covering AND regaining some of my sanity back. You know that feeling of training your students on all of your routines and expectations for months, only to be asked, where do I turn this in? just a month later? After a while, those kinds of questions can drive me nuts, so instead of getting frustrated, I simply point over to this section of the room. Students can scan the QR code and see the answer to their question (it’s a video of me!).
TRY A “TAKE WHAT YOU NEED” TABLE:
To make students feel part of the classroom is the entire point of building an inviting classroom. The goal is to create community AND beauty, so I starting building a special space in my room called the “take what you need” board. This space has a table and bulletin board where students can grab whatever they need AND donate to the space as well. From coloring pages to hard candy, to note cards with inspiring messages to hand lotion, I keep all kinds of items here to help students feel comfortable and cared for.

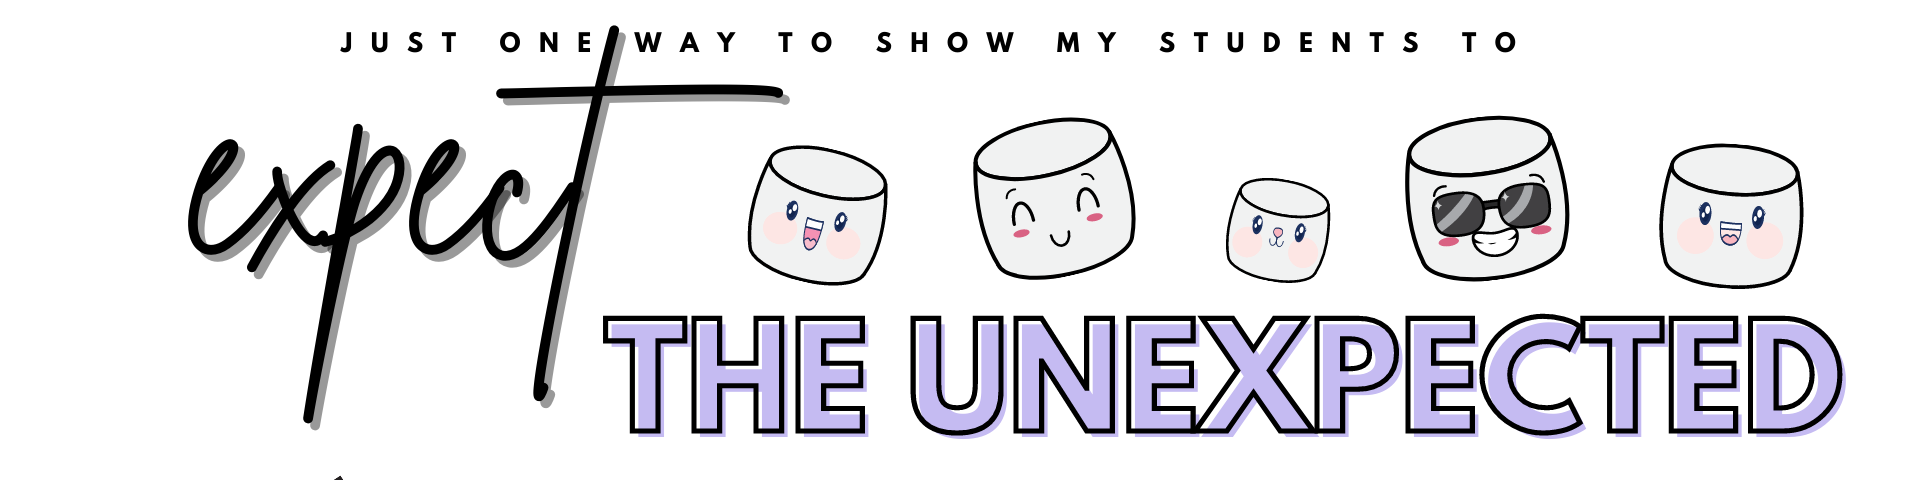
2. Expect the Unexpected
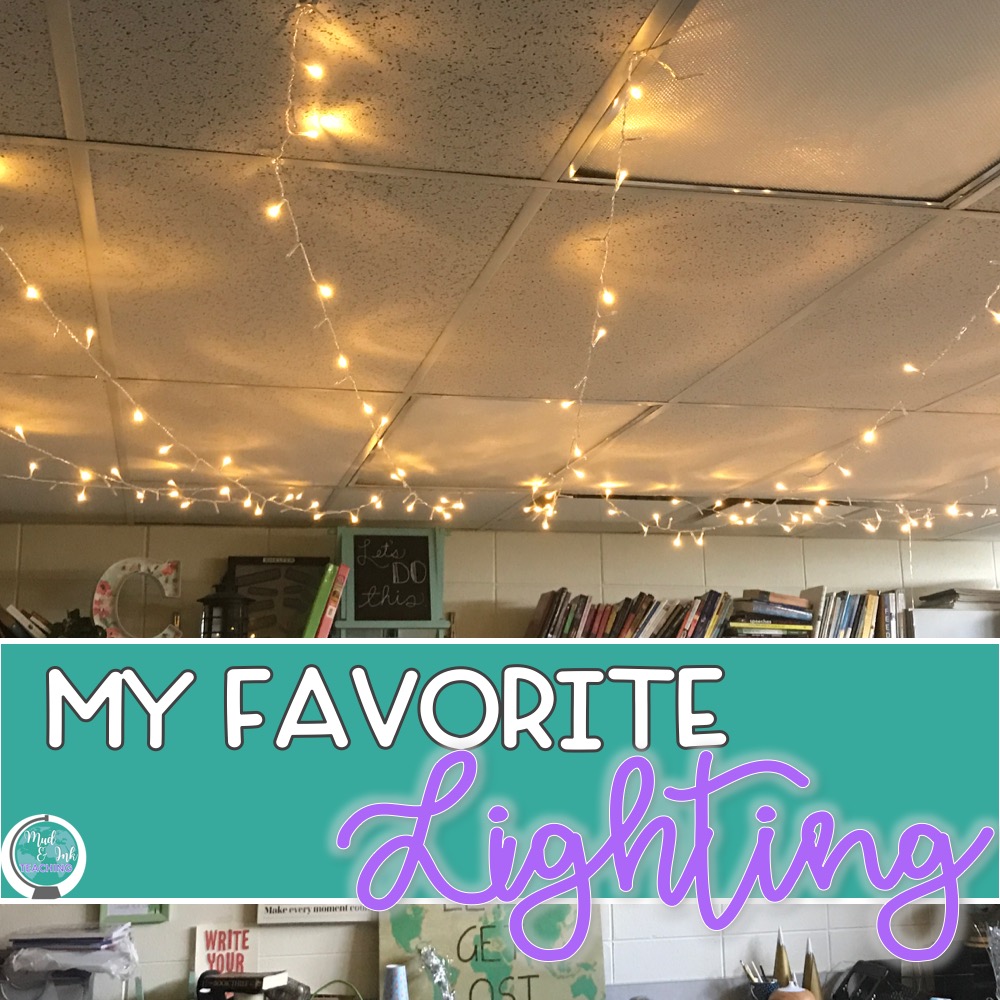
Whatever you do, don’t get too comfortable with any arrangement! As teachers, we learn that everything can change in an instant. When putting your classroom together, keep FLEXIBILITY in mind at all points. Flexible seating, flexible use of spaces, and flexible lighting are all incredibly helpful as you navigate through changing expectations and situations in the classroom. I’ve written a bit about my Amazon favorites before and have truly enjoyed these touch lamps to replace the fluorescent ones that my classrooms have always had.
3. The Classroom Library
If you’re setting up a high school ELA classroom, a classroom library might be on your mind. I’m here to give you permission to pump the breaks on building an entire library. Your classroom library can be something as simple as your favorite reads on a three-tiered rolling cart. Here’s how I downsized my classroom library when I moved schools after ten years of teaching.

4. Phones & Technology
While handling cell phones and charging cords and iPad carts might not come to mind first when you’re thinking about classroom decor, remember that these functional components of your teaching day should be a part of what you consider when putting your spaces together. Think about how and where your students will have access points to charging (or not!) and what you plan to do when students use their phones (or not!). My cell phone policy is actually blended into my classroom decor as I use a shoe hanger on my whiteboard for kids to give their phones a break and charge during class. I’ve also found great success with a power strip that has charging ports for power cords and USB cords.

What other considerations do you have when putting together a classroom space for high school students? I’d love to hear your ideas in the comments below!


LET’S GO SHOPPING


Behind the Scenes: My Classroom Google Site Tour
Take a behind the scenes look at my Google Sites setup for the school year. I’ll share with you how I use it differently than Google Classroom and give you an exclusive tour!
Deciding how to organize your digital classroom can be a daunting task. After lots of experimentation, I’m ready to share with you the system that I’ve developed and keep refining and workshopping as the school year evolves and our needs keep changing.
This year, I decided to go with Google Sites as the main hub for my classroom instruction and information. Why? Well, there are a lot of reasons that I’ll outline here, but if you just want to jump in and take a look around behind the scenes, I’ve created a COPY of my classroom site for you to check out. I’ve removed a lot of things — so many of my activities use student names or have other information that I’d rather not publicly share, but I think what you see here should help you get started thinking of your own ideas in using Sites yourself this school year.

GOOGLE SITES VS GOOGLE CLASSROOM
These two services work simultaneously in my classroom, but as you’ll see in my Site, these two perform very different operations and services to my students. It’s GOOGLE SITES where I provide my daily instruction and agenda. The layout is visually pleasing and user friendly. I can include as much as I want without it clogging up a feed or getting lost in another row of the Classroom Classwork tab. Where GOOGLE CLASSROOM comes into play is serving the function of a “turn in” bin. All assignments are listed, dated, and graded on Classroom. That’s the business side of everything. Links move kids back and forth between these two places all the time, but kids have learned that if they need to participate in a class activity to go to SITES and to turn an assignment in, they go to CLASSROOM.

SITES NAVIGATION ORGANIZATION
In my Google Site, I organize my pages by course and by week. I designed one layout for the week that I like and then each consecutive week, I simply click the three dots next to the page and >> DUPLICATE PAGE. Bam! Easy! I go through to change dates and update the week’s calendar and I’m done.
Now that we’re seriously moving into the semester and several weeks in, I love going back to look at all the work that we’ve done and sharing this with parents and case managers who are wondering what their kids can do to catch up. I’ve got it covered here — and then some!
EMBEDDABLE ELEMENTS
The other thing I love about sites is my ability to EMBED so much of their work directly onto the site. Instead of kids having to navigate all over the internet, I can embed things like:
FlipGrid
Google Forms
Google Slides
Google Docs
YouTube Videos
NearPod lessons
Once embedded into my Google Site, kids can work on them directly on the site without having to navigate away. This has prevented so many headaches.
What do YOU love about Google Sites? What tips and tricks do you still want to know? Leave me a note in the comments and I’ll be sure to add more as needed!

My Virtual Classroom Tour: Teach From Home Setup
The world’s weirdest school year has arrived and I’m ready to take you on a quick tour through my work-from-home classroom. A few things have changed since the spring, and that’s because the educational landscape has also changed. Here’s a peek into my classroom setup for the 2020-21 school year.
The world’s weirdest school year has arrived and I’m ready to take you on a quick tour through my work-from-home classroom. A few things have changed since the spring, and that’s because the educational landscape has also changed. In the spring, we were scrambling. Now, in the fall, we are READY. Every scenario for back to school has felt unreal, unreasonable, and unfathomable, but in the end, I’m truly grateful for the decision to let us stay home and stay safe for our families.
Here are a few things to keep in mind as you tour through my at-home work space:
No one should feel the need to buy more stuff. I had empty Amazon boxes and stacks of books holding up my laptop in the spring — my decision to invest in a laptop stand was my own choice and not something you NEED in order to successfully teach at home.
Use what you have at home, but if you like something you see that could help you, I’d love for you to shop using my affiliate links. I’ll earn a tiny commission for your purchase, so thank you!
My setup needed to be “mobile”. I set it up every morning after the kids leave for daycare and I take it down at the end of each class and before I pick them up. My son loves to steal my microphone and pretend he’s a rockstar, so in order to keep it from getting broken, I have to put everything away!

The Planner:
This planner is from the Blue Sky brand and I found it at Target. Usually, I have my planners custom designed, but this year I just so happened to be at Target and found a layout that I really liked! I can’t find the exact one online, but I’ll keep looking and link it as soon as I can find it!
The Laptop Stand:
I’m currently only a few days into using this stand, but I’ve really liked this addition to my setup this year. The difference between a laptop stand and a stack of random books is the stability of the laptop while actually using it. If you’re just talking to students and using the camera, use a stack of books. But if you’re using the keyboard and mouse and trying to navigate while the camera is on, this feels more stable to me than awkwardly reaching around my soon to be toppled stack of novels.
The Microphone:
This mic is a solid addition to my classroom. I’ve been using it on the podcast (have you listened yet?) and it’s been nice to have reliable, clear audio for my lessons now, too. My microphone has been unavailable for a while now, but it looks like this one is very similar.
The Lipstick:
This might sound silly to list here, but on camera, I have this thing with my skin where my lips blend in to the color of my face. I always have a lipstick on me and I’m been using this lipstick from Neutrogena for years.
The Ring Light:
My workspace is in front of a huge window in my eating area which is LOVELY most days. But there are certain times of day or stormy weather days that make it a bit hard to see me on camera. This miniature ring light has been just the thing I needed. I also use this for my business when doing Instagram live events and taking pictures. It’s a ring light and phone holder all in one!
The Miscellaneous Accessories
Lined Post-its. I’ll never buy blank ones. These are the ultimate list makers!
Flair Ultra-Fine Point Pens. These write beautifully and last as long as my kids don’t get their hands on them.
Thermos. This one has been great so far. I’m collector of random cups, and this one has stayed in the rotation for a while!
The pencil notebook was a $2.50 steal from Target from the brand Gartner Studios.

This year will be unforgettable for so many reasons. Here’s wishing you the best of luck, positive vibes, and a reminder to TAKE CARE OF YOURSELF this year — even more than you have in previous years.
Cheers!
Let’s go shopping!
9 Amazon Back to School Products for the High School Classroom
When back to school season rolls around, I always have my guard up when it comes to shopping. There is always SO MUCH that I WANT, and so little that I actually NEED. What I’ve done for the past few years is this: I set a budget and I set a limit on my projects. The point of summer break is to recharge and relax, but for me, part of that recharging does involve some school work - the fun stuff that I never have time to get to during the year! But, also knowing myself, my list of projects can get unreasonably long, and so can my impulse buying at Target.
Here are a few questions I ask myself before making a purchase or starting a project:
What is the longevity of the item or project? Will it/should it last?
Does this help solve a problem or frustration in my classroom?
Does this contribute to a classroom management strategy?
How often will I make use out of this product?
How does this benefit students?
Armed with those questions, I spend my summer browsing. I use the save feature on Instagram, I get on Pinterest, and I mostly look for inspiration for things that will help me solve problems or pet peeves I have in my classroom. Now, this doesn’t mean that I never do things that are cute simply because they’re cute - I do! But I try my best to make sure my time and money are spent on things that are functional and long-term solutions for my classroom.
These are my top 9 Amazon purchases for my high school English classroom:
I did not make these purchases all in one summer; I have accumulated these items over time and I only recommend them because they’ve actually worked and I’ve been able to answer my questions above in purchasing them.
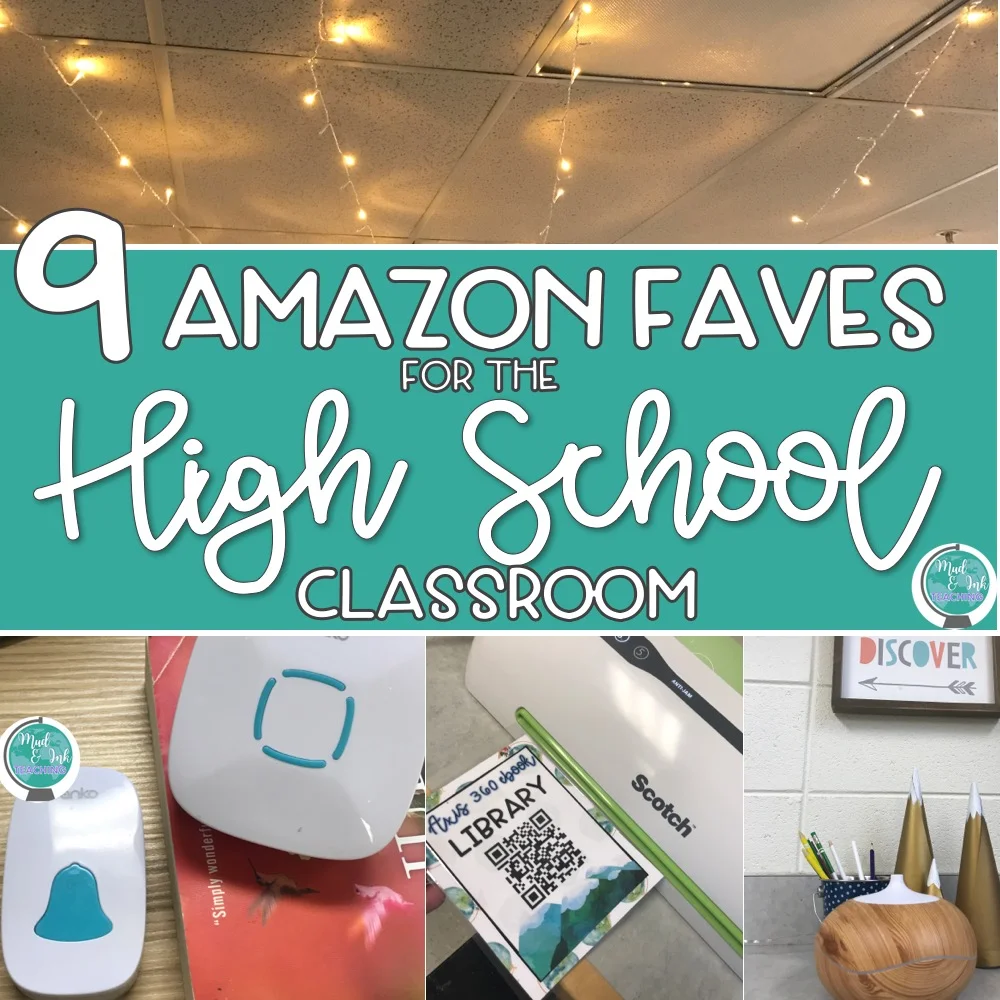
CLASSROOM MANAGEMENT: Wireless Doorbell
I can’t think of a strategy that I use more frequently than stations. At the start of the year, one thing I do is practice my routines (more about that here). As my students move through stations, I use the wireless doorbell to signal when it’s time to rotate. The kiddos get a kick out of it and love that I can change the ring tone.

3-Tier Cart for Classroom Library
This one was my new purchase for the 2019 back to school season. My classroom library had always been a disorganized mess, so I decided to reprioritize and makeover my library. I ended up with a mini library on this rolling cart. The money spent on this cart has solved so many problems that I once faced in my classroom and makes an impact on students every single day. Totally worth it!
My go-to classroom management strategy with cell phones is to use a charging station. Using a shoe hanger and a sweet power strip, I’m able to encourage students to stay off their phones and focus on the work we need to get done. More on that policy here!
CLASSROOM ATMOSPHERE:
Vertical String Lights & Fairy Lights with USB
For ten years, I taught in a classroom with enormous, gorgeous windows. I never turned my lights on and I never needed any lighting solutions for my classroom. Then, I changed schools and my new classroom is a box with some tiny little windows around the upper perimeter of the room, and when my lights are off, it’s a dark place to be! I can’t stand flourescent lighting and floor lamps are obnoxious with teenagers, so I opted for a sting light solution. These lights I hung across my ceiling and they are BEAUTIFUL. They bring plenty of light into the room and set a peaceful mood in the room. Paired with these fairy lights (they come in a two-pack...I bought them for my house and only needed one set!), my room twinkles and glows.
And, for whatever reason, my classroom (and schools in general) always have such a distinct, unpleasant smell. Enter: essential oils diffuser. This one is my favorite and I use whatever oils I have lying around. The scent is light and I’ve never had a student complain of the smell being to overwhelming, so so far, a win!
CLASSROOM SUPPLIES
Crayola boxed marker set & boxed colored pencils
This is the list that tempts me the most to overspend, but, simply put, after over a decade of teaching, these are my three favorite school supplies. The boxed Crayola markers and pencils last the entire school year. They’re already organized in their own box (no more supply caddies per table!). I can put them away and take them out easily, there’s plenty to share, and it’s a one stop shop. They’re a little expensive (I always make sure to request them from my department - don’t pay for them yourselves!), but I used to just run out of supplies halfway through the year and have to replenish anyway. I’ve never had to do that with these boxes!
Bic intensity dry erase markers
Now these dry erase markers fit virtually none of my listed criteria that I shared with you at the beginning of this post, however, they’re still my favorites! These dry erase markers on Amazon are only 12.00 (and there are 12 markers), they’re bold, and they seem to last forever. You should just try them and see for yourself!
Looking for more favorites? Check out the rest of my Amazon favorites here!
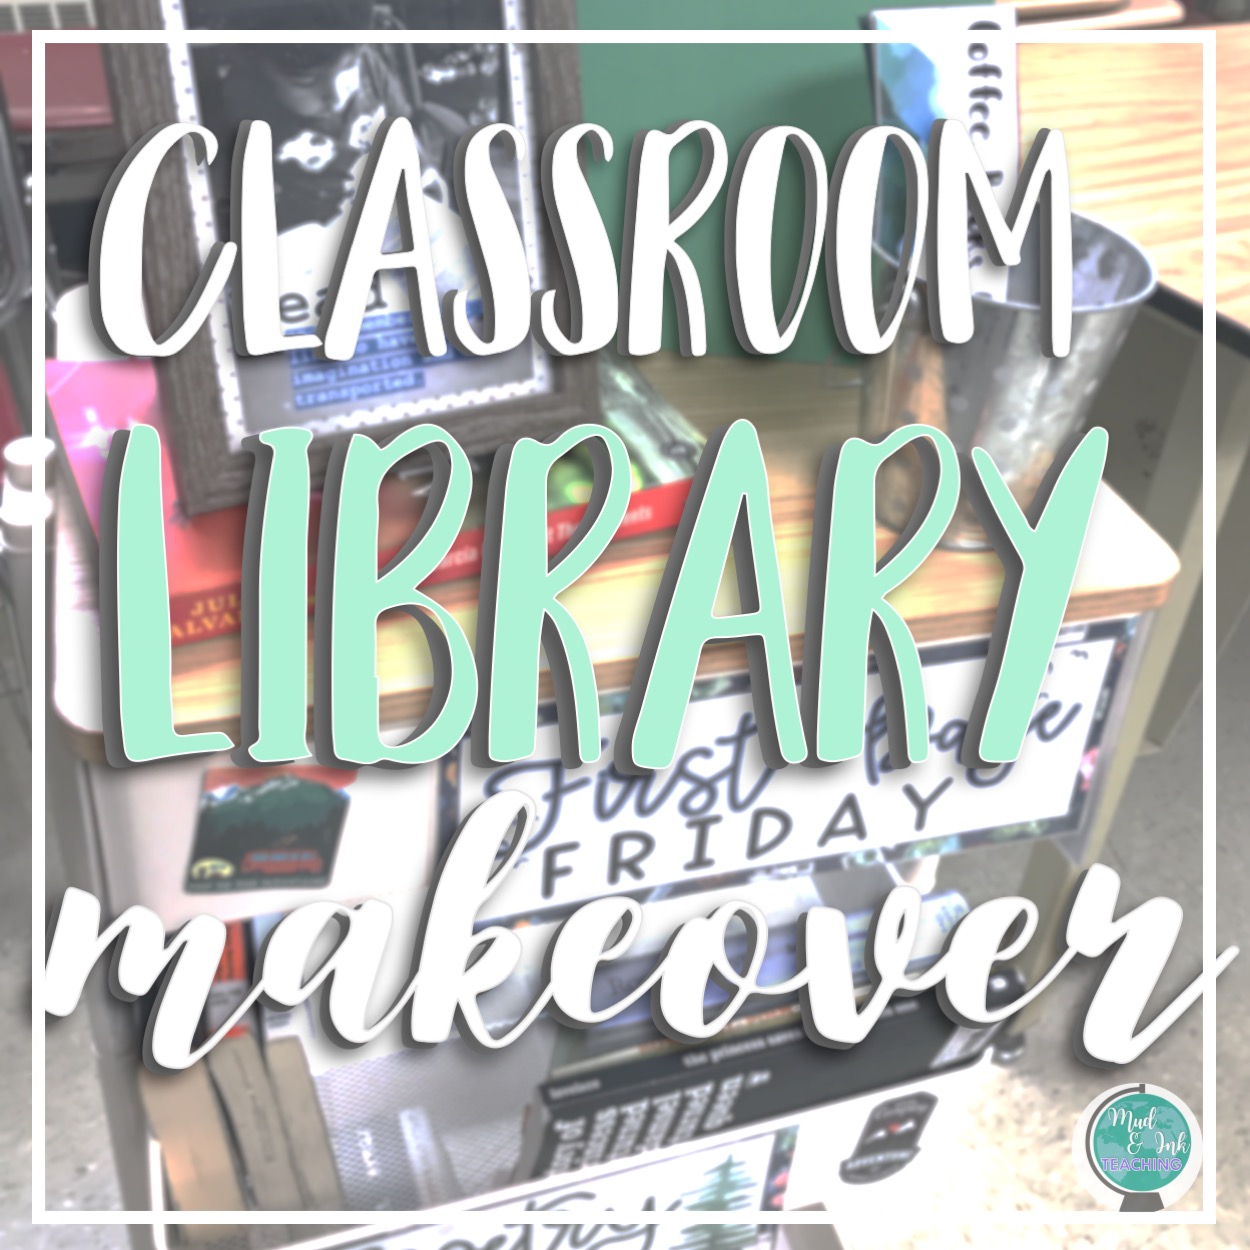
My Classroom Library Makeover: Downsizing & Prioritizing
In my own classroom, the library has never really functioned the way I wanted it to in my dream scenario. The time, effort, and focus that it takes to truly run the library the way it deserves to be run never really seemed to be worth it. I am already dedicating so much time to other things that the classroom library feels like a chore. That corner of the room is always a disaster. I never know what’s there -- it seems like all of the good, favorite books disappear and I’ll I’m left with are the random books from garage sales that I’ve never read (and no kids want to read either!). But when I was a young teacher, I believed that MORE BOOKS meant a BETTER LIBRARY. I have decided that this simply cannot be true.
The power of the classroom library cannot be ignored (I hear you, NCTE), but, I admit, for a long time I haven’t been a huge fan. Something about their popularity on social media always rubbed me the wrong way. So often I see new teachers posting, begging, and desperate for ideas for how to collect enough books for their libraries, and I’m frustrated that there’s just one more thing on our plate to take responsibility (not to mention, more money!). I see pictures of color coordinated, gorgeous spaces in August followed up by pictures of the same area covered in construction tape come November, and I can’t help but wonder, what’s the point?
I can remember this panic as a first year teacher: how on earth was I going to get enough books to fill my classroom library? Then, I scoured garage sales and Goodwill to find titles to fill the random shelves left in my classroom from the retired teacher who “lived” there before me. Fast forward about three years and those shelves and the dream classroom library scenario that I had imagined was a hot mess. I never actually found time to catalog anything. We had a “go grab something to read” policy that wasn’t fostering a love for books. Nothing was organized, and as I’m sure many veteran teachers can remember, there were quite a few other things on the table that took precedence over maintaining order over the classroom library. I tried putting students in charge, I tried tending to it one day a week, but without dedicating serious time and energy to the library, it just became more and more frustrating to maintain. What WAS working, however, were BOOK TALKS. Conversations about literature between me and my students, between the librarians who visited my classroom and the students, and other adults in the building sharing their love of reading: that was time well spent. Alphabetizing and reorganizing the mess in the back? Not so much.

The library clutter right around June 1st…
Then, after ten years in that school, it was time to move. And guess what? There was NO WAY I was moving all of those books. I kept the ones that were nearest and dearest to my heart and gifted the rest to students and the teachers who would inherit my classroom. It was time for a new approach.
I’d like to share with you today how I revamped my classroom library and gave it a total makeover. From the physical space to the philosophy and purpose behind the library itself, I’ve done a lot of renovation to create something that will be effective and practical in my busy teacher life.
CLARIFYING PURPOSE
For me, the purpose of a classroom library is not really about access to books. For my teaching career, I’ve worked in schools with incredible librarians and school libraries that are well stocked, diverse, and engaging with students. Because of this, I needed to define the exact purpose of my CLASSROOM library. Why have my library if the one down the hall is incredible? The answer to this question is the driving purpose behind each of the decisions I made in my library makeover: to share a passion and love of stories and to pique curiosity.
THE PHYSICAL LIBRARY

So, if my goal is to share my passion and love of stories and pique curiosity along the way, there’s no need for a massive library space. We don’t do silent sustained reading, my kids aren’t looking for cute reading furniture (that’s just not how my 50 minute high school periods go!), so I was focused on finding one furniture item that would allow me to house the books that would accomplish my purpose.
Enter: the three tiered rolling cart.
I love this cart for so many reasons. It was easy to put together, it’s portable (hello wheels!), and it’s naturally sectioned off for me to create categories.
I really like this one on Amazon, or even this one as a cheaper option (it would be so cute with some Dollar Tree bins!)
Since I wanted to pique curiosity, I will be implementing a shortened version of the First Chapter Friday practice with my own First PAGE Friday. I want the book that I read from to be easily visible for students, so I opted to pick up this cart topper so that the top of the cart was more like a shelf. Then, the next Friday, I can toss the book(s) from the previous week into the top bin and move on to the next book!
FIVE STAR BOOKS ONLY!
My dear friend Ashley Bible is the queen of all things tidy. She hosts a Clean Classroom Challenge through her Instagram account a few times a year, and when I read through the challenge, this idea stuck with me: five star books only. Ashley made a decision to cut the clutter in her classroom library by only affording shelf space to the best books in her collection. The others were given away or donated. Read all about her system here.
So, with that in mind, my library will take on the same attitude. Again, my purpose is to pique curiosity and share passion, so what better way to do that than with the books that I’m seriously crushing on and that I know kids are drooling over? I used to think that if I didn’t spend my summer weekends scouring garage sales, writing grants, and creating donors choose drives, I would never be able to replenish my library. I’m done with that! All that time I now spend working on other things that more tangibly affect the overall growth of my students and their literacy skills. Also, I spend more time on ME relaxing and taking care of myself before the next school year rolls around.
Any books that don’t fit in my small little library either are at my house or in a closet at school. Students will still be able to see that I own them by accessing our DIGITAL library. More on that in a bit!
ORGANIZING THE SYSTEM

QR codes are seriously my friend. I use them for everything, especially now that our school is 1:1 with chrome books. With QR codes, my little portable library gives students access to the extra books I have at home (using the app Libib), the books in our school library (just links to their online digital catalog), the books in our school ebook library (again, organized by my fabulous librarians!), as well as a YouTube playlist of book recommendations, trailers, and reviews (grab that playlist here). To display these QR codes, I simply created some templates (I used a mountain/outdoor theme to match my classroom), printed, backed on cardstock, laminated, and attached them directly to my cart!


The First Ten Days of School - Routines, Rigor, and Relationships
It’s every teacher’s most stressful, most highly anticipated, and most powerful time of the year: back to school! After over a decade of first days back to school, I’ve finally found a plan for the first ten days that streamlines the three most important things for me: routines, rigor, and relationships. Here, I will outline for you the importance of routines, rigor, and relationships, then, provide my daily plans for the first ten days.

It’s not the most pinterest-worthy or “cute” part of the job, but routines from these first two weeks are, I would argue, the top priority. Yes, even above building relationships. I can say this because I’ve been there before: it’s really hard to build relationships in a class where the classroom management is out of control. By establishing key routines, you’ll be setting the tone for a classroom that is respectful, runs smoothly, and can operate on its own while you take time to meet and confer with students on a need-to basis.
Here are the routines that are essential to establish in my first ten days:
Start and End
The daily starting and ending routines of my classroom are the most important. To start my class, I’ve always aimed to have a routine that students can do independently, silently, quickly, and meaningfully. And, an added bonus if it doesn’t need to be graded immediately! Enter: BELL WORK! Every year I tweak exactly what we do, but I always end up using a version of one of these two systems: my vocabulary bell work notebook and my digital bell work notebook. Students have access to the digital notebook on their chromebooks and I control the exercise that they will complete each day. Sometimes students are creating a meme based on the reading from the night before, sometimes they’re writing a personal reflection, and other times they’re looking up the perfect song on YouTube to capture the mood of a poem. No matter what, they’re able to read my screen at the front, take out their chromebooks, start and complete the assignment independently, silently, quickly, and meaningfully. I need this time to do so many other important micro-tasks. I’ve used this first 5-7 minutes to return work to students, have a one-on-one conversation with a student in the hall, take a few deep breaths, send a quick email to a parent about an issue from the previous class period…you name it! I NEED these minutes, but I am not willing to waste them, either. So, bell work has been my solution. Since it’s assigned digitally, I collect it via Google Classroom at the end of a unit (or end of a week depending on the class/level/task), so I’m able to look at their over their work all at one time and it’s not another daily to-do.
To end class, I have three clear directives: “It’s time to pack up!” I take time practicing this with students - they are not packing up their things until they hear this phrase. It is a HUGE pet peeve of mine, and on the whole, I’ve learned that pet peeves can be solved by creating and practicing routines, so this is one of them! After they hear me say that, they remain “cheeks in chairs”. Yup. That’s high school talk for sit in your chair and DON’T LINE UP AT THE DOOR. Finally, when they hear “Have a great day!” (which I usually say with the bell), they are dismissed.
This probably sounds like a lot. And it is. You’re only four paragraphs in to this post so far. But trust me: figuring out your version of what works for your starting and ending routines are what save you down the road. They improve the quality of your lessons, they foster respect, and, not to mention, they’re things that visitors to your classroom notice (AKA observations!). Check out my TpT store for lesson ideas for your next observation or to kick off a new semester!
Movement
We use stations ALL the time and having students know how we do stations is essential for my classroom management. We practice stations during these two weeks and I train my students to move with this doorbell from Amazon. When they hear the bell, they know it’s time to move. When they’re at a station, they are to stay on task until the bell has rung, then, they have a break. They can move, hi-five someone from across the room, but then at the second bell, they should be at their next station prepared to work.
You’ll also want to consider the ways in which you want to permit students to move in and out of your classroom (hallways, bathroom, etc.). I use a QR code attached to a Google form to track tardies as well as students going in and out of the bathroom.
Work Submission
Do you have all of your work collected on Google classroom? A turn in folder? A combination of both? Whichever it is, make sure that during these first two weeks you assign multiple items so that students can practice your turn-in routine (and you can practice how you hand things back!). Don’t assign work just to assign it - it should be meaningful - but make sure the assignments are handed in and scored in a way that reinforces your routine expectations! I always assign a letter of introduction for my students to write and I use this opportunity to teach my turn in policies: if it’s assigned on Google Classroom, it must be turned in on Google Classroom. On the day the letter is due, I go right into Classroom and put the assignment in the gradebook: checks for turned in and ZEROS for anything not turned in. This sets of a red flag really quickly, but more importantly, a teachable moment. It takes students a few assignments to get over the “but I didn’t click turn-in” or “I thought I had to print it, but there were no working printers, and my grandma was visiting from out of town, and my turtle escaped from his tank, so I couldn’t get it to hand in to you” excuses. Every single time an assignment comes in, we go through the same routine. If you’re pulling out your hair in December about something that drives you crazy, create a routine that solves it, then implement that routine in the first two weeks. Dedicate time and energy to this routine as much as you can and you’ll find that the rest of the year is so much more tolerable!
Technology
I have students using their Chromebooks every day in my classroom, so establishing a daily routine of taking out your CHARGED Chromebooks needs to happen! I purposefully plan Chromebook related activities to make sure that students are in the habit of bringing it every day to my room ready to go. Even if the assignment is as small as an exit slip, purposefully scheduling time for students to need their Chromebooks is essential.
Ready for the next level?
If you’re loving this blog post, but could use more support, you need to check out my COMPLETE Back to School Toolkit - The First 10 Days! This course will hold your hand through over a dozen asynchronous video trainings led by me. I’ll share with you the why, the how, and the when for planning and implementing the best back to school season ever!


During the first two weeks, students get several assignments from me, each with a specific purpose. Some of them help me teach routines (see above!), others help me demonstrate my grading policies and what I have outlined in the syllabus, but the others are designed to help me craft an atmosphere of high expectations and rigor in my classroom. In the first ten days, I assign both “classwork” (assignments that are checked-in pass/fail) and “assessments” (assignments that are graded on a rubric). I train students to read their gradebooks accordingly. In these first ten days, I will assign the following:
Classwork:
Student/Parent Syllabus signature
Cell phone policy contract
Email etiquette assignment
Assessments:
Bell work (graded at the end of the unit)
Letter to My Teacher
Socratic Seminar
I think sometimes high expectations and rigor can be misinterpreted as “teacher-centered” or being inflexible. For example, with one of my first assignments, the letter mentioned above in the ROUTINES section, I set a hard line on work that is turned in late. Zeros go in the grade book if the assignment is not turned in on Google Classroom. Period. When students come with excuses, I simply respond, “That’s fine! I just have this zero here as a placeholder and reminder to you and everyone who can see this 24/7 internet-based gradebook that I have not received it from you. When I do, that zero will change, but until then, it’s just gonna stay that way.” This might sound harsh - how could I do this when I don’t even know my kids yet? How could I do this when I don't know what hurdles they could be facing outside of school?
We can’t build strong relationships around lax routines and procedures - we have to start strong with firm expectations. Remember, being firm and clear in building a strong academic culture in your classroom doesn't mean that you’re ignoring student needs. Expecting responsibility, strong worth ethic, and a commitment to high standards DOES MEAN that you care about your kids, deeply.
And, while we’re on the subject, this is a good time to think about your curriculuar approach for the year — have you made the shift to inquiry-driven instruction? A makeover of your short story unit might be a great place to start…

With an efficient, respectful set of routines established and an atmosphere with high academic expectations cultivated, powerful relationships grow. At the start of my career, I thought relationships were the only thing that mattered. I wanted to reach every kid and know everything about their lives, their families, their backgrounds, their struggles. And I did. I went to games, I called home, I did surveys, I wrote personal letters, I sponsored the clubs that no one else would sponsor, and I did it: I built GREAT relationships! But, there were some consequences to this approach that I didn’t see coming.
First was the burnout. I was weighed down with so much emotional baggage and physical stress (the only way to do all of these things for my students was to completely ignore my own health, of course) that I burned out fast. I’m a happy person that burned on adrenaline to survive, but as close as I was with my students, it was the worst I’ve ever felt physically in my life.
The second is the more embarrassing one to admit. Most days in my classroom were a total flop. Since I prioritized relationships above all else, I never really considered how I was going to control the workflow of my classroom and be everyone’s “cool” teacher all at once. Since I knew everyone’s issues, I was willing to forgive bad attitudes, accept work (extremely) late, and let students take fifteen minute bathroom breaks. I thought I was meeting their needs and caring for them. But in reality, the learning environment was not one of respect: it was one where my kindness and flexibility were taken advantage of. I was too close to push my students to meet their academic potential and too much time was wasted. It took me years to find that routines and rigor were truly the foundation to building the kind of relationships that I really wanted in my classroom.
Here is the kind of relationship I’m committed to having with my students: one where they know I care so much about them that I want not only to support them in times of need, but also where I can push them to grow in ways they may have never gone on their own. One where I can say, “Listen, I know what’s going on at home is really tough on you right now, but here’s what else I know. I know you can do this. I know you can handle this assignment and feel really proud about what YOU did, and not sad about the other things going on that are out of your control. If you need an extension, we’ll make that happen, but I really believe in you and I believe you can do a great job.” Take time to think about how you want to define your relationships with students. Then, build the kind of classroom that will help those kinds of relationships grow.

Day 1: Marshmallow Team Building (RELATIONSHIPS)
Our first day is typically a shortened class period, so I always have this lesson ready to go. Marshmallow team building is a quick way to get students working together, being creative, and establish a classroom culture of student-centered learning. I have a handful of other possible options listed here!
HW: None
Day 2: Debrief, Expectations, Syllabus (RIGOR & ROUTINE)
The next day, we debrief the marshmallow team building exercise. What was the experience like? How did your team work together? What were the struggles? I let this conversation flow into an overview (not word-for-word reading!) of our class syllabus. I’ve done more interactive versions of this, but I’ve found that I want to be very clear and direct the first time through our expectations, so I give it to them pretty straight. We reinforce and practice these different parts of the syllabus later, but this day is typically pretty dry - on purpose! One thing that helps has been moving my syllabus to a digital format. Instead of reading a paper syllabus, my students receive their Google Classroom codes and open their syllabus that I’ve created using Google Sites. This allows us to look through the “boring” stuff, but also watch book trailers for the novels we’ll be reading and experience the other interactive elements on the site.
To close class, today we practice our closing routine: “Time to pack up”, “Cheeks in chairs”, and “Have a great day!”
HW: Parent & student syllabus signature (on a Google form attached to the syllabus)
Day 3: Meet the Teacher / letter to your Teacher (ROUTINE, RIGOR & RELATIONSHIPS)
I continue establishing relationships on Day 3 by sharing a few pictures and stories about my life. I tell students that it’s important to me that they know who I am, who I love, what I care about, what makes me laugh, and what my life is like outside the classroom. It’s important to me that they’re not coming to a classroom to learn from a stranger. I share with them, very transparently, my journey to becoming a teacher and how much I love coming to work every day, but also how I love going home to my family and traveling the world. I want them to see me as a whole person, and then, I ask them to do the same. Students then write me a letter of introduction (routine - turn in on GClassroom; rigor - graded on a rubric as an assessment; relationships - getting to know their stories).
Today is the second day of practicing our closing routine.
Day 4: Intro bell work routine / Pocket Points tutorial / First Text (ROUTINE & RIGOR)
On Day 4, we begin our most important routine (and one that takes quite a bit of practice!): bell work! This takes about three times as long as normal, so we go slow and practice. With the remainder of the class period, we discuss and practice our cell phone policy and practice it with a text (short story, quick article, etc.) . This year, we will be experimenting with Pocket Points, so the plan is for students to get logged in and do their first reading session in a small group. The text we will use during this session will be connected to their upcoming socratic seminar and I’ll have them reading with a small group.
This is the third day we practice our closing routine.
HW: Continue Letter to My Teacher
Day 5: Bell work / classroom stations (ROUTINE & RELATIONSHIPS)
Class starts again with bell work training. We slowly start trying to increase independence and reduce time spent on the task. The plan for the rest of the day is to do one of my favorite activities: classroom stations! Each year this varies, but basically the goal is for students to get a tour of my classroom while using the classroom routine procedure of stations. My six stations include:
Technology Station: register for Actively Learn accounts
As students move through the stations, we practice movement (as stated above!) using the doorbell from Amazon.
Of course, we close class by practicing our closing routine again!
HW: Finish Letter to My Teacher
Day 6: Intro Socratic Seminar (ROUTINE & RIGOR)
Bell work continues.
Collect Letter to My Teacher.
Socratic Seminar is one of my absolute favorite types of assessment. I first heard about seminars a while ago, so I observed many in action and did some research. My go-to for seminars, however, is from the incredibly talented Esther Wu on Teaching Channel. I love how she does seminar and I’ve been doing an adapted version for years!
On this day, I teach students what seminar is, show them a seminar in action, go over our rubrics and expectations, and assign them a short list of texts that we will be discussing. Each year, this list changes. Last year, our seminar was designed around summer reading. This year, it will be tied to our first unit’s essential question. Either way, I design the questions (and students write questions to add) that are both text-dependent AND opinion/experience-based. I want students to do a lot of things in a seminar, but for the first one, I really just want everyone to TALK.
Here’s the video I show students and the resources that I learned from.
Closing routine continues.
HW: Read through one text on the list & annotate
Day 7: Seminar Prep Day (routine & rigor)
Bell work continues.
The next day we will spend preparing for seminar. Depending on the age and level of the students, this day might be spend heavily on reading additional texts to help our conversation, it might be spent taking a more in depth look at the video from the previous day, it might be an interactive presentation of the rubric so students know how they’ll be assessed, or some combination of all of these things. Either way, students usually need a day to get read for seminar rather than just jumping right in. I usually also take this day to practice more routines (if needed) or do a small partner exercise (for relationship building).
Closing routine continues.
HW: Complete reading texts for seminar; complete seminar prep sheet
Day 8: Day 1 Seminar (routine & rigor)
Bell work continues.
Collect seminar prep sheet from Day 1 students.
If you had a chance to look through the Teaching Channel video linked on Day 6, you’ll know that these seminars are broken into two days. The group for Day 1 will seminar today. While students are in seminar, I am taking notes and giving feedback.
Closing routine continues.
HW: Complete role sheets & coaching sheets
Day 9: Day 2 Seminar (routine & rigor)
Bell work continues.
Collect seminar prep sheet from Day 2 students.
This day looks identical to the previous day, but the students in the center circle have shifted. I continue taking notes and giving feedback on the discussion.
Closing routine continues.
HW: Complete role sheets & coaching sheets
Day 10: Socratic seminar reflection & goal setting (routine & relationships)
Bell work continues.
Collect any remaining role sheets and coaching sheets.
On the day after our first socratic seminar, we take time to reflect and celebrate. Typically, I’ll have students do a silent chalk talk and share their experiences on the board. Anything you like to do for reflection would be great here, but make sure you find time to also set group goals for the next seminar! How did we do overall with incorporating evidence? Did seminar sound like everyone reading their homework out loud or an organic, meaningful discussion? What can we do to improve for the next seminar? These are important questions to address together, so be sure to find time to do this!
Closing routine continues.
I hope this article has helped you start to envision the first ten days of your own school year. I’d love to hear your version of these critical days - how do you set these days up? Have any of these ideas worked for you? Be sure to share in the comments - I can’t wait to connect with you!
LET’S GO SHOPPING FOR YOUR CLASSROOM…

How To Build A New Novel Unit From Scratch
After teaching for ten years and then switching schools, I was very quickly reminded of how much work goes into writing curriculum from scratch. For a long time, I was in a happy place of continual revision of curriculum that I liked, but was tweaking here and there for relevance, rigor, and for fun.
Now? It’s the Wild West. It’s intergalactic chaos. It’s constant guessing and unpredictability. All that aside, however, it’s also invigorating and exciting. I would call myself “a curriculum person” because this kind of blank slate challenges me in a way that sparks joy in my life, despite the chaos, so I’d like to share with you how to most easily navigate through a first attempt at writing and implementing a new curriculum for a new novel in your secondary ELA classroom.
1. Read the novel
I know this sounds obvious, but really having a chance to get through the novel from start to finish before the kids do is critical. I have tried to muddle through a new book by just staying ahead of the kids, but let me tell you, the stress of that life is unbearable. In the very best case scenario, try to ensure that you have enough time to get through the novel before the kids start so that you have time to think about the priorities of why it’s important to teach. While reading, consider the following:
What are the patterns that I find myself annotating? Are these the things I want students to look for, too?
What does this novel offer to students that no other novel has? What is uniquely special about this particular story that is a “must teach” because they won’t likely see it again in such a clear way? (Things like parallel plot structure, extended metaphor, motif, a really strong example of foil character, etc.).
How have I been enjoyably reading this book - in larger chunks or chapter by chapter? What is the most natural way to break up the reading for the kids?
2. Consult Your Team
“Accumulating resources is different from constructing a unit. ”
Some of us work on course teams. Some of us work solo. I find that I plan best when in conversation with a lot of people about the book I’m teaching. I talk to teachers at my own school who teach or have taught the novel in the past, I call my friends from my old school and talk to them about the novel, and I’ve even been known to put out the “bat signal” on Instagram to hear what the amazing teachers across the globe have been doing with the novel. After those three sources are consulted, I usually have WAY MORE than what I could possibly handle and I’m sparked with ideas for the unit. A few reminders:
Just because someone gives you something doesn’t mean you have to use it
Accumulating resources is different from constructing a unit. I know teachers don’t want to “reinvent the wheel” (which I find insane - I love reinventing that stupid wheel!), but regurgitating someone else resources for your students is not best practice.
Look at the resources through a critical lens - which resources address similar issues? Which resources are BOTH rigorous and exciting to use/teach? Can any of the resources be grouped together to address a big, conceptual question?
3. Create a Curriculum Map Vision Board
This is a new idea that I just started using for my unit on To Kill a Mockingbird. After reading the book and pouring through recommended resources, this is the place to visualize the patterns, issues, skills, themes, and questions that you’d like to address somewhere in the unit. I think there’s potential to use this in class at some point, but for now, I just make these for myself as a draft before I commit items to an actual curriculum map.

4. Draft Your Essential Question*
THIS IS THE MOST IMPORTANT PART OF THE PROCESS!! I wish it could go higher on the list, but it’s hard to write a high quality essential question without having processed through the steps above. If you’ve never gone through this process before, I recommend purchasing Essential Questions: Opening Doors to Student Understanding (affiliate link) by Grant Wiggins and Jim McTighe (they’re the original gurus) or at least checking out the abbreviated version on their publisher’s website.
Your unit needs ONE essential question. One question that captivates curiosity, applies to a broad spectrum of texts, and begs your learners to uncover an answer rather than regurgitate one. McTighe and Wiggins lay out seven criteria that define essential questions:
Is open-ended; that is, it typically will not have a single, final, and correct answer.
Is thought-provoking and intellectually engaging, often sparking discussion and debate.
Calls for higher-order thinking, such as analysis, inference, evaluation, prediction. It cannot be effectively answered by recall alone.
Points toward important, transferable ideas within (and sometimes across) disciplines.
Raises additional questions and sparks further inquiry.
Requires support and justification, not just an answer.
Recurs over time; that is, the question can and should be revisited again and again.
So how do you get there? Look through your vision board. Look back at the resources you’ve curated from your team. What are the thematic patterns? What do you want students to walk away from your lessons wondering about - EVEN IF THEY DON’T READ THE NOVEL? The essential question is huge because it is the question that drives instruction - not the novel itself. It will help you make decisions about what to include and exclude from the unit.
Then, start drafting. Write all ideas down - even the “bad” ones. Cut them and paste them. Say them out loud. Run them by a colleague. Ask your non-teacher friends if they’re captivated by your question. Once you think you’ve gotten there, run your question through the criteria above. When you’ve got it, throw a party for yourself!! This is a huge accomplishment!!
Before you begin the unit, be sure to have a place in your classroom where you’ll display the question. In order for essential questions to really hold their value, you’ll have to address the question throughout the unit, so making it visible sends the message to students that it’s something they should be constantly thinking about.
LOOKING FOR INSPIRATION? HERE’S A NEW NOVEL UNIT TO TRY…
5. Set Up for Backwards Design
If you’ve been trained in UbD (Understanding by Design), you’ll have a more sophisticated understanding of what I’m about to cover, but essentially, when designing a unit, it is critical that everything starts with the end in mind. When working with essential questions, this is really easy: your unit should start and end with the essential question.

Most people end their units with an assessment. If that’s the case, ideally, you’ll have your students respond to the essential question in either a written, spoken, or project based way. However, you might want the final assessment to be more skill based. For example, if you want your students to write a literary analysis paper on symbolism in The Great Gatsby, you should do that and build up to those skills, but don’t forget that to END the unit, students should also thoughtfully address the essential question that drove the unit. They could answer a reflection question on Google Classroom, they could have a mini-conference with you about the question, they could informally share in groups what they’ve learned about the question, they could present a portfolio that responds to the question, or anything else you come up with. But if you start To Kill a Mockingbird asking “When an injustice is committed, is empathy enough?” and end by asking them to write an essay that asks, “Who are the mockingbirds in the story?”, your students will struggle to find value in the essential question.
As you look at your unit calendar and move backwards, be sure that the assessments you have planned match the skills you plan to teach in each section of the novel. Your close reads, part of that backward planning process and calendar creation, are also skill-focused, giving students the scaffolding and practice they need to approach the summative. Again, for example, if you want to end a unit by having students write a narrative, make sure that the instruction all throughout the novel is about plot elements, creating characterization, writing dialogue, etc. Good backwards design means that you are designing units that set students up for success - not blindside them with expectations.
6. Write Your Curriculum Map
For some teachers, curriculum maps are something they like to write as they teach. If you have time, sketching out your map before the unit is nice because it’s a backbone that can keep you stable, but if you’ve done everything else up until this point, you’d be fine to fill it in as you do things that you like! If you need a map, I have one here that’s pretty elaborate, but you can certainly do something simpler if you’d like. I have these blank maps printed and spiral bound for myself and I keep them at my desk! Once I’ve got a rough draft I like, I will start to move them into a digital format linking the assignments that correlate with each section of the map.
Did you find this helpful? Where are you feeling lost? If you need a community of teachers to run ideas by or be sounding boards, we’d love to have you join us in The Adventurous Teaching Academy Facebook group or on Instagram. Share below your best tips that you’d add to this list!
RESOURCES FROM MUD & INK TEACHING:
Write here…

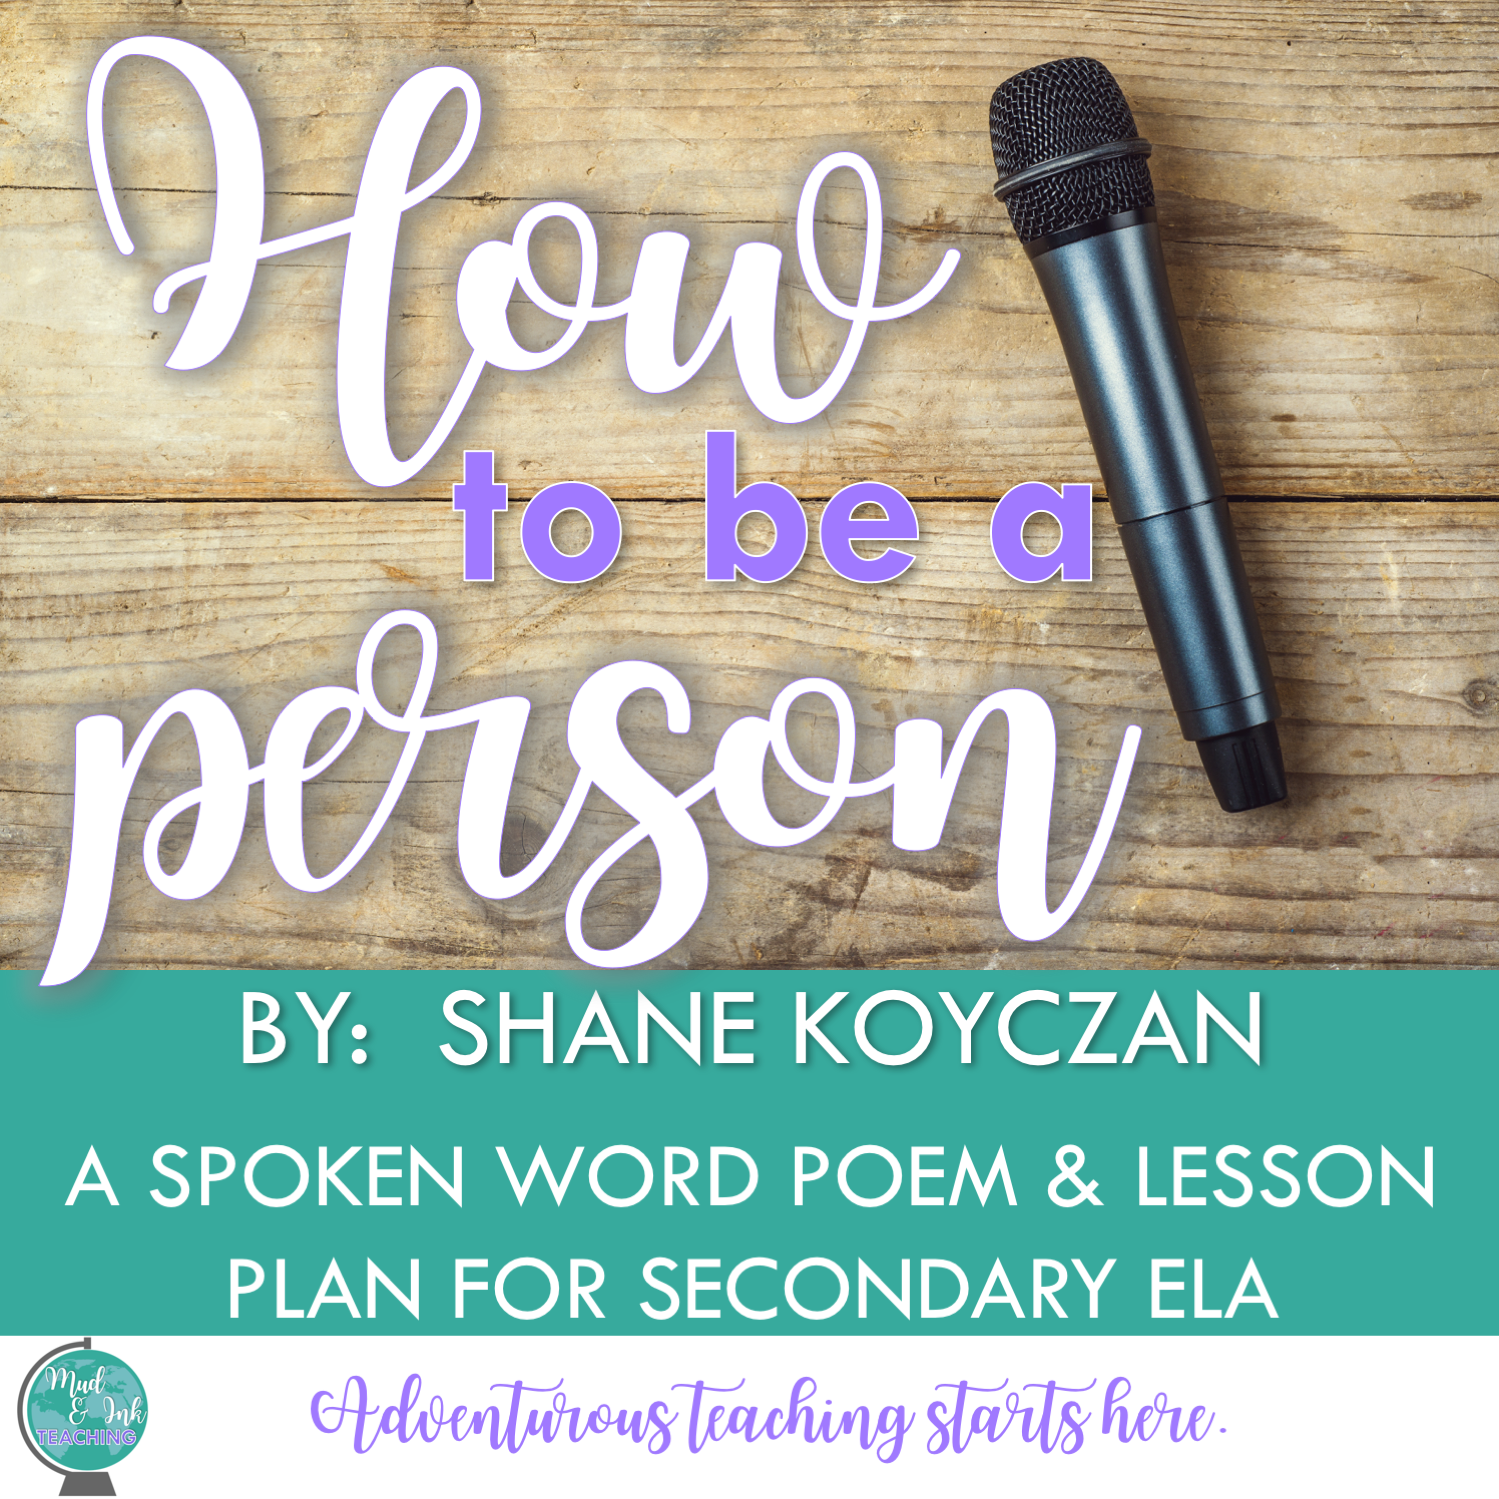
"How to Be A Person" A Spoken Word Poem to Reset Your Classroom Culture
Whether I’m starting a brand new school year, returning after winter break, or even just starting a new quarter, there’s always this itch in my gut that tells me to take a breather on those first few days together to regroup and reset our classroom culture and community. It’s vitally important to take the temperature of your classroom - has it been feeling toxic lately? Are students there to be the best versions of themselves? Are we having fun but not working hard? Are we working really hard and don’t know each other at all?
Whether I’m starting a brand new school year, returning after winter break, or even just starting a new quarter, there’s always this itch in my gut that tells me to take a breather on those first few days together to regroup and reset our classroom culture and community. It’s vitally important to take the temperature of your classroom - has it been feeling toxic lately? Are students there to be the best versions of themselves? Are we having fun but not working hard? Are we working really hard and don’t know each other at all?
These, among many others, are questions that keep me up Sunday night before starting anew. In search for a solution, I turned to my BFF poetry and here’s what I have come up with.
SHANE KOYCZAN.
He’s brilliant. He’s engaging. He speaks directly to the hearts of students (and adults for that matter!). My classes have seen “To This Day” (his most famous work by far!) about a billion times, so I went in search of something else he had that just might do the trick. And then I found it. “How to Be A Person”.

I haven’t found the text published anywhere, so I set to work copying this YouTube video into a Google Doc (which I can’t share because I don’t own the copyright). I gave it to my students and we watched and discussed. That was the first time through. Here is a more experienced version of a lesson plan you could try with your kids. For me, this is best used at the return of winter break, but as I said earlier, it can be used anytime you need to hit that reset button and refocus your class on their WHY.
OPENING:
I like to start with a little listing exercise to begin this lesson. Listing is easy, engaging, quick, and is a form of prewriting that really helps students when they try to compose their own pieces later on in the lesson.
5 in 5 (5 Lists in 5 Minutes)
MINUTE 1: List 5 things that annoy you about other people’s behavior in this class/school/hallways/pep assemblies/cafeteria
MINUTE 2: List 5 academic things you are proud of from last semester/last year
MINUTE 3: List 5 personal things you are proud of from last semester/last year
MINUTE 4: List 5 ways you could easily improve your own life
MINUTE 5: List 5 ways you could easily improve the lives of the people around you
THE POEM
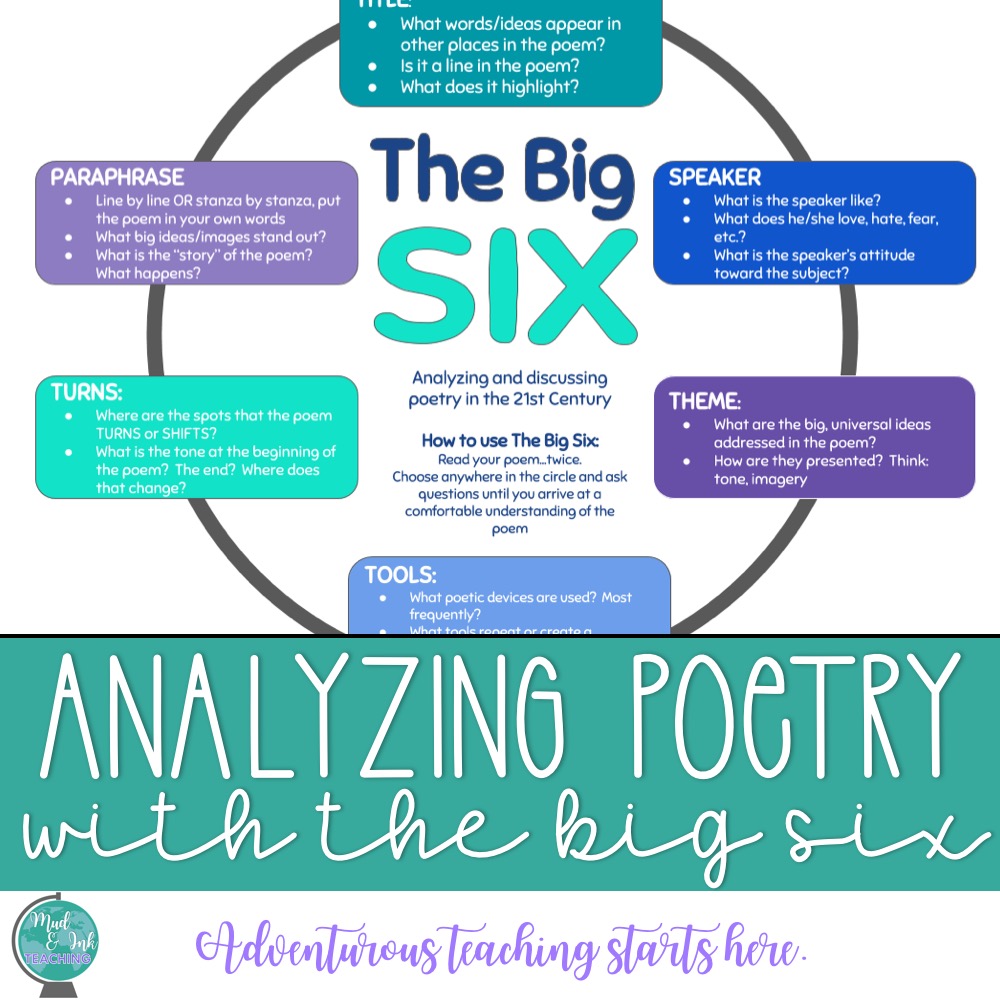
Whenever we study poetry, my class works with a framework that I designed in my master’s program called The Big Six. Today’s lesson focuses mainly on two of these six elements: tools and theme.
Make sure that you’ve previewed the poem ahead of time (there are a few lines that you may or may not include/show to your students depending on their grade/maturity level).
If possible, hand students a hard copy of the poem to annotate as they watch and listen to the video a few times.
Watch and enjoy the video once and be casual about it. Ask questions around content, impressions, favorite lines, etc.
Send students in for a second, closer look. Stanza by stanza, I have students try to identify one MAJOR poetic device/technique at work. After watching and reading the poem a second time, I’ll take hands raised for any stanzas that students think they have encountered a “showcase technique”
For any remaining stanzas that we can’t identify on the spot, I’ll assign students to think, pair, share about those. During this time, I’ll filter around the room facilitating discussions about the things they’re noticing. Depending on the level that you teach, you might scaffold this experience with a word bank or some kind of structure that helps students use the kind of language that you’re looking for. Here’s what we usually find and discuss for this poem:
Stanza 1: Metaphor
Stanza 2: Repetition
Stanza 3: Anaphora
Stanza 4: Cause & Effect
Stanza 5: Listing
Stanza 6: Metaphor
Stanza 7: Alliteration
Stanza 8: Powerful Diction
Stanza 9: One-Word Sentence
Stanza 10: Visual Imagery
Stanza 11: Personification
Once we have found these techniques, we then work through what each of the techniques reveals. How does personification demonstrate the speaker’s message? What about repetition? As we look through each technique, what themes and messages are emerging about being a person? Does Koyczan qualify whether or not he wants to be a “good” person? Why or why not? (As you can see, the questions just start to write themselves after a while!) . I don’t spend a long time analyzing the poem, but just enough that students have an engaging discussion
TIME TO WRITE
Now comes my favorite part - the part where students WRITE THEIR OWN. You can structure this as strictly or loosely as you’d like, but so far what’s worked for me (I try to keep this whole lesson down to one class period and a homework assignment), I have the students try a three stanza imitation. Each of their three stanzas uses a different technique that Koyczan implemented in his poem and all of their poems are also titled “How to Be A Person” and roughly follow the same thematic approach. Here is a student sample (used with permission and changed name):
How to be a person!
By Jasmine (10th grade, ELL, double block ELA support)
One: Be like the world, Strong even if you’re ugly on the inside. Be strong because if you aren’t you won’t be able to succeed.
Two: Be like the clouds, cry if you have to because pain inside, will kill you. The clouds cry too!
Three: Be like the wind, invisible to those who don’t like you so that you can blow on their faces to let them know that you aren’t weak like they thought you were.
Four: Be like the sky, blue so that others who are younger admire you, so that others look up to you, and show them that you can achieve what you want.
Five: Be like the doors, Open just in case someone wants you to let them in, but if you feel like the that person is not worth your time and if you feel like that person doesn’t treat you the right way don’t let them in.
Six: Don’t be like the planet ‘Pluto’ far far away so that no one will notice you, because one day they will forget you. Get Closer to the world don’t fear to be wrong.
Seven: Don’t be like the grass, on the ground so that everyone who walks would always step on you with their dirty shoes. Stand up from there!

Did you try this lesson with your class? I’d love to hear about it! Leave a comment below and let the Mud and Ink community know what you did and how it worked! Also, remember to tag me on Instagram @mudandinkteaching!
RESOURCES FOR YOUR ELA CURRICULUM

A Cell Phone Policy that Actually WORKS!
Every school and every teacher has a different philosophy with student cell phones, but with classroom management as a whole. Whether you are on the FORBIDDEN end of the spectrum or on the “do what you want, it’s your grade” end, I just might have a solution that will help in your classroom.
Every school and every teacher has a different philosophy with student cell phones and with classroom management as a whole. Whether you are on the FORBIDDEN end of the spectrum or on the “do what you want, it’s your grade” end, I just might have a solution that will help in your classroom. Setting clear expectations and routines around this policy during the first two weeks of school will take practice, but is critical to establish as it can easily be the number one classroom management problem you will face at the middle and high school level.
A Disclaimer
This post comes with a HUGE disclaimer: cell phone behavior is changing constantly and so is the way that teachers and administrators need to respond to this behavior. The suggestions in this blog post are tried and true, but that doesn’t mean that when you’re reading this, it might be something that’s not right for your situation. Officer Gomez, an SRO that speaks in-depth about discipline issues he faces in his position, argues strongly for full-banning practices in schools. The bullying, social-media addiction, and other unsafe exchanges that happen on cell phones need to be taken seriously - especially at the middle school level. School-wide policies that respect the best interest of student-learning and safety are the best situation, but for those of you facing a “handle it yourself” classroom situation, then I’m here to offer my story and my success.
The Cell Phone Charging Station
I’d first like to point out what I’ve named the policy - The Cell Phone Charging Station. It’s not “Phone Jail” or anything negatively connotated. The goal of using a charging station is to incentivize responsible behavior before punishment is even necessary. This is a lot like what I’ve learned to do as a parent. I know for a fact that my toddler’s mood between 4:30pm and 7:00pm is demonic…like unrecognizable, monster human status. Do I schedule playdates or haircuts during this time? HELL NO. I try to create situations that foster the kinds of outcomes that I desire long before I’m stuck handing out consequences, and this is critical for us in the classroom, too.
These are the kind of things that are so important when setting up your high school classroom: trust me, the Dollar Spot has its temptations, but if you don’t have FUNCTIONALITY in your classroom design, it won’t matter HOW sparkly that unicorn is. We must have a goal of creating a classroom environment that is safe, comfortable, and prime for academic success. Figuring that out needs to happen before anything else (and if you need help with that, I’m here for you).
Here’s what I tell the kiddos in the first week of school:
So here’s how cell phones work in our class: sometimes we need them to look something up quick, but most of the time, you know they’re a major distraction to your education. And that’s what you’re here for after all, right? Well, the bottom line here in this room is that I don’t want to see them out and being a distraction, but I also want you to learn how to control your own behaviors and be able to use them at appropriate times.
So here’s what we’re going to do: if you know that you can’t handle the distraction for the day, drop your phone off at the charging station. Plug it in, turn the ringer off, and just forget about it for the class period. You won’t even be tempted to look, plus, when class is over, you’ll probably be back to a full charge! For those of you who choose to take your chances and I have to ask you more than once to put your phones away, the second time I see the phone I’ll simply ask you to walk it over to the charging station since you couldn’t follow the first warning.
And that’s it. It’s that simple. From about day four, I had more students choosing to put their own phones at the station than I’ve ever had to reprimand. In the first semester of trying this system, I had one student (out of 125!) refuse to put his phone away and I was able to handle him separately.
A note: I’ve seen a lot of teachers have success with caddies in desk clusters, too.
The Benefits:
There will never be a perfect policy, but this approach certainly created a few things in my classroom:
An atmosphere of adult trust. Students are treated like adults with a choice, not children with rules (see class contract below)
An opportunity to self-assess and build self-monitoring skills. By putting the responsibility on them for knowing their own habits, I hope to be building a behavior that will strengthen over time and into their adulthood.
A community of caring. The tone of our room is one where we care about each other and care about learning - I don’t spend day after day nagging students about this annoying behavior!
Want to see my complete first two weeks of school plans? I’m here to walk you through step by step in my course:
The Setup:
Here’s what you’ll need to create your Cell Phone Charging Station:
A visible place at the front of the room. I have mine on the front board so that I can always see who is up there and keep an eye on any funny business.
A clear shoe hanger. I bought mine on Amazon for about $8.
A power strip that has USB ports. I bought mine on Amazon and this one has room for 14 devices to be plugged in at once. I never have this many at once, so it’s worked out great! Students do have to have their own cord in order to plug in - but most of them live with a plethora of cords in their backpacks so that hasn’t been a problem either.
A few dry erase markers. I ask the students to put their name on the pocket where their phones are so that there are no mix-ups or if they leave and forget the phone I know who it belongs to.
A sign or place on the whiteboard for you to write your rules for using the station.
I’d love to hear how this has helped in your classroom and how you tweaked it to fit your school. Establishing this as a routine in my classroom has become an essential part of the first two weeks of the school year. We need to practice this routine and actually test it in action a few times before we get it down. This is also a cornerstone component of the class contract that we sign together at the start of the year. I’d love to share a copy of the contract with you — feel free to adapt and change for your needs!
LINKS TO PRODUCTS
(some may be affiliate links which means I will be partially compensated for your purchase)

How to Work with Words Without a Workbook
In order for our students to succeed across subject areas, we must all acknowledge the critical importance of vocabulary instruction. There are so many best practices out there, so many specialists, and so many approaches, it can feel daunting to choose a streamlined and effective strategy for your classroom. No matter your favorite method or style, I have a thoughtful yet efficient strategy for you to try in your class this year.

How to Teach Vocabulary Effectively and Efficiently at the High School Level
In order for our students to succeed across subject areas, we must all acknowledge the critical importance of vocabulary instruction. There are so many best practices out there, so many specialists, and so many approaches, it can feel daunting to choose a streamlined and effective strategy for your classroom. No matter your favorite method or style, I have a thoughtful yet efficient strategy for you to try in your class this year.
Let’s start with the routine: bell work. Most high school teachers have seen the merits of implementing bell work and I’d argue that this is the best and most consistent way to have daily vocabulary practice without having to give up tons of class time. When the bell rings, you need something that students can do independently, quietly, and quickly. Why not have them try using the Vocabulary Digital Interactive Notebook?

Here’s how it works: you provide students with your list of words at the beginning of the unit. Then, daily, students take out their 1:1 devices (should be Google-ready), open their Vocabulary Digital Interactive Notebooks, they choose a vocabulary activity (there are eight of ‘em pre-loaded), they work on the selected activity for 4-5 minutes, and then you’re ready to move on with the rest of class!
Here’s how to get started:
1. Create your Vocabulary Units
The first thing you’ll need to do is decide on your word lists. Some of you may already have pre-selected words for your units, and others of you might have more flexibility, but either way, you are the one responsible for deciding on the words and the length of each unit. When you’ve got your word lists ready to go, we can introduce the Vocabulary Digital Interactive Notebook!

2. Train Students on the Routine
To use this notebook effectively, students should be trained on the bell work routine that you have determined to be the most efficient. In my room, that means when the bell rings, students are in their seats with Chromebooks open. At the front of the room, I display (from my computer) whatever specific directions I have for the day and the students know to check there and then begin. They open up their Vocabulary Digital Interactive Notebooks, follow the directions, and in 4-6 minutes, they’re done with that day’s vocabulary practice.
3. Model and Practice Each Activity (and add your own!)
Inside the notebook, you’ll find eight different practice activities for students to use with one or multiple words from the word list. At the beginning of the year (or when you implement this activity) it’s critical that you model and practice each of the graphic organizers and activities in the notebook. Oftentimes, during Unit 1, teachers spend time teaching each of the activities one by one before making the bell ringers and independent activity in Unit 2. Don’t forget: since this notebook is completely editable, you can add any of your other favorite quick vocabulary activities that you want before you assign it to the students!

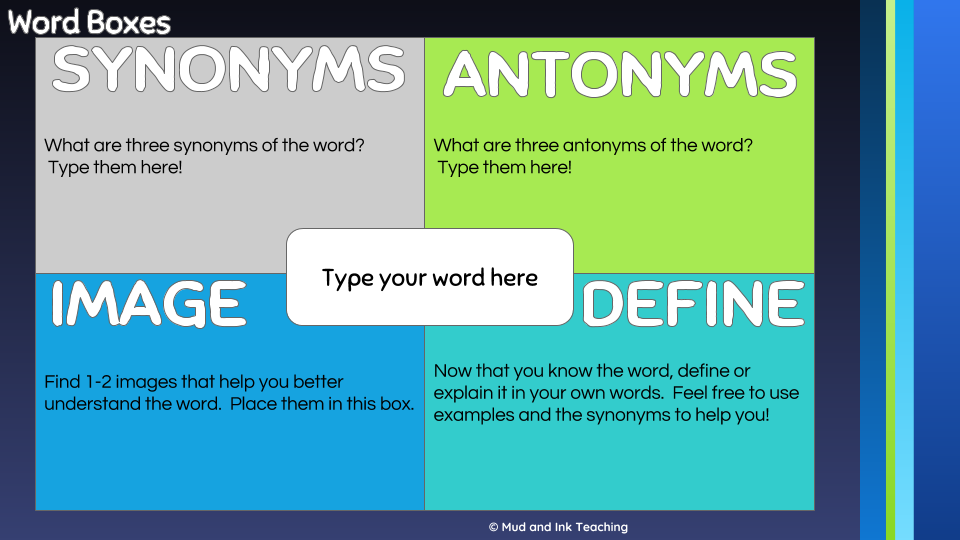
4. Add Your Own Assessments
Vocabulary study requires all different kinds of assessments, and this particular post and product don’t provide this part. Make sure that you and your team decide on appropriate formative and summative assessments to use along the way.
5. Keep it Fresh
There are lots of ways to keep this activity fresh throughout the year. Here are just a few things teachers have tried:
Pick a few days a week to have students work with a partner. This gives students a chance to talk about the words and word meanings rather than always working solo. Marzano (and other vocabulary experts) have made it abundantly clear that students need multiple exposures to words in order to fully learn them. Partner and small group work make this possible!
In a given week, divide the list into parts. Ask students to focus on the same 3-4 words ONLY but go through every activity. This ensures mastery of the words, not just practice. The next week, students could rotate to the next grouping of words.
If you’re assigning this notebook through Google Classroom, you will automatically have access in your Drive to each student’s notebook. Occasionally, project a few notebooks from students that have done exemplary work. This ensures students know what quality looks like and helps them to not get lazy with the routine. You can also print out notable work directly from their Google slideshows!
Ready to get started? Then what are you waiting for! Pick up your own digital, edible copy of the Vocabulary Digital Interactive Notebook today!

The Pinterest Perfect Classroom: What's Missing?
As I’m writing this, you’ve probably already pinned 100 new ideas for your back to school decor on Pinterest. You very well might be simultaneously stalking a corner of the Target Dollar Spot. Maybe you’re even wish-listing things for your classroom on Amazon. And if you’re not doing one of these two things, you’re almost certainly scrolling through Instagram with major “Insta-classroom envy” every other post you see.
As I’m writing this, you’ve probably already pinned 100 new ideas for your back to school decor on Pinterest. You very well might be simultaneously stalking a corner of the Target Dollar Spot. Maybe you’re even wish-listing things for your classroom on Amazon. And if you’re not doing one of these two things, you’re almost certainly scrolling through Instagram with major “Insta-classroom envy” every other post you see.
It’s hard to not get caught up in all of the back to school hype and the visual overstimulation of the internet and stores that you go to every week. Let’s face it - the marketing is on point. They’ve got us figured out and everything coming out of our favorite stores is just SO STINKIN ADORABLE.
Here’s where things get real though. I want to give you a reality check. I can’t help but wonder, when I look at these Pinterest/Instagram perfect classrooms, what’s missing? Not from the individual teachers who have crafted these gorgeous temples, but what’s missing from our back to school mindset?
Sometimes back to school reminds me of Christmas: with so much distraction, decor, and festivity, it can be easy to lose the importance of the day in all the madness. At Christmastime, we forget how important it is to celebrate family and to be grateful for what we have; at back to school time, we forget how important it is to connect with students and revisit last year’s mistakes with the intention of making each year a better experience for students.
So before you go spend another Dollar Tree dollar, here are FOUR things to do that are MORE IMPORTANT than your Pinterest-perfect classroom.

1. Authentically connect with students.

Every year I build a Meet Your Teacher presentation into the first week of classes. And it’s a long presentation. I tell my students my story - not to boast or to get too personal, but to give them a genuine look at my life and my passions. I share with them some of my biggest trials (shattering my ACL, MCL, and meniscus junior year of high school during a soccer game where I was being recruited by Division 1 schools), my successes (athletically, professionally, and educationally), my worldly travels and adventures (I show as many pictures as possible - so many of them don’t even know travel is possible!), and my education story. This presentation takes precious hours to put together and adjust year to year, but they’re so much more worth it to me than a new bulletin board. After my presentation, the students write me a letter in response about their own stories and let me tell you - after I’ve just been so transparent about my life, I get the same thing back from them. In these letters I’ve read about childhood abuse, pregnancies, divorces, and so many other intimate details of students’ lives that I wouldn’t have learned until much, much later in the semester. Now, moving forward, I am learning how to better serve each and every one of my kiddos.
2. Establish Routines and Systems
This part of back to school preparation might be linked to some shopping and/or decorating, but it’s the system that’s important. Systems and routines make your classroom run: they create the predictability that students need for their best behavior and attention. Think about this year and see if you can answer these questions:
How will students get their homework assignments for each day?
Where do students see targets for each class period?
How will I hand back graded work?
How will class start and end each day?
If students need to leave class for any reason, how will I handle it?
Where in my room can I send a student that needs to relocate?
How will my students be trained to bring their 1:1 devices every day?
What will my assessment revision policy be?
Where will students access supplies? How will I keep it organized?
This is just the tip of the proverbial iceberg. Make these decisions before you find bins and trays and start going nuts on your label maker.
3. Connect with Colleagues
The teaching profession is getting lonelier all the time. Teachers, annoyed with policies and administration, retreat into their classrooms and only come out when it’s time to gossip. How can you prevent that from happening to you? Your team? Your department? Find time (again, this is time away from obsessing over a HP themed classroom) to meet with your colleagues and build each other up for the school year ahead. You might:
Write a joint mission statement or motto for the upcoming school year
Take a group picture and put the same one on every syllabus - send the message that WE are all your teachers and you are ALL our students
Plan a monthly social event, gathering, or silly thing to do at school
Let’s build schools with community rather than competition. Make it a point to not just be a classroom teacher, but a hallway teacher and a teacher the whole school knows has students as her priority.
4. Reflect and Set Goals
Teachers have the beautiful little luxury of getting the chance to start over. Every single year, we get to hit the reset button and adjust the way things get done. Before school starts, make a quick list of lessons, systems, routines, or other things that you didn’t really like the year before. What was always an annoyance? Next, make a similar list with ideas for solutions to those problems. Finally, set some fun, creative, pedagogical goals for the upcoming year. What are the new trends in education that seem worth trying? Be an adventurous teacher! What will you try next? Gamification? A digital breakout? Digital interactive notebooks for bell ringers? Pick just one or two things you want to try. Keep your teaching fresh by at least attempting one new methodology per semester!
Focus on what matters, play later
Let me be REALLY CLEAR: it is SO MUCH FUN to decorate our classrooms for back to school. It might even be more fun to get lost on Pinterest and Instagram dreaming about the most neon-tastic classroom ever. So many teachers are so artfully talented and their crafting is just off the charts, and to you I say WOW! But to everyone out there stressin’ out about keeping up with the social media classroom decor hype, let me be clear: what happens in your room far outweighs how beautifully decorated it is. Prioritize your summer on these four things: authentic connection, routines, collegial bonding, and reflection and goal setting. Once these things feel established, feel free to resume your Dollar Spot stalking.