ADVENTUROUS TEACHING STARTS HERE.

Must Listen Podcasts for English Teachers
If you’re new to the podcast world, let me give you a big, warm WELCOME! Podcasts have been a game-changer for me both for professional development and for adding new texture, voices, and perspectives to my Essential Question based units.
The curated list below is broken into these two categories: podcasts for PD and podcasts for content. Each of these will inspire you with new ideas and restore your joy and love of teaching at your core.
PODCASTS FOR PD:

Looking for a community of teachers ready to break barriers and challenge the status quo? Join us at Brave New Teaching! Marie Morris of The Caffeinated Classroom and I adore hosting this podcast and helping teachers at every step of their journey.
These are two of our most downloaded episodes. Jump in and give them a listen!

There’s a reason Jenn Gonzalez’ podcast has over 8 million downloads — her content is challenging, brilliant, and honest. Start with this episode:

Join Amanda for a her expertise in all things Writing Workshop! As a middle school teacher for over a decade, Amanda will give you support AND ideas!

Betsy Potash just keeps churning out episode after episode full of strategies and inspirational ideas. I love this one about real-world research projects!

Looking for a teacher bestie down the hall that keeps it real? Pop in your earbuds and dial up The Educator’s Mindset!
PODCASTS FOR ELA CONTENT:
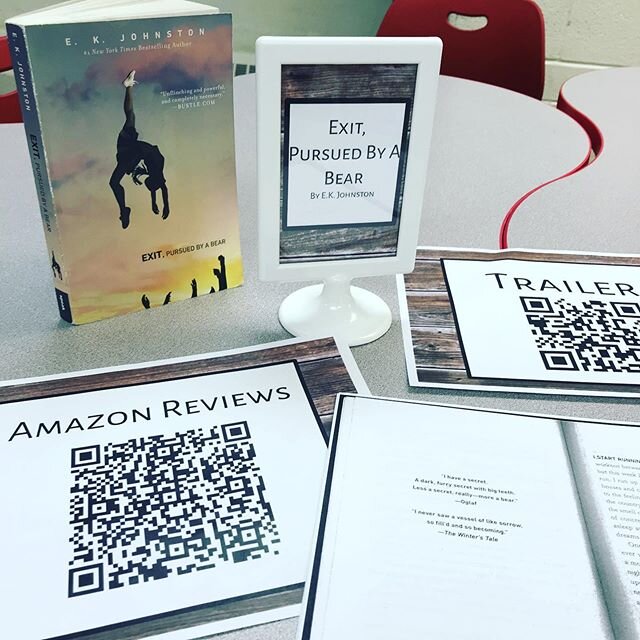
If there’s a dystopian unit in your future, it’s time you included LIMETOWN into the mix! This delightful 6-part podcast takes us through the fictional world of Limetown, a city of over 300 residents that vanished virtually overnight. No one really knows what was going on in this town (but we do know it was home to a mysterious research facility), and investigative journalist Lia Haddock is on the case. Follow along with Lia’s story as students watch their own dystopian worlds unfold in their novels. Grab my listening sketchnotes to help you through the podcast part and sit back and enjoy!

“Lore is an award-winning, critically-acclaimed podcast about true life scary stories. Lore exposes the darker side of history, exploring the creatures, people, and places of our wildest nightmares. Because sometimes the truth is more frightening than fiction. Each episode examines a new dark historical tale in a modern campfire experience.”
This episode pairs beautifully with The Crucible or the study of Margaret Atwood’s poem: “Half-Hanged Mary”. If superstition is on your theme list, give this one a listen!

With each episode of This American Life, Ira Glass looks into a slice of American life, typically through profiling a unique individual’s life. One of my favorites is “Switched at Birth”. I love to share this episode with students to talk about writing structure and tension.
This is a wonderful podcast to pair with any unit on memoir or writing — take a look through the huge list of favorite episodes here to get an idea of the huge variety of topics discussed on the podcast!
“What's CODE SWITCH? It's the fearless conversations about race that you've been waiting for. Hosted by journalists of color, our podcast tackles the subject of race with empathy and humor. We explore how race affects every part of society — from politics and pop culture to history, food and everything in between. This podcast makes all of us part of the conversation — because we're all part of the story. Code Switch was named Apple Podcasts' first-ever Show of the Year in 2020.”
Use this podcast to practice the important art of listening to other stories and experiences as we educate ourselves more deeply on the impact of race.

“Lauren Clark is a hair stylist in D.C. When a stranger sexually assaulted her in 2013, it sparked a years-long courtroom saga and a campaign for justice. Her story started The Post’s Amy Brittain on a reporting journey that has lasted for nearly three years — one that played out in the middle of a larger cultural reckoning.”
If you’re working on a unit examining the role of gender, this story gives powerful light to women who are all too often afraid to speak up and be labeled as attention seeking and not taken seriously.

“Each week of On Eyre, Vanessa and Lauren Sandler will take a critical look at the text and ask themselves ‘does this old book still have something to say in our world?’ But before we jump into the first chapter, a few questions need to be answered. Questions like: Who is Charlotte Bronte, and why should anyone (who isn't Vanessa) care about this book?”
This is the most intensive, analytical look at Jane Eyre I’ve ever found. The hosts break down the novel chapter by chapter and analyze through a lens of desire and power. This is a MUST listen for anyone who teaches the novel or is a huge, nerdy fan.

Calling all teachers of literary analysis — here is your podcast. Each season of Dissect tackles an album and analyzes each song one by one. From Beyonce to Mac Miller, the genres range widely and the analysis is pointed, clever, and enjoyable to listen to. Most recently was Season 9:
“Season 9 is dedicated to Mac Miller’s Swimming In Circles. Over 14 episodes, we dissect the music, lyrics, and meaning of Mac’s beautifully honest efforts to swim amidst the often tumultuous currents of the human experience.”

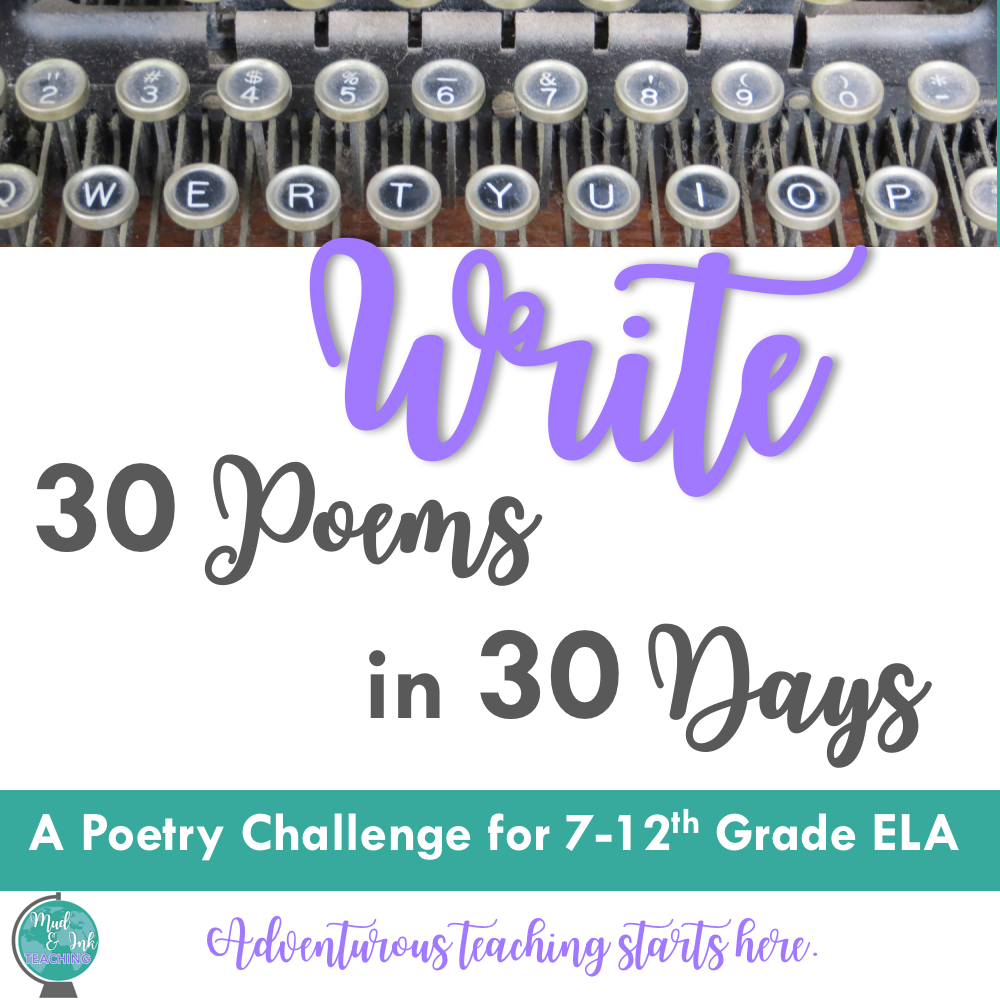
If you’re looking to broaden your own poetry arsenal or you’re working through an exclusive poetry unit, this Poem of the Day Podcast will give you and your students wonderful access to new poetry. This daily podcast has a wealth of episodes to scour through! The Poetry Foundation website has even more to explore, but this podcast just might get you back in the zone when it comes to poetry. If you’re looking to step up your poetry game in the classroom, here are 30 poems to get started with right away!

“What is it like to be famous before you’re famous? What is it like to walk in the shoes of another person? Each episode of Imagined Life takes you on an immersive journey into the life of a world-famous person. It’ll be someone you may think you know, even admire -- or maybe the opposite. You’ll get clues to your identity along the way. But only in the final moments will you find out who ‘you’ really are.” This podcast is fun to do similar to first chapter Friday or in the creative writing classroom.

“Hidden Brain explores the unconscious patterns that drive human behavior and questions that lie at the heart of our complex and changing world.”
I love using this episode when contemplating happiness and the American Dream while teaching The Great Gatsby. It gives us a great non-fiction, research-based look at happiness to apply as a lens.

If teaching the American Dream is on your to do list this year, Gangster Capitalism should also be on that list. This podcast digs into the SAT and college entrance scandals spearheaded by Rick Singer. Hear about how the wealthiest Americans work their way into college — in a much different way than those who are all working hard for it. Pair this podcast with my unit on The Great Gatsby for a rich discussion about wealth in America and how that impacts the American Dream.
Hosted by the brilliant Ada Limon, this podcast shares contextual thoughts related to a different poem each day. Episodes are rarely longer than seven minutes in length, making them easy to use in the classroom or as a starting place for homework. If you teach any YA novel that deals with the ways in which Black young men have been affected by police brutality, this poem is a beautiful pairing.

“Admissions Officers Hannah and Mark share the complex and dynamic work happening inside the Yale Office of Undergraduate Admissions. The podcast gives firsthand accounts of how officers read applications, make decisions within the Admissions Committee, and collaborate with other offices and resource centers. Yale College receives more than 35,000 applications annually for a first-year class of 1,550 students. Hannah and Mark give an inside look into the strategies and processes that enable admissions officers to attract promising applicants from around the world, consider every applicant through a whole-person review process, and build a class filled with strong students from an amazingly diverse collection of backgrounds. Recorded inside the Office of Undergraduate Admissions on Hillhouse Avenue, this new podcast pulls back the curtain to reveal some of Yale’s most fascinating and rewarding work.”


LET’S GO SHOPPING


Class Discussion: When to Stay Quiet, When to Speak Up
In order to facilitate high-quality classroom discussion, we must set up purposeful scaffolds on the front and back end of each discussion; however, in order for students to engage with the practice needed to meet these goals, we have to let the discussion happen organically and without our interference. These are the time that we stay in the background and when to speak up.
Let’s start by taking a quick poll:

Share your answer with us in the comments, and don’t forget to say WHY!
A: Fishbowl / B. Socratic Seminar / C. Philosophical Chairs / D. Online Discussion with Parlay
No matter which of the above is your jam, I think we can all agree that class discussion and the techniques we use to make them happen are all chasing after the goal of helping our students learn to have thoughtful discourse, how to talk about hard topics respectfully, and how to evolve their positions with both concession and deeper, more complex claims.
Discussion, whether it be at the beginning, middle, or after a unit of study, is a cornerstone in the pursuit of an inquiry-driven curriculum. Most often, discussions in my classroom are anchored to the unit essential question and present a series of sub-questions that are related. Students are encouraged to utilize a variety of sources to provide a variety of perspectives on the answer or solution to the question at hand. These discussions are high energy, personal. critical, political, and sometimes even emotional. And we, as educators, need to make sure that all of the pieces are in place so that the conversation can happen organically and without your constant intervention.
Let’s be clear on goals
If I had to make a master list of what I’m aiming for my class discussion to be able to do, it would look something like this:
How to listen to and trace the development of claims and arguments
Building confidence in students owning their own voices
Practice synthesizing information
Build connections between ideas and elevate them to a new layer of the conversation
To learn the difference between neutrality and open-mindedness
To engage in discourse to deepen thought; not to be right or wrong
In order to accomplish these goals, it requires us, the instructors, to set up purposeful scaffolds on the front and back end of each discussion; however, in order for students to engage with the practice needed to meet these goals, we have to let the discussion happen organically and without our interference.
When to Stay Quiet
The simple answer? As much as possible. Your goal is to fade into the background during the discussion and closely observe student interactions and listen to the evolution of the conversation as it unravels organically.
Troubleshooting in the Background
The logistics of these discussion strategies can be difficult to navigate the first few times though, so I’ve built two helpful tools that help me keep track of the discussion quickly and efficiently so I can spend more time paying attention to the content of the conversation.
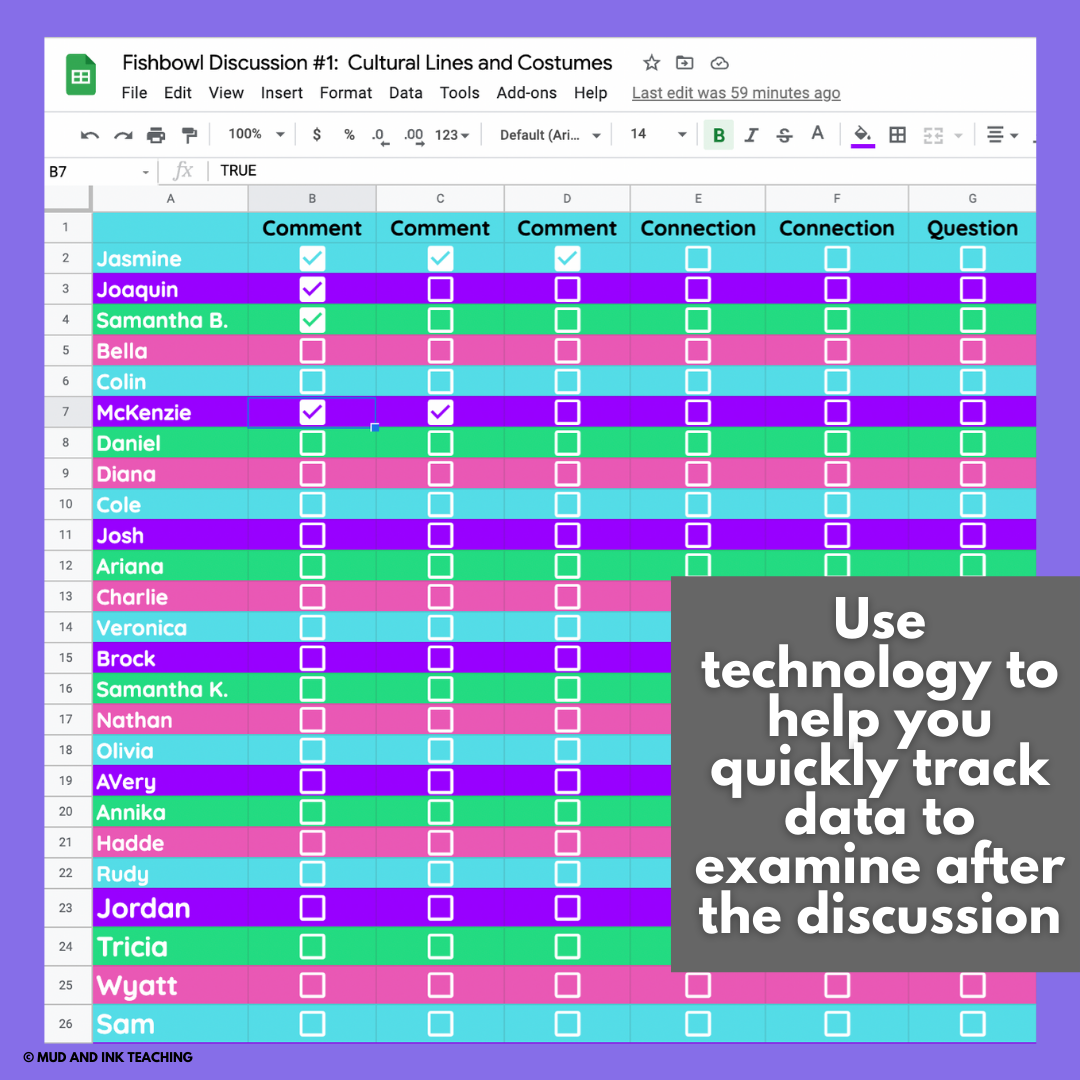
Google Sheets Checkbox Tracker
Open up a new Google Sheet. Copy and paste your roster in the first column. In each additional column, use INSERT > CHECKBOX to create a clickable checkbox. You can label the columns “Comment 1”, “Comment 2”, “Asked a question”, “Used evidence”, etc. This is a simple way to track student participation without having to shuffle papers around. This task can also be assigned to a student if you are looking for ways for students to participate when they’re on an off-day. If students have access to a view-only version, they can monitor their own progress without you having to verbally remind students to speak up.
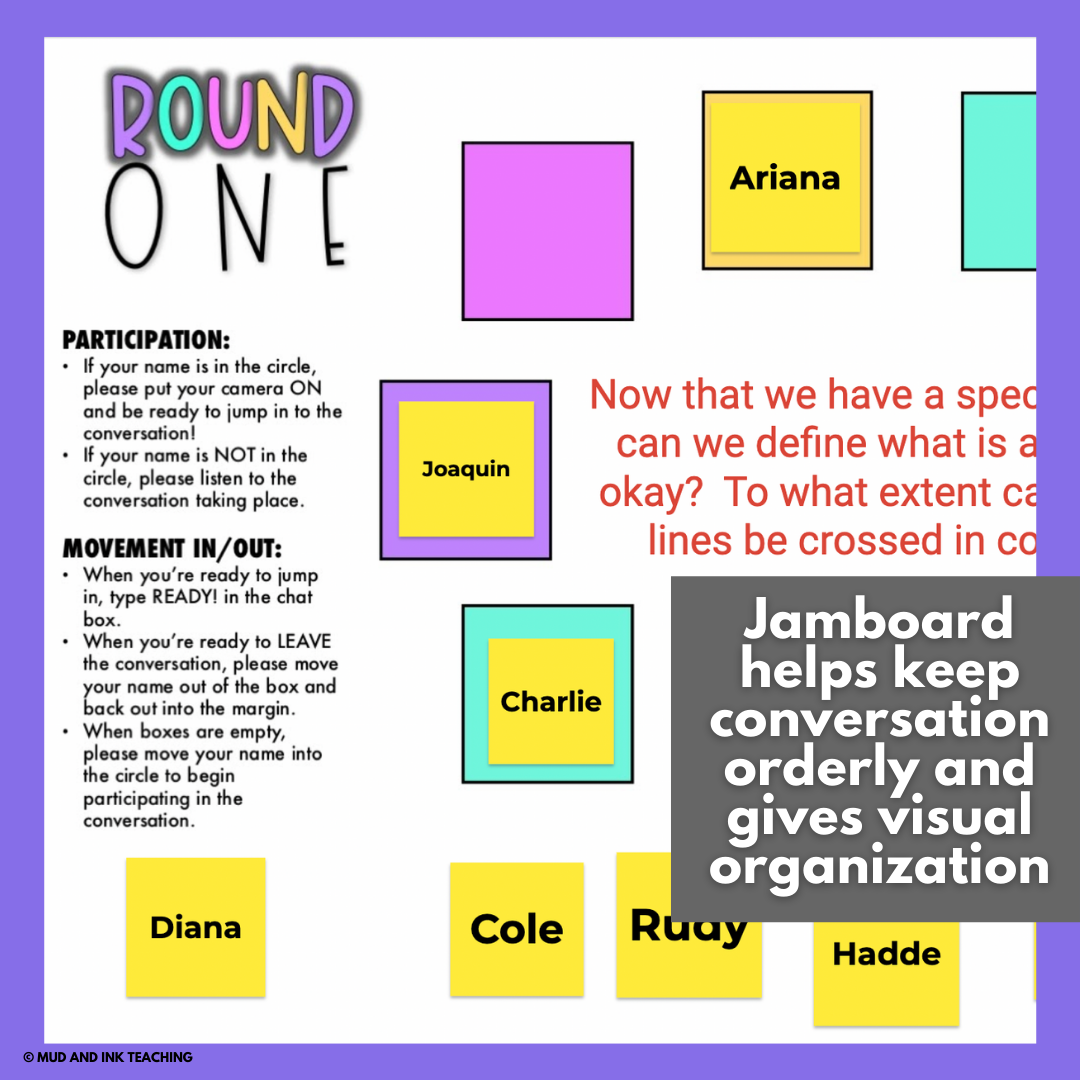
Google Jamboard
Jamboard is a unique tool that can help students keep track of who is in the circle and outside of the circle for a Fishbowl or Socratic. Using my Google Jambord templates, insert the template as the background image. Create a sticky note for each student with their first name. Give students “view only” access if you want to control the movement of students, or, leave it editable so students can move themselves inside and outside the circle. This works well for a virtual discussion or in classrooms where physically moving the desks into circles is particularly difficult.
Parlay Ideas
Parlay is an all-in-one tool that does the work of both the Google Sheets tracker and Google Jamboard. Parlay, when used for a live discussion, give students self-sufficiency and order as they navigate their difficult decisions. Whether you’re having a live discussion or a virtual one, Parlay will keep you away from logistical tasks and focused on the conversation at hand and will be delivered a data breakdown at the end of the conversation. Here are some ways I’ve used it with A Raisin in the Sun:
When to Speak Up
As much as we want our students to be engaged in a fully student-led discussion, there are times where our intercession is necessary. If we’re practicing these discussions over time, we might be intervening a bit more in the first one or two discussions, and gradually moving out as the students become more confident over time. Here are the times when we need to speak up:
If harm is done
Intentionally or not, there are times when student comments may be unnecessarily harmful or hurtful. Address these moments swiftly and clearly. Depending on the conversation at hand, you might prepare yourself for what might come up and plan ahead for how you will handle inappropriate takes on the conversation.
Time reminders
In both my seminars and my fishbowl discussions, I like to give clear indicators in time allotment. This helps students make space for others who still need to participate, be self-aware about their own contributions, and have a sense of where they stand within the class period.
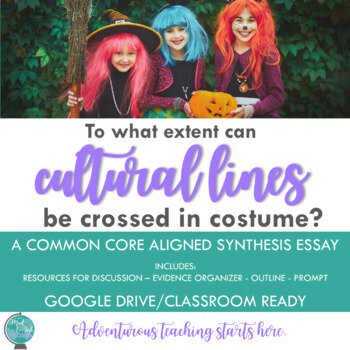
A clarification/definition is needed
Especially when difficult topics are on the table, you might hear students skirting an argument. When my students discuss “To what extent can cultural lines be crossed in costume?” I can hear them nervously trying to not offend anyone by using generalizations. After listening for a while, I stepped in, offering a definition of “cultural appropriation” and asked them to use that definition moving forward to make delineations in their arguments. The definition helped provide clarity to the issues on the table and helped students have the language they needed to make their claims more solid.


Evidence reminders
Finally, I have found it both helpful and necessary to intervene in conversations that get too far away from the texts on the table. The generalizations mentioned above can mushroom, and sometimes I need to speak up with a quick, “Can we bring this idea back to the evidence?” or “Are there specific examples of this from something we read?” is enough to steer them back on track.
In Pursuit of Inquiry
No matter where you are in your teaching journey, know that the pursuit of inquiry and inquiry-centered instruction is the best path you can be on. Getting students to think for themselves, ask their own questions, and thoughtfully engage in important conversations is just as important as sharing great works of literature with our students.


LET’S GO SHOPPING

Student Names Matter: Digital Ways to Learn Names
Knowing your students begins with knowing their names. It begins with pronouncing them correctly. Prioritizing this part of the back-to-school phase is critical and this blog post offers some easy ways to use technology to learn names quickly and correctly.
To my absolute horror and embarrassment, I can still remember the last day of school from my third year of teaching. One of my students, Andrea, gave me a hug and said goodbye, but also mentioned, “You know, Miss Cordes, you were my favorite teacher. But I should have told you that my name is pronounced AHH-ndrea not AN-drea”. After apologizing profusely and shaking my head in disbelief, I couldn’t stop thinking about the fact that she’s probably not the only student whose name I got wrong — for the whole school year.
Teaching is a whirlwind of chaos and instantaneous decision-making. And what I’ve learned over my years is that the chaos doesn’t stop, but what we CAN control are the things that we decide are important - the things that we decide to be intentional about. Learning student names (correctly pronounced!) at the beginning of the year has become a top priority for me and something I’m not willing to ever push aside again. Names are identity, history, and culture. Knowing someone’s name and addressing them by that name is a foundation in respect and rapport. I am committed to honoring these things about my students, whether I’m teaching in a physical classroom or in a virtual one.
Distance learning presents a new challenge in doing this: I have a list of names on my roster and school ID pictures, but I have no live humans to see right in front of me. I have no way to remember Alessandrea always comes in early and that Erik always has his head down. Here are a few strategies I’ll be using for both learning how to pronounce names correctly and learn who is who in my virtual classroom this year.
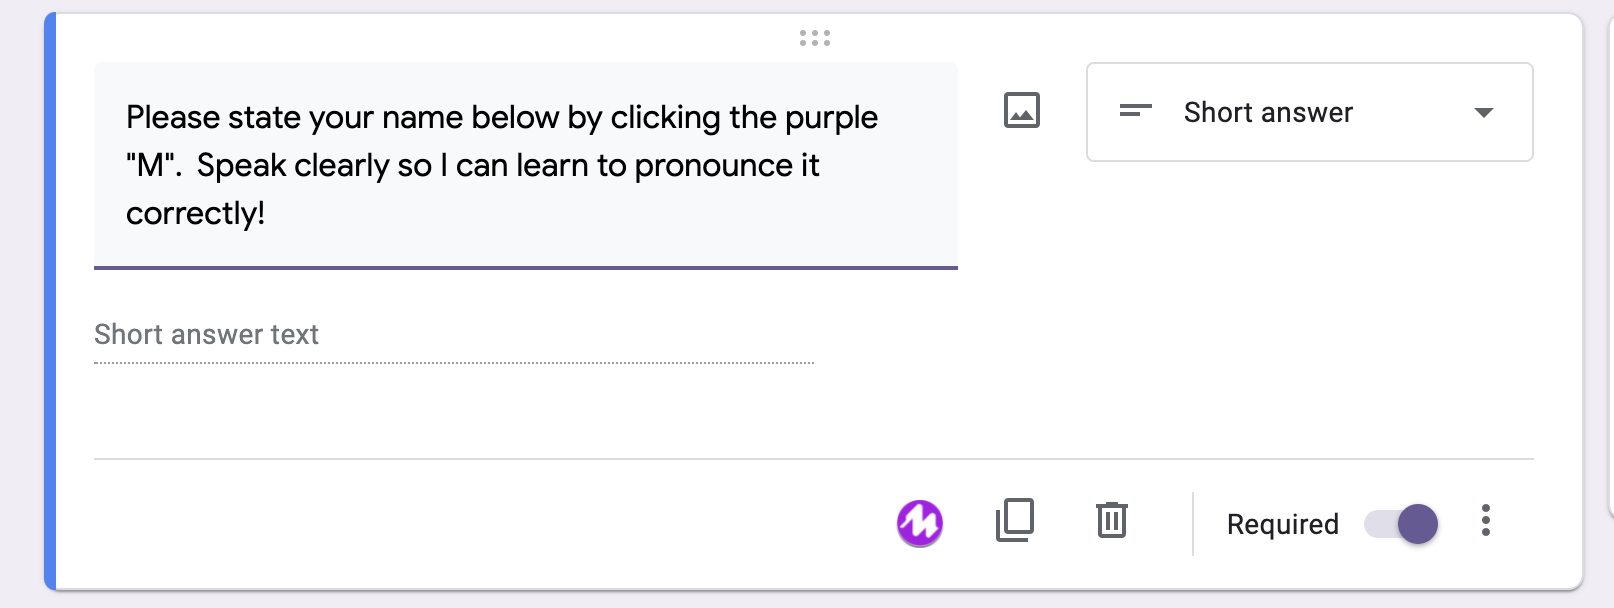
GOOGLE FORMS & VOCAROO/MOTE
In my back to school survey I’m adding a field in my usual Google Form where students can VERBALLY state their names. This allows me the opportunity to listen and re-listen to the student pronouncing their own name in their own voice as much as I need to. This is really easy to implement in your own Google Form using either Vocaroo or Mote.
USING VOCAROO:
Give students a link to the website vocaroo.com
Ask students to record themselves pronouncing their name on the site. Have them save and download that audio.
On the Google Form, create a space for them to UPLOAD A FILE. Have them upload the audio there.
USING MOTE:
Install the Google Chrome Extension MOTE: bit.ly/getmote
Write your directions as one of your questions and select “short answer”. Students will see a purple icon with the Mote logo where they can click and leave a voice note as their response.
SKIP THE SYLLABUS ON DAY 1
If knowing your students and building community is an important goal of yours, then the organization of your back to school lesson plans need to reflect that. Having students sit through forty minutes of being read a list of rules and school supplies doesn’t send the message that their voice matters. The syllabus is an important document, but who said we have to drone on about the whole thing on day one? Try dividing it into sections and reviewing a different section over the course of a few days. Maybe break it apart and have students experience the syllabus through stations.
If you’re stumped thinking of an idea for day one that sends the message that your classroom will be a place where students are at the center and their voices, their names, are important, consider doing an activity that places the students at the center and the teacher on the periphery.
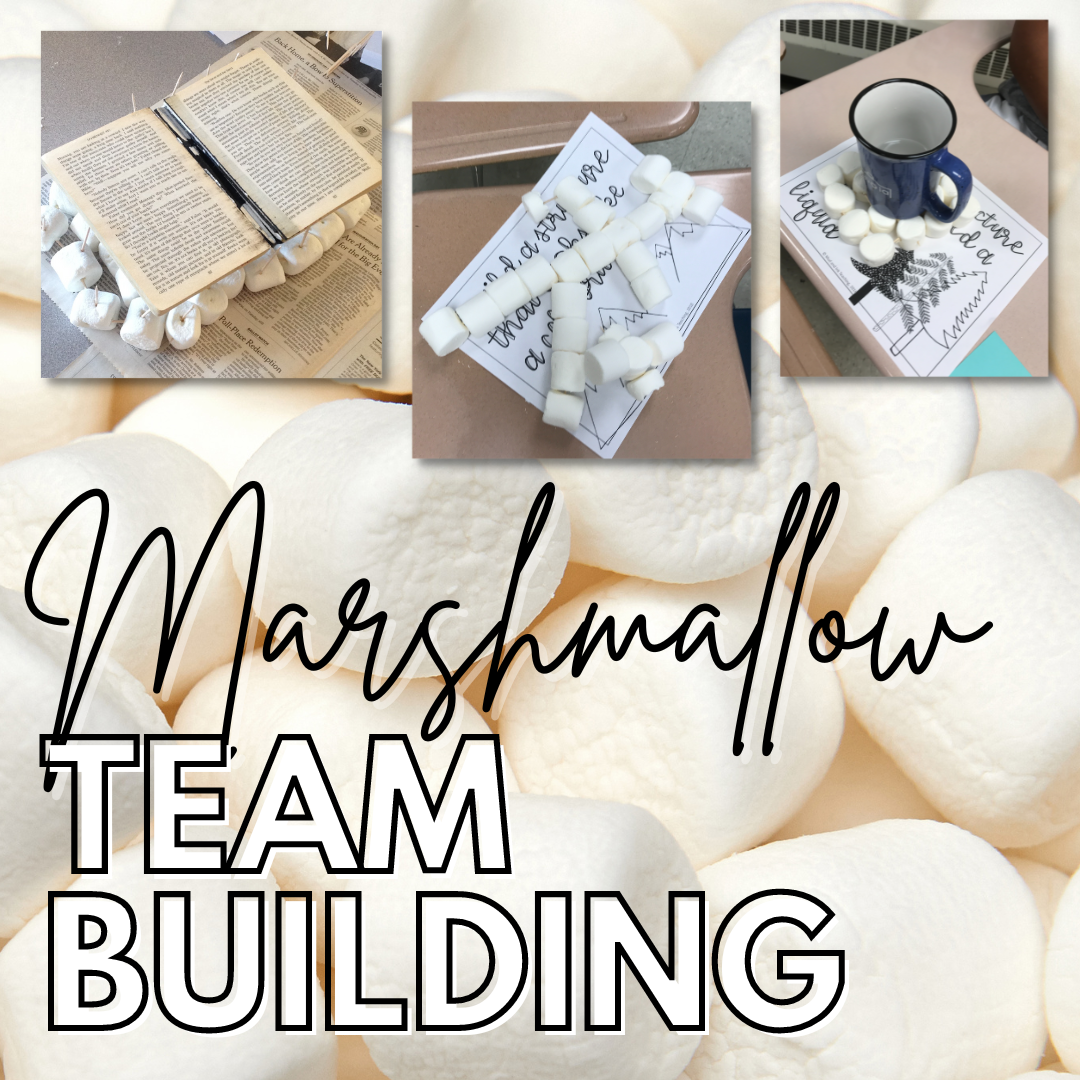
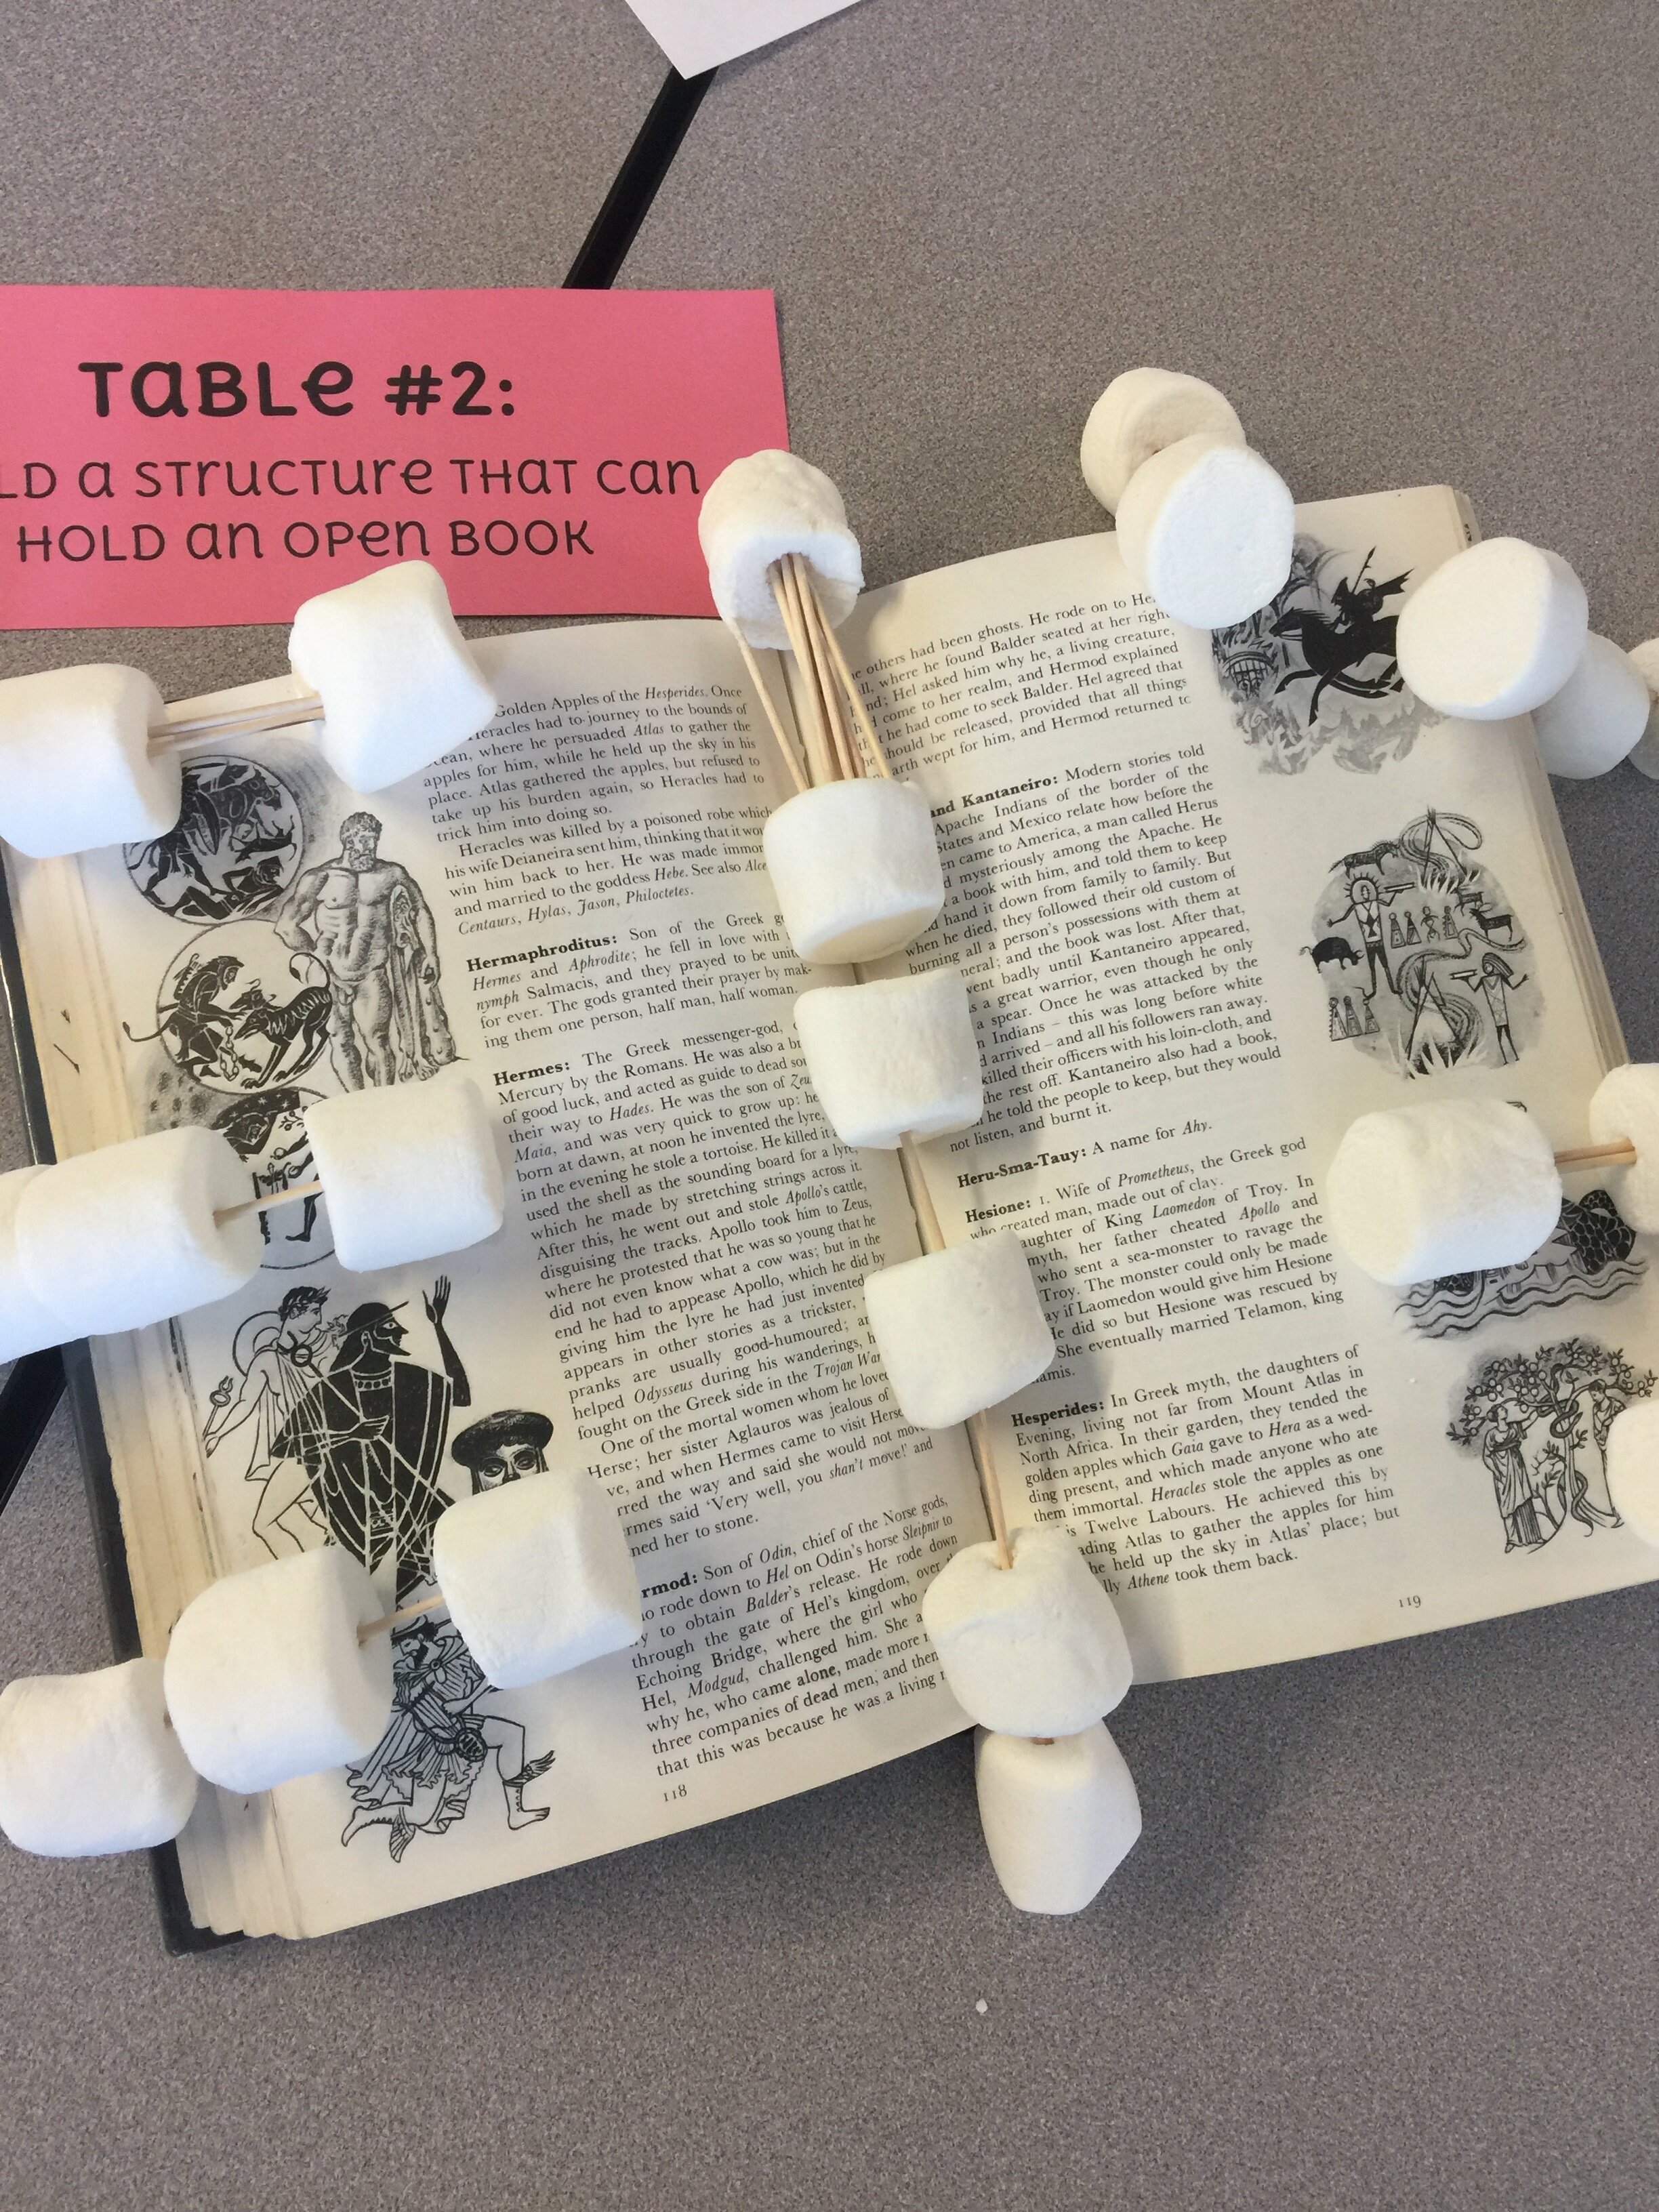
MARSHMALLOW TEAM BUILDING:
Learning names comes so much faster when I’m circulating the room and having memorable conversations with students. This is why I love a group team building exercise for day one. One of my favorites is marshmallow team building, and it’s a lot like it sounds: teams get a bag of marshmallows and some toothpicks and are challenged to build something unique and work together. As they work, I float across the room taking note of body language, holding my seating chart with names, and making casual conversation with students as they work.
WILDERNESS SURVIVAL CHALLENGE
Similar to Marshmallow Team Building, a survival challenge can also be a fun way to see kids working together and get an early feel for their personalities. For this activity, put students into groups and paint them an elaborate picture of living out in the Alaskan wilderness: tens of miles away from civilization, certainly in danger’s way on a regular basis, sharing a section of the world with bears…you get it. I then let them know that they’re allowed to bring three items from a list (usually of 12 or so). The list is usually pretty silly and even a little bizarre - this always stirs up some great conversation and gives a little foreshadowing into my goofy personality. After a timer goes off, groups share their decisions and rationale. Not only is there team building involved, but YOU get to move around the room, ask questions, start memorizing names, and learn the names of your students from the beginning.

I’d love to hear from you in the comments below all about your favorite ways of learning student names and putting THEM at the center of your classroom in the first weeks of school. How do you set up your classroom and plan intentionally for this to happen? Share with us below!
LET’S GO SHOPPING!

Mentor Sentences, Grammar, and Padlet: A Digital Lesson
Teaching grammar shouldn’t happen in isolation. Here is one Padlet-based lesson idea for teachers to practice grammatical concepts by writing and revising captions of various pictures.
I’m asked all the time, “How do you teach grammar?” “What workbook do you use to teach grammar?” and other variations of that question on a weekly basis. And my answer?
I DON’T.
This is not to say that I don’t teach the construction of language, the structures of punctuation, and how to proofread before submitting final work. I do all of these things. But what I haven’t done is assign a single grammar worksheet or taught any direct instruction lesson on a grammatical construct in a very, very long time.
The Grammar Teacher’s Danger Zone
There are two red flags to consider when planning for your grammar instruction: methodology and historical oppression.
First, as teachers embarking on any kind of grammar instruction, there are myriad ways to go about that instruction. Direct instruction through PowerPoint lecture, assigning work through a third party like NoRedInk, or teaching in context alongside other materials (rather than in isolation) are common considerations. Jenn Gonzalez from The Cult of Pedagogy explores research related to these options and shares clearly that grammar in isolation is not the way to go. Others here and here argue similarly. So if isolation (AKA a single Grammar Unit) is not the way to go, then let’s explore the power of teaching grammar in context.
The second danger zone that lurks in the background of the lessons we teach and the way we present grammar to students lies in the roots of oppression and colonization. In the United States, the English language was brought over from Europe and has remained the dominant language ever since. Native Americans have been long-time victims of the pressures of assimilation, especially when it comes to education. There have been mandated educational standards forcible enrollment in specially designed schools since the mid 1800s where “children were severely punished, both physically and psychologically, for using their own languages instead of English” (Klug, Cultural Survival). The message consistently sent by Standard English is that following the “proper” constructs of the language, one can be part of a more highly respected group of people. Cultural dialects and foreign languages have often been shelved at a lower place than Standard English, leaving us English teachers to sort this whole thing out as we look out at our sea of incredibly diverse voices in our classrooms. How do we teach English grammar in a way that helps students become stronger communicators and still validate the beauty and cultural importance of native languages and dialects? It’s not easy, but I can tell you right now we can stop doing two things:
circling every error we see with a red pen (or digital equivalent)
teaching full-length grammar lessons out of context
On a related note, you should hear what Vanessa has to say about teasing people about their accents:
So what DO we do?
I have a self-conscious disclaimer: this is one of my sore spots in teaching English. Grammar makes me very nervous and self-conscious, even though I mostly know what I’m doing. Honestly? I’m a terrible proof-reader. If you’ve been here on this website for any length of time, I can honestly report that I rarely do more than a quick skim to see if there are any glaring errors. If not? I publish. Readers catch mistakes all the time and I thank them, correct it, and move on.
I try to take this attitude with my students when we approach grammar instruction. Any time a grammar lesson is in play, it’s surrounded by encouragement to experiment and try. Not a single grammar lesson goes without a reminder that learning language is just another way to help my students find their voices. We learn constructs and play with them. Mostly, you’ll see grammar lessons in my classroom immediately following a major piece of writing as I teach the common errors in the context of the paper and making improvements. We also look at speaker’s and author’s syntax in writing, much like we look at diction and tone. You’ll hear me say things like: Hey! Do you see this? This is called an appositive phrase and this is where we see the speaker’s real attitude toward the subject come out! What would happen to this sentence if the appositive were taken out? That’s right! This would have been a pretty neutral sentence if it wasn’t for that side-comment appositive phrase. Let’s try manipulating that ourselves…
What does this look like with technology?
One lesson that I shared on social media recently is a caption writing activity that uses Padlet. Padlet’s software is free for three uses, and then moves to a paid tier. This activity is great because you can complete the activity, keep it live for a while, and then delete it — freeing you up to use Padlet again for another lesson.
STEP ONE: CHOOSE AND TEACH THE GRAMMATICAL CONCEPTS
To do this, I built my students a YouTube playlist and sent them out to watch, take notes, and collect examples of 10 different grammatical concepts with varying levels of difficulty. About half of them were probably familiar to students from previous years of their education (this is a lesson I did with 11th grade) and the other half were probably new or generally unknown to them. My handout looks like this:
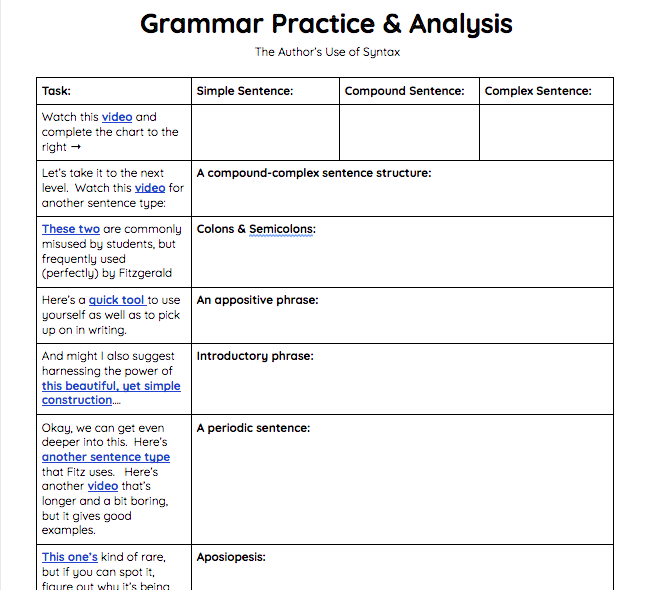
STEP TWO: PRACTICE AND PLAY
Once my students had a working knowledge of these concepts, we started looking at examples from literature and from of the major works we study for rhetorical analysis. We discussed Fitzgerald’s use of aposiopesis when he ends The Great Gatsby with the lines:
“Gatsby believed in the green light, the orgastic future that year by year recedes before us. It eluded us then, but that’s no matter—tomorrow we will run faster, stretch out our arms farther.… And then one fine morning—
So we beat on, boats against the current, borne back ceaselessly into the past.”
We also looked at Elie Wiesel’s simple, yet powerful use of a semicolon at this point in his speech “The Perils of Indifference”:
“We are on the threshold of a new century, a new millennium. What will the legacy of this vanishing century be? How will it be remembered in the new millennium? Surely it will be judged, and judged severely, in both moral and metaphysical terms… So much violence; so much indifference.”
These discussions served two major teaching points for me: one, they put grammar into context, which as we know from the above research is imperative, and two, this is how I help students learn what analysis looks like. We can identify aposiopesis and a semicolon with relative ease, but the discussion about how and why are they effective given the context is where I want my students to be in their writing.
Now, it’s time to play. Enter: PADLET.

The idea behind this Padlet lesson is for students to manipulate language to create a noticeable change in meaning, tone, or purpose to a given sentence. Here’s how I set up the Padlet:
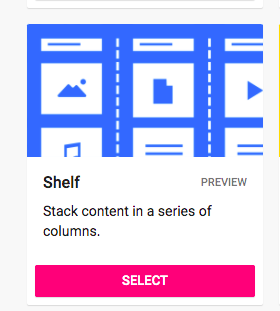
Head over to Padlet and login with your credentials. Click Make New Padlet.
Choose the SHELF option to set up the lesson the same way that I did. This option is what I use for any gallery walk type of lesson.
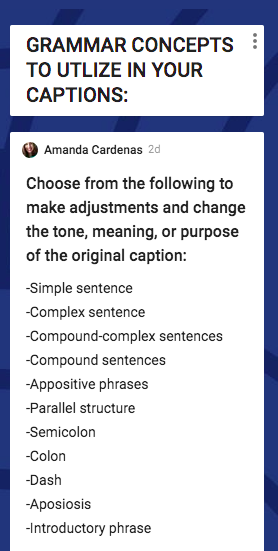
On Shelf 1, provide your instructions and any other notes for students to reference as they work.
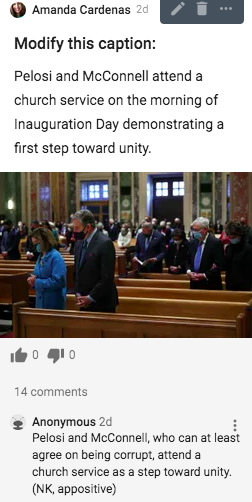
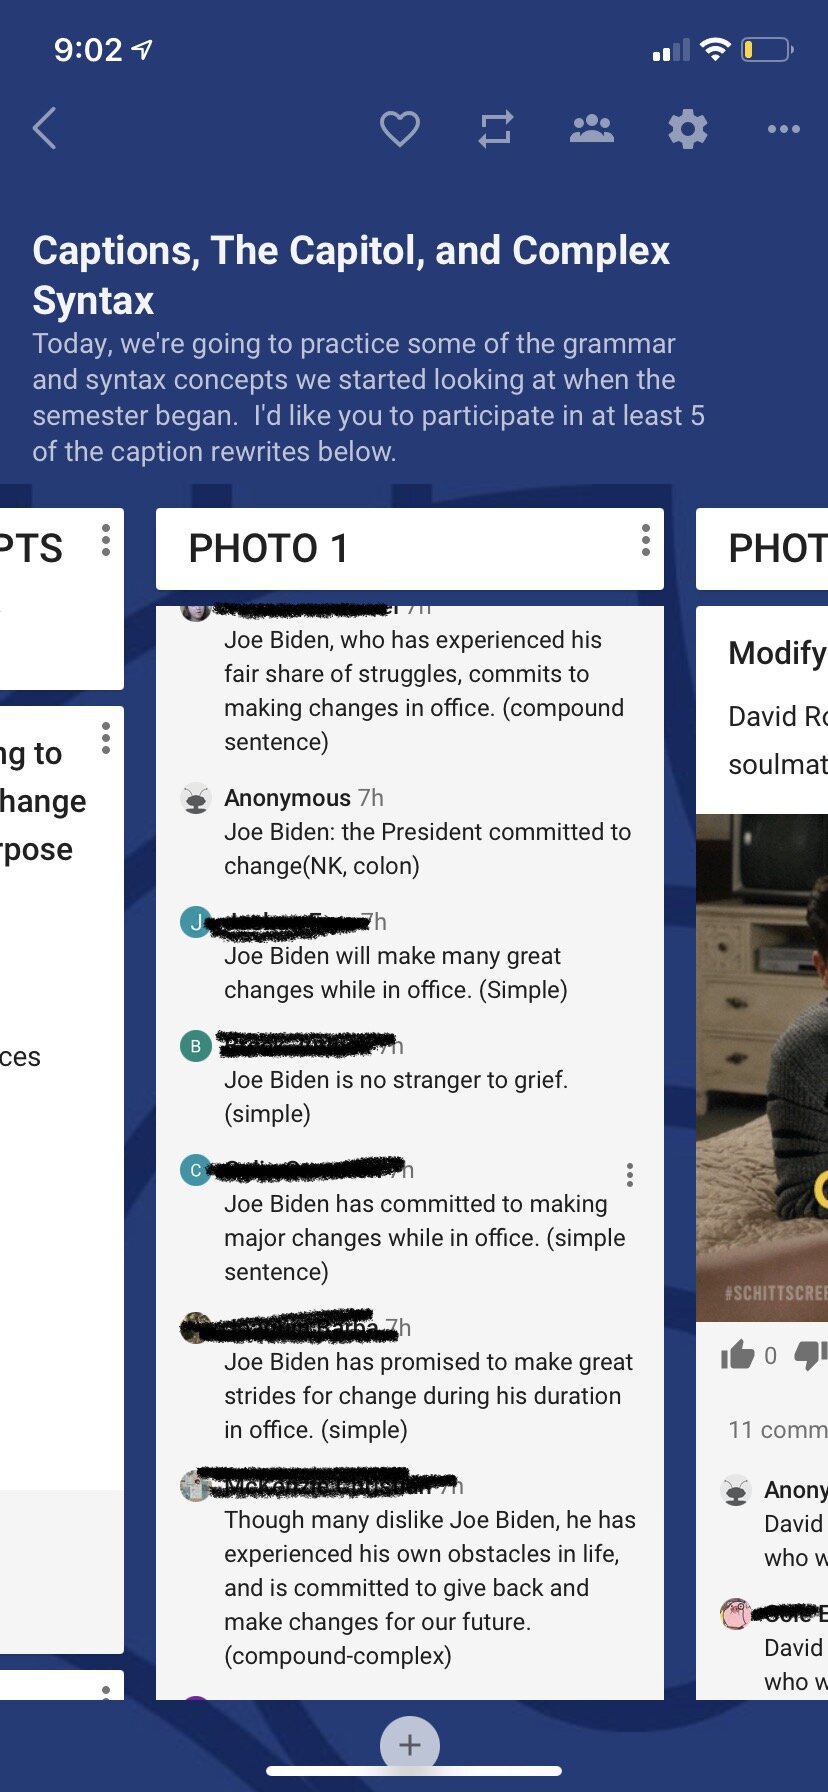
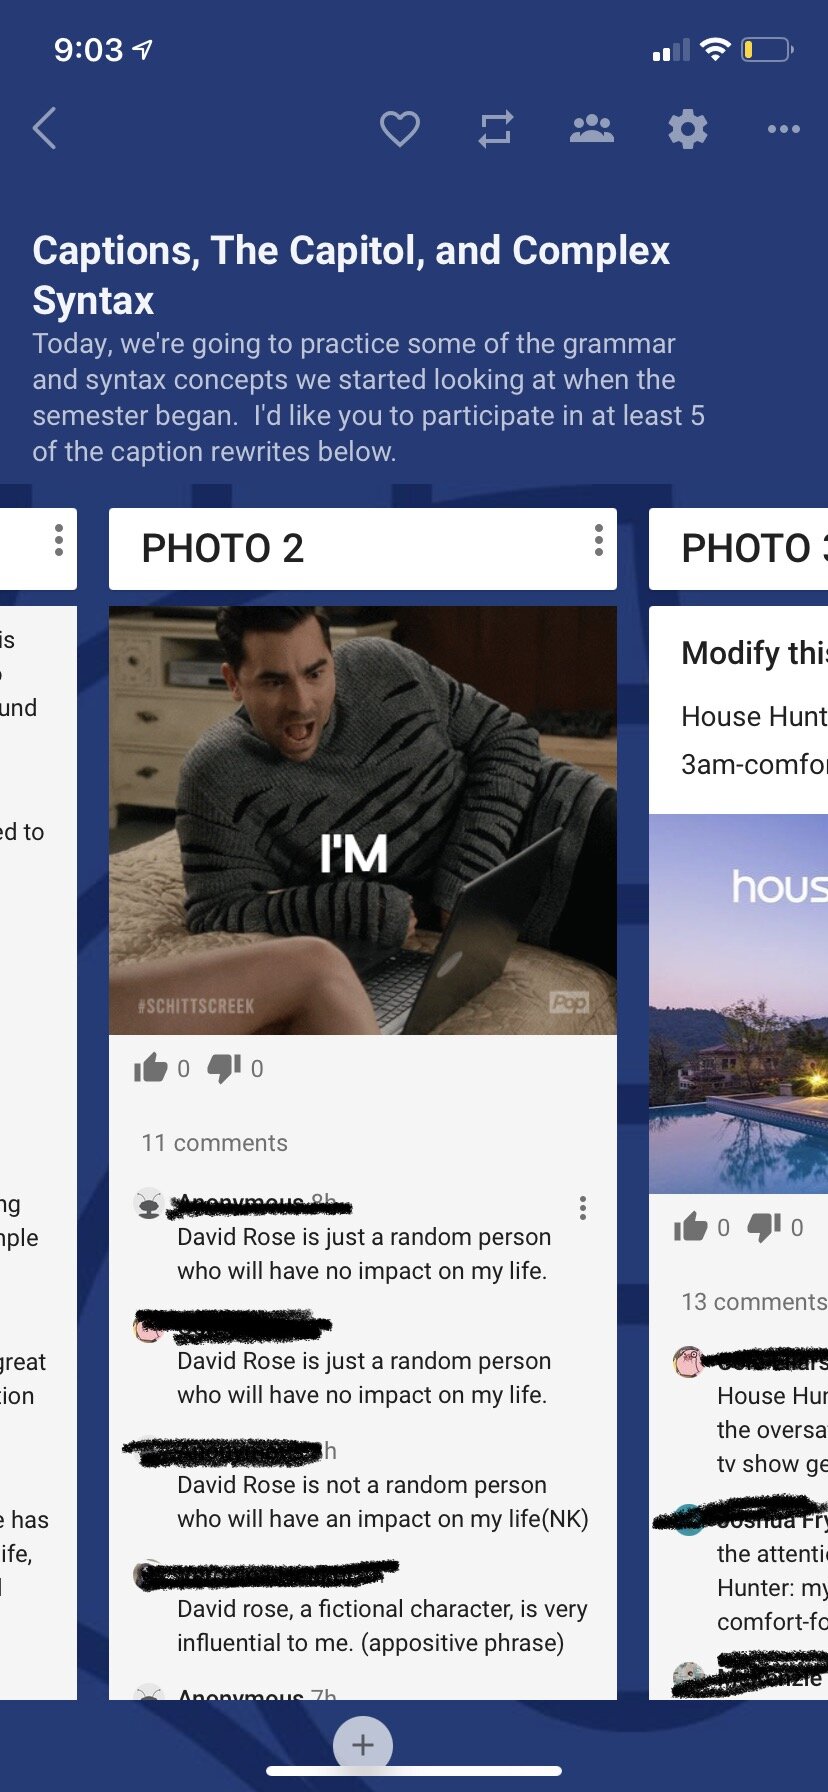
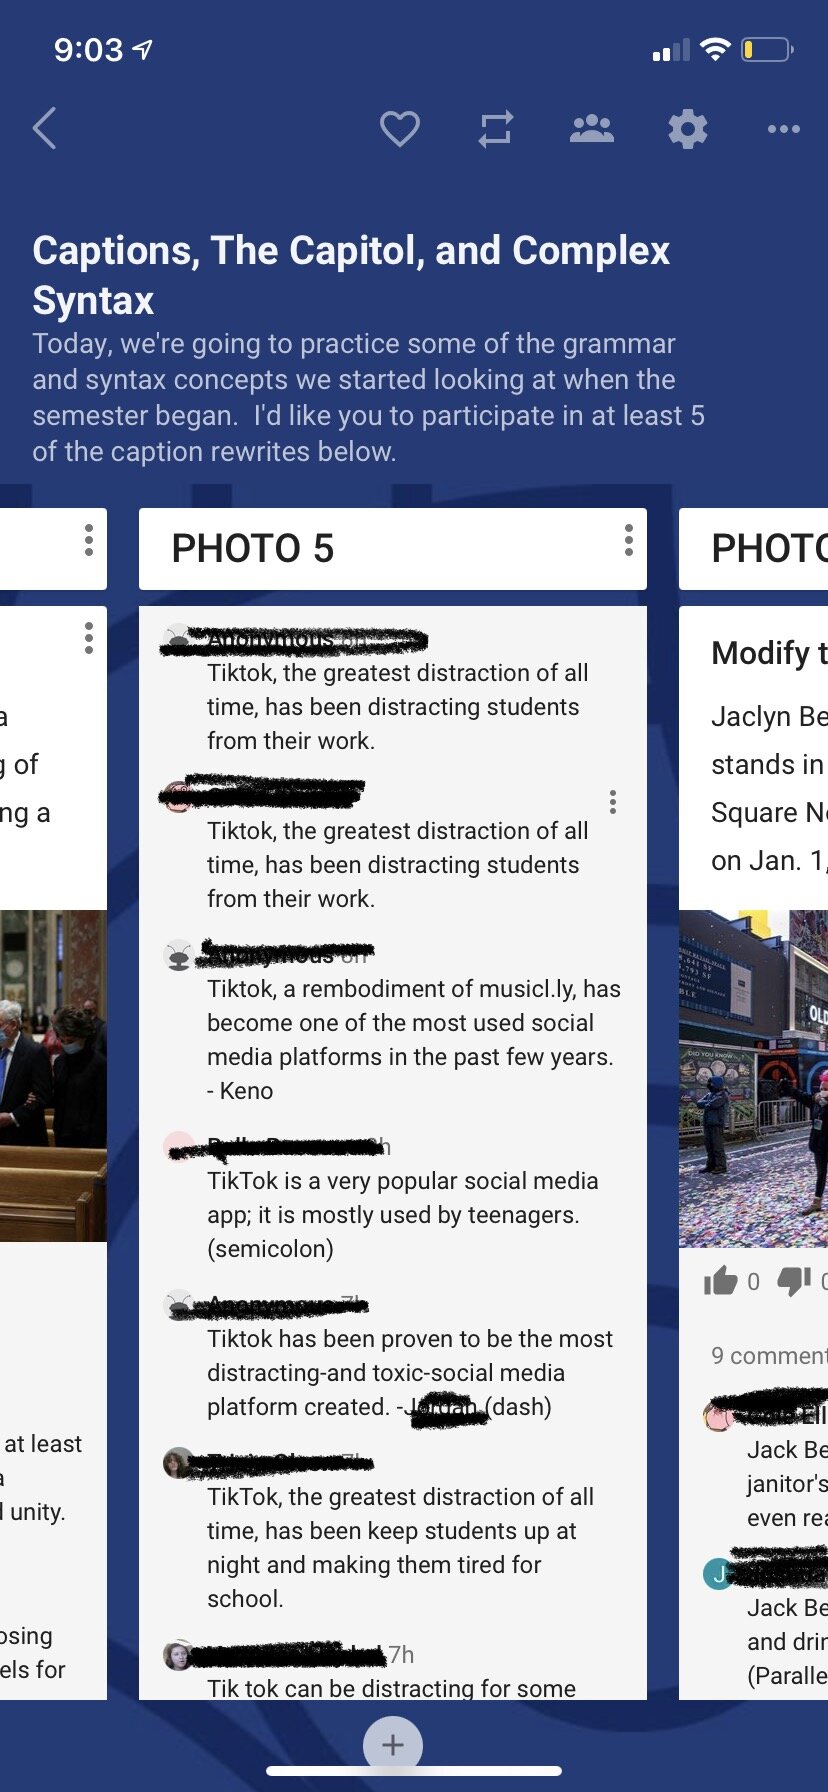
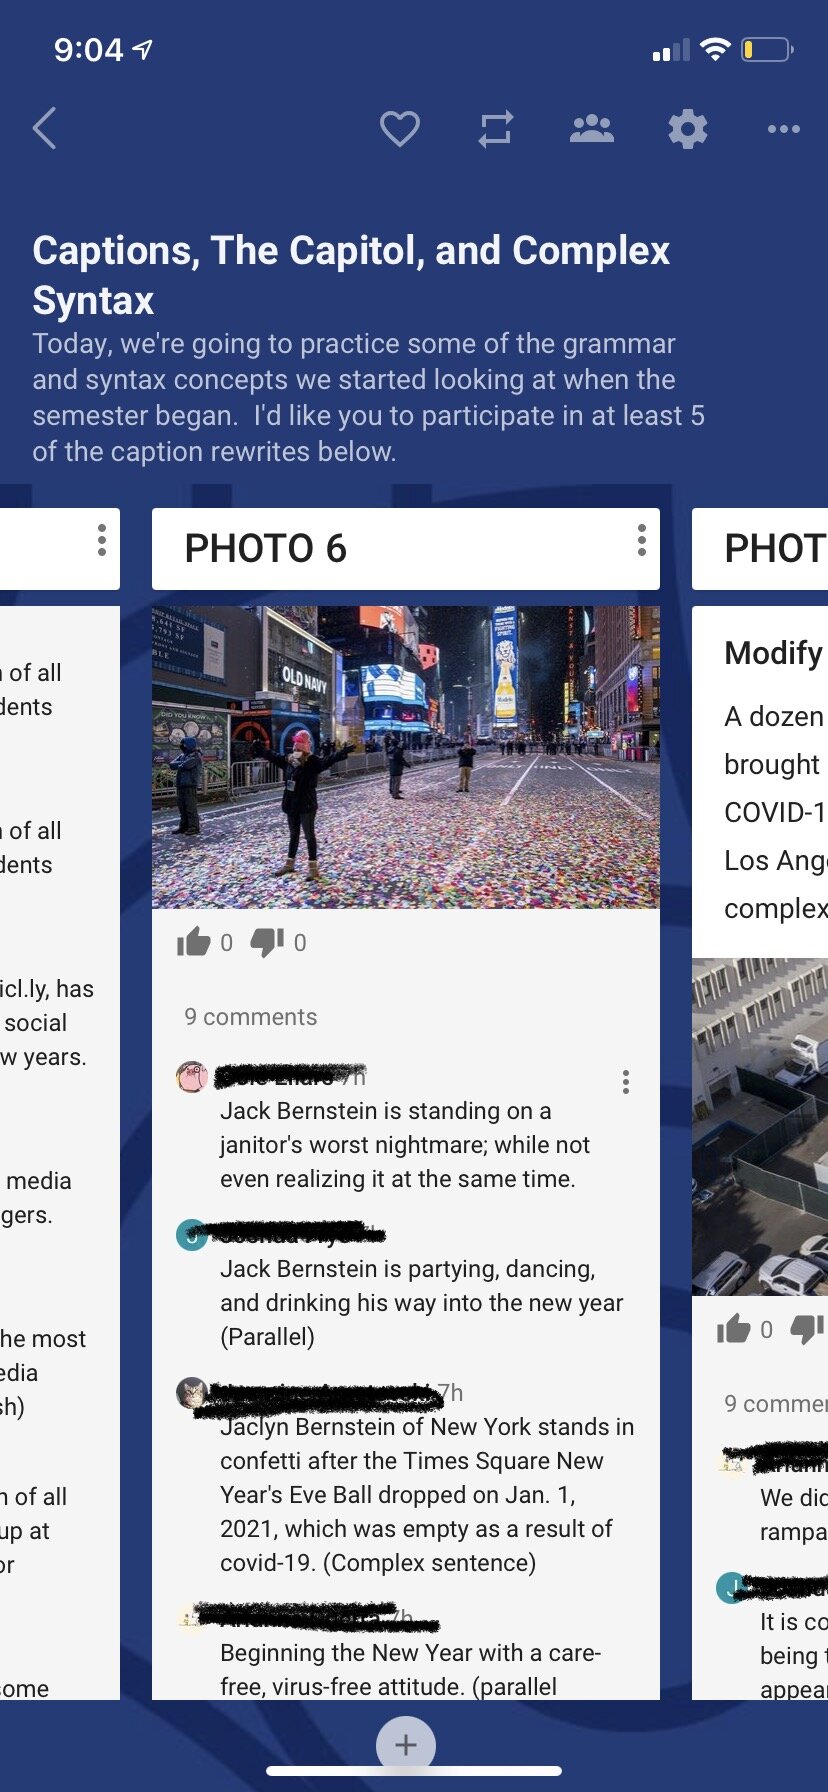
On the remaining shelves, provide an image and a neutral-ish caption. For this particular sample, you’ll see a variety of images that are connected to what our class discussions have been about recently. The variety is key: choice in this lesson is critical so that students can find a comfort zone where they can experiment without feeling overly restricted.
Ask students to login to Padlet. This makes it easier to see who comments as it will automatically display their names.
Students now can see all of the images and captions and choose five (that’s what I asked for!) of them to modify using a grammar construct that we practiced earlier in the week.
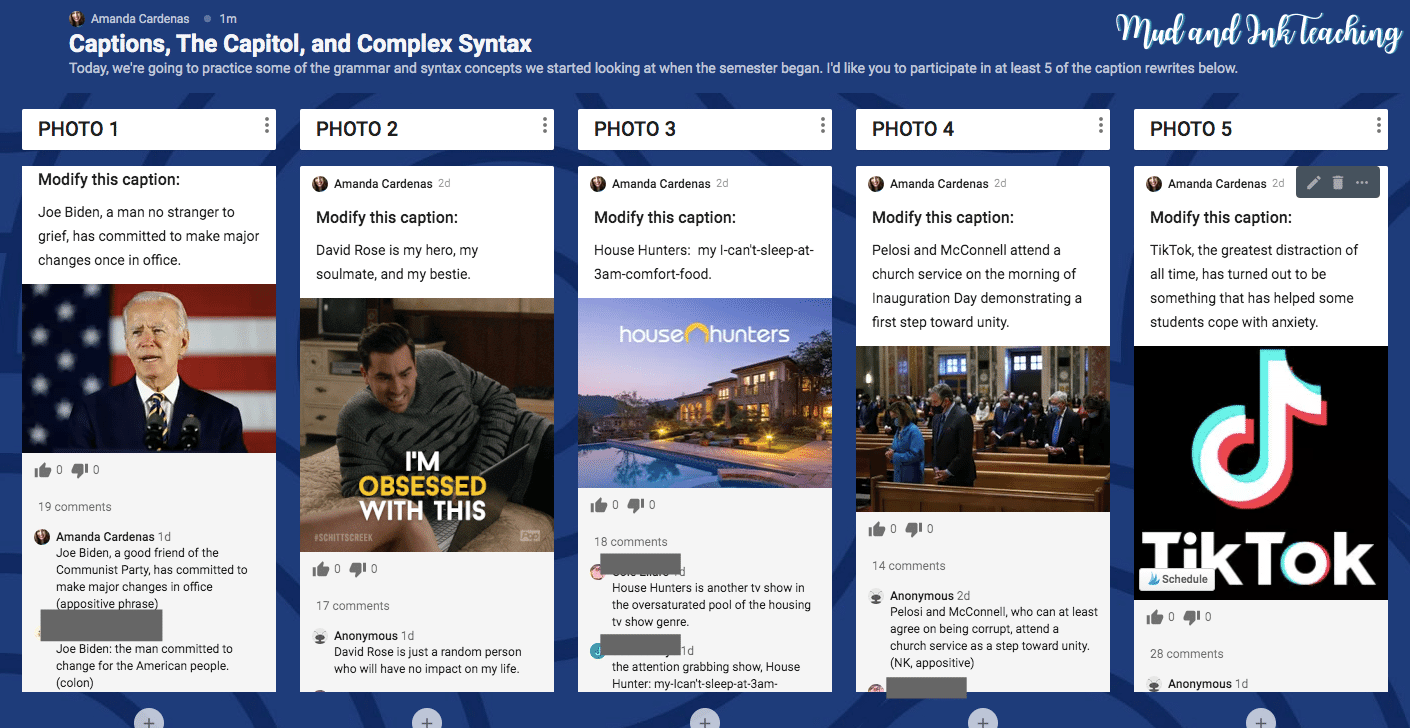
That’s the gist! Afterwards, I had students read through the Padlet and upvote their favorite sentences, they pulled examples from the Padlet to analyze in small group breakout rooms, and, ultimately, complete a self-evaluation on their growth and progress in their ability to identify and analyze these concepts.
I’m curious to know: how have you been successful with grammar instruction in your classrooms? How else have you used Padlet’s shelf feature?
Let’s go shopping!

Google Jamboard is My Jam: 3 Ways to Increase Student Engagement
Engage students in a whole new way by tapping into the power of Google Jamboard. From fishbowl discussions to daily check ins and attendance questions, Jamboard is versatile and powerful in all classrooms.
Google Jamboard is a very simple concept: it’s a whiteboard that all students can access simultaneously. Jamboards can be opened directly through a Google Meet giving all attendees immediate access. You can use Jamboards on the spot or you can prep them as templates before class starts. I’d like to share my three favorite uses for Jamboard that I’ve experienced so far with my high school students. Don’t forget to check out my bundle of templates that I have ready to go and use instantly!
Fishbowl Discussions
By creating a graphic template that I insert as a background on the Jamboard, I’ve been able to re-create a Fishbowl Discussion in both the hybrid and virtual classroom! Similar to Fishbowl in-person, the template has squares (desks) depicted in the center. Then, each student has a post-it with his or her name. I begin the discussion by placing post-its on the inner circle of squares and posing our first question. Then, once students have begun responding, they simply slide their post-it to the outside of the page, leaving their square open for another student to jump in. It’s a little clunky to start and I found it helpful to use a chat feature for kids to have a “back chat” to get in line for spots in the middle, but after a while, they get the hang of it!

Question/Quote of the Day
As students are filtering into class each period, I’ve enjoyed having an attendance question, daily check-in, or some other kind of way for students to get going first thing. As I’ve started to add Jamboard into the rotation of tools I regularly use, I’ve found that using it for a Question or Quote of the Day has been highly engaging and loved by students. These templates can also be used for students as places to put notes if they’re working in breakout rooms: Question 1 is for Breakout room 1, Question 2 is for Breakout room 2, etc. Students take notes and then we can all see what the discussion was in each of the rooms and students can report back when we come back full class. Either way, these templates are ready to go and easy to use!
Debate & Argument
I still love doing 4-corners in my classroom, but with social distancing and the shortened time frame we have to get everything done, these templates make “movement” types of debate activities easier AND they’re saved in cyberspace should we ever want to return to these discussions! Setting up a debate is as simple as placing an image, a question, a meme, or other contentious statement in the center of the board. Draw a line down the middle. Ask students to place their post-it on one side or the other and be prepared to be called on to explain why they’ve taken a particular side. Move through these as quickly or slowly as you want!

Classroom Management Issues
If the open access settings or collaborative features are becoming a distraction and students are inappropriately utilizing the platform, you Jamboard might not be your jam, however, that doesn’t mean you have to abandon these ideas. All of these ideas work almost identically in Google Slides with just a bit of tweaking. In slides, you can track revision history and assign to small groups of students at a time, rather than the entire class. You can create text boxes or shapes instead of sticky-notes. It might be a bit more leg work, but if you really like an idea here and are not finding success with your class behaviors in Jamboard, give Slides a try before walking away!
TELL ME: How do you Jamboard? What are your favorite activities?
Let’s go shopping!

Behind the Scenes: My Classroom Google Site Tour
Take a behind the scenes look at my Google Sites setup for the school year. I’ll share with you how I use it differently than Google Classroom and give you an exclusive tour!
Deciding how to organize your digital classroom can be a daunting task. After lots of experimentation, I’m ready to share with you the system that I’ve developed and keep refining and workshopping as the school year evolves and our needs keep changing.
This year, I decided to go with Google Sites as the main hub for my classroom instruction and information. Why? Well, there are a lot of reasons that I’ll outline here, but if you just want to jump in and take a look around behind the scenes, I’ve created a COPY of my classroom site for you to check out. I’ve removed a lot of things — so many of my activities use student names or have other information that I’d rather not publicly share, but I think what you see here should help you get started thinking of your own ideas in using Sites yourself this school year.

GOOGLE SITES VS GOOGLE CLASSROOM
These two services work simultaneously in my classroom, but as you’ll see in my Site, these two perform very different operations and services to my students. It’s GOOGLE SITES where I provide my daily instruction and agenda. The layout is visually pleasing and user friendly. I can include as much as I want without it clogging up a feed or getting lost in another row of the Classroom Classwork tab. Where GOOGLE CLASSROOM comes into play is serving the function of a “turn in” bin. All assignments are listed, dated, and graded on Classroom. That’s the business side of everything. Links move kids back and forth between these two places all the time, but kids have learned that if they need to participate in a class activity to go to SITES and to turn an assignment in, they go to CLASSROOM.

SITES NAVIGATION ORGANIZATION
In my Google Site, I organize my pages by course and by week. I designed one layout for the week that I like and then each consecutive week, I simply click the three dots next to the page and >> DUPLICATE PAGE. Bam! Easy! I go through to change dates and update the week’s calendar and I’m done.
Now that we’re seriously moving into the semester and several weeks in, I love going back to look at all the work that we’ve done and sharing this with parents and case managers who are wondering what their kids can do to catch up. I’ve got it covered here — and then some!
EMBEDDABLE ELEMENTS
The other thing I love about sites is my ability to EMBED so much of their work directly onto the site. Instead of kids having to navigate all over the internet, I can embed things like:
FlipGrid
Google Forms
Google Slides
Google Docs
YouTube Videos
NearPod lessons
Once embedded into my Google Site, kids can work on them directly on the site without having to navigate away. This has prevented so many headaches.
What do YOU love about Google Sites? What tips and tricks do you still want to know? Leave me a note in the comments and I’ll be sure to add more as needed!

A New Twist on Article Of the Week: Coffee & DONUTs
he Donut describes themselves as “a community of people changing the world through inclusiveness and positivity. We provide fact-based summaries of the day’s biggest stories and shed light on big-media spin, all while promoting good vibes and civic action”. Okay! So, yes. Yes to all of this. Here’s how I’ll use it in my classroom.
Disclaimer: I am an affiliate with The Donut and will be compensated if you use my referral links below. All ideas, opinions, and suggestions are my own!
In my brick and mortar classroom, I have to admit, I’ve always been pretty bad at following through on “weekly” assignments. I have started so many activities that were intended to be weekly rituals and, although SO well intentioned, I either can’t keep up with the idea or just run out of inspiration and ideas by the time we reach October and November.
I had especially high hopes for implementing Kelly Gallagher’s "Article of the Week” activity. I had a few ups and downs and, ultimately, just couldn’t keep things going. I often struggled with a lot of self doubt when selecting articles, whether they were ones from Gallagher’s own website or ones I was trying to implement myself. There were formatting issues, Lexile issues, and most concerning: bias issues. I was always worried that with just one article I was setting myself up to be one-sided and not giving students the chance to see multiple sides to a story.
ENTER: THE DONUT.
Not too long ago, I was contacted by a staff member at The Donut. The Donut describes themselves as “a community of people changing the world through inclusiveness and positivity. We provide fact-based summaries of the day’s biggest stories and shed light on big-media spin, all while promoting good vibes and civic action”. Okay! So, yes. Yes to all of this.
I subscribed to their free daily newsletter which serves as a daily news update, and found that The Donut delivers - for each issue of the day, 2-4 sources are provided AND labeled on the media-bias spectrum. I immediately saw how valuable this could be with my students and I’d like to share those with you:
Everything is curated FOR you. No more looking for articles online. The newsletter is published daily and archives are available from previous dates. Less work for me? Check.
The stories and layout are both accessible for students and colorfully designed. The design of the newsletter might sound like a silly reason to get on board with the program, but there’s something magical about packaging that looks attractive and fun, but not childish.
The variety of perspectives is wide and deeply informative. I can now offer my students CHOICE when looking at an issue and ask them to determine their own stance on a spectrum. And remember, all of the leg-work is done for you.
Um, it’s free. Yes, there are some sponsored products/ads in the newsletter, but so far that hasn’t been a deterrent for me.
Here is a screenshot of the opening section of the newsletter: a deep dive into an important conversation

How I plan to use The Donut

Right now, I feel like The Donut is a springboard for discussion. In my virtual learning classroom (and eventually hybrid and in-person classroom) I’d like to use The Donut as a weekly reading and reflection activity. I’ve created a Google Form that I can reuse each week and I plan to have the students read a minimum of two articles on the focal issue of the newsletter. Then, I want them to identify the claim of the source and at least two pieces of textual evidence that support the claim. Finally, students will reflect and share their own impressions and ideas on the issue in writing, followed by either a live Google Meet discussion or a Flipgrid based discussion with the rest of the class. If you’d like a copy of that Google Form, help yourself and download below!
For more ideas and live tutorials, be sure to check out my Instagram page and highlights!
If you’d like to subscribe to The Donut, I’d love it if you used my referral link!

How to Make a Digital Poetry Choice Board
In five easy steps, let me walk you through and demonstrate how easy it is to create a digital poetry choice board. I even have a free template for you to download and get started!
Don’t let the word “digital” or the trendy assignment phrase “choice board” intimidate you. This blog post will lay out the process for you simply and helpfully. There are a few things you need to know in order to get started.
STEP ONE: UNDERSTAND WHAT A CHOICE BOARD IS
A choice board is simply an assignment handout structured in the form of a grid. On each of the boxes is a “choice” that students can make. Some choice boards are 3X3 and set up like a tic-tac-toe board, others are bigger than that with titled columns. You can set up your board however you like depending on how you plan to use it. To make these digital, simply use a Google Doc and a table or a Google Slide and a table or shapes to create your board.
STEP TWO: DEFINE YOUR PURPOSE
Will your choice board function as an assessment? Is your choice board something that students are doing over the course of an entire unit for homework practice? Before designing your board, it’s critical to define the type of assignment it will be as well as the skills that you are trying to teach, practice, or assess.
STEP THREE: SETTING UP THE BOARD
Randomized: If this board is for enrichment or simply as something to refer to for practice over the course of a unit or a few weeks, your board can have tasks randomly arranged.
Organized by Columns: On this choice board, you can easily create controlled choices for students - this is my personal favorite! Title each column of your choice board with the skill focus that you want to make sure students tap into during their choice board experience. For example, if you want students writing poetry with their board, you might have your columns titled:
Write with Rhyme
Write a Form Poem
Write Free Verse
Write a Spoken Word Poem
Under each of these headers, you can list links to websites explaining the poem, YouTube videos of examples, or other documents that you have personally created.
Tic Tac Toe Rules: This option uses a 3 x 3 grid. You can also use columns if you like. The goal of this board is that students must choose any three boxes to complete, but they must create tic-tac-toe with their choices (across, down, or diagonal).
STEP FOUR: GOING DIGITAL:
Check out my YouTube for a how-to tutorial that walks you through the digitization of this activity. Remember, don’t let the word “digital” scare you! This is on the low-tech end of the spectrum. Click below to watch and download my free template to get started!
WATCH MY TUTORIAL BELOW!

STEP FIVE: ASSIGNING & DIRECTIONS
Once your choice board is built, the last thing you’ll need to do is write clear directions about how students will complete the board. Do you want them to complete one square per week? Complete ten squares by a certain deadline? And how will they turn their work in? For turn in, I personally like for students to attach the individual pieces that they’ve written in separate Google Docs to the assignment that I create in Google Classroom. You could also post the choice board every week and collect something from students each week. Keep in mind the purpose that you identified in step two, and you’ll be good to go!
Looking for more poetry support in your classroom?
I have a book for that! Twice per year, I publish an edition of Teaching Poetry: Pedagogy and Best Practices for Secondary ELA. This book will help you wrap your mind around incorporating poetry meaningfully and regularly into your secondary ELA classroom. Grab your copy today!

READY TO GIVE SLAM POETRY A TRY?
Keep up with the latest on Instagram


Apps & Tech Worth Trying during Remote Learning
I’d like to present SIX tech tools for teachers worth adding to your list of considerations. If you are feeling comfortable where you are and ready to implement something new, or maybe you’re happy where you are, but you need just one more solution to an issue that you’re having, I have been using these six tools faithfully and I want to recommend them to you with confidence.
Remote Learning, as some of us are now calling it, has thrown many teachers for a loop. Truthfully, I’m feeling a lot like Mr. Cook (on right) - working my rear off as hard as I can while so many kids are enjoying a spring break/summer break siesta. At first, it was a barrage of everything available for free and immediate pressure to quickly flip our classrooms. Then, we leveled out and started to really think about what we needed most: a predictable, organized structure that mirrors much of what we’ve been doing in our classrooms already. While the content and demands might be shifting, it’s come to light clearly that the most important thing we can do for students is recreate familiar experiences with them through systems and the types of technology that we were using before COVID-19 shut down our schools.
With that said, I’d like to present SIX tech tools for teachers worth adding to your list of considerations. If you are feeling comfortable where you are and ready to implement something new, or maybe you’re happy where you are, but you need just one more solution to an issue that you’re having, I have been using these six tools faithfully and I want to recommend them to you with confidence. Let me demonstrate the ways in which each of these tools effectively helps me deliver content, create a comfortable, organized learning environment, and provide flexible opportunities for learning.
![Pinterest Pins for TpT [Autosaved].png](https://images.squarespace-cdn.com/content/v1/56f2c68022482eb8ffb71e44/1586527143730-CJFWET9BEHEWUN459QS4/Pinterest+Pins+for+TpT+%5BAutosaved%5D.png)
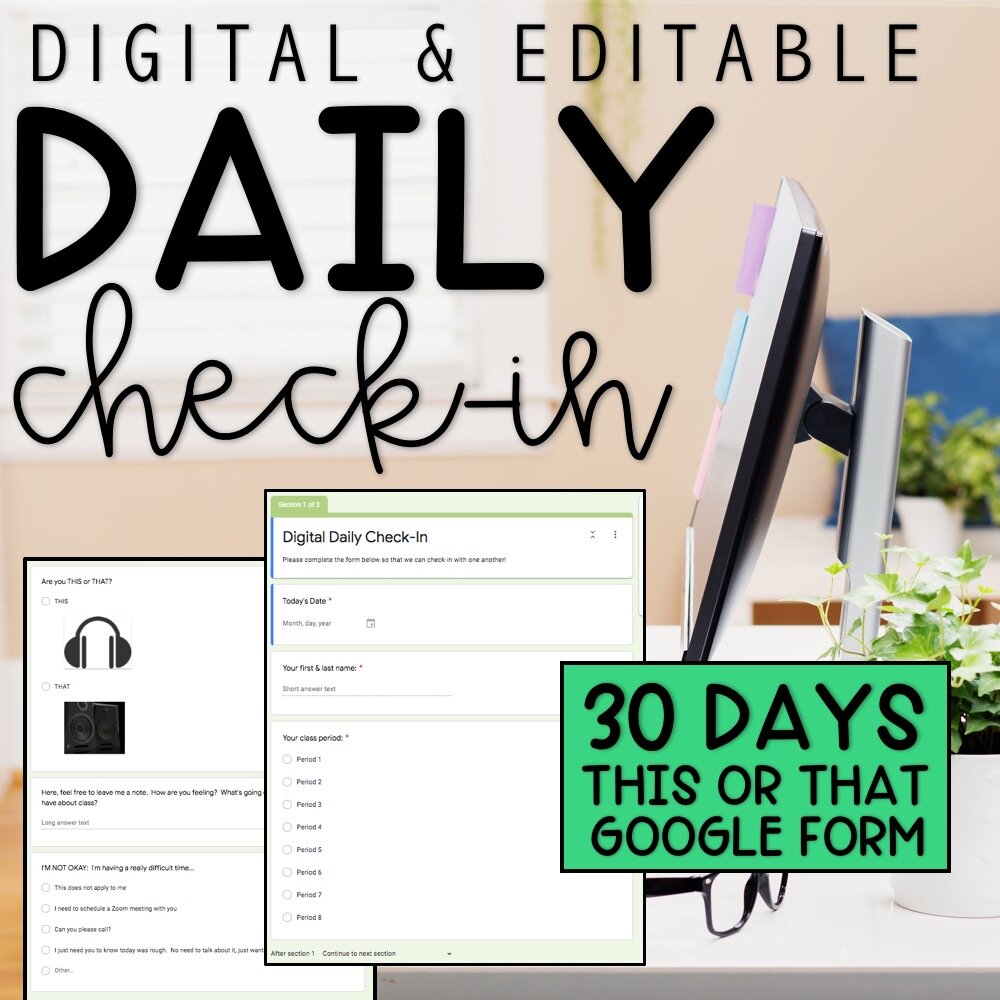
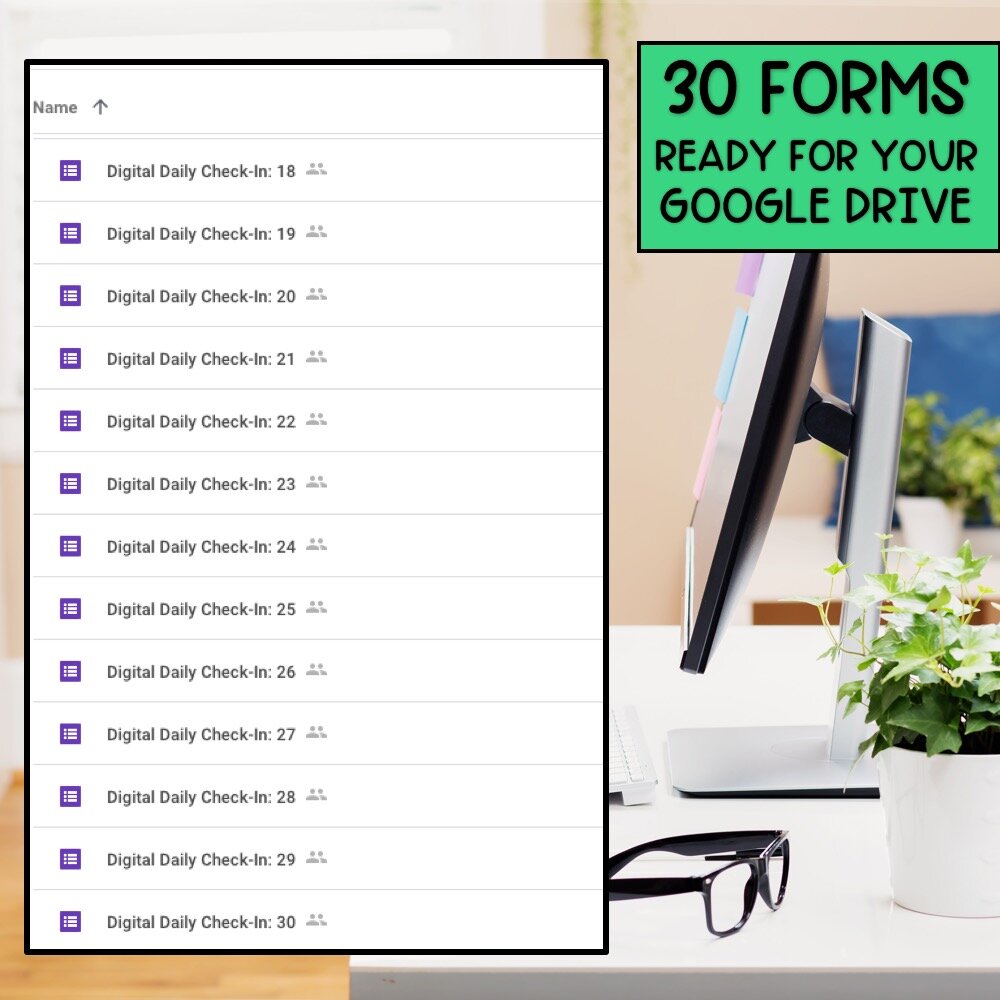
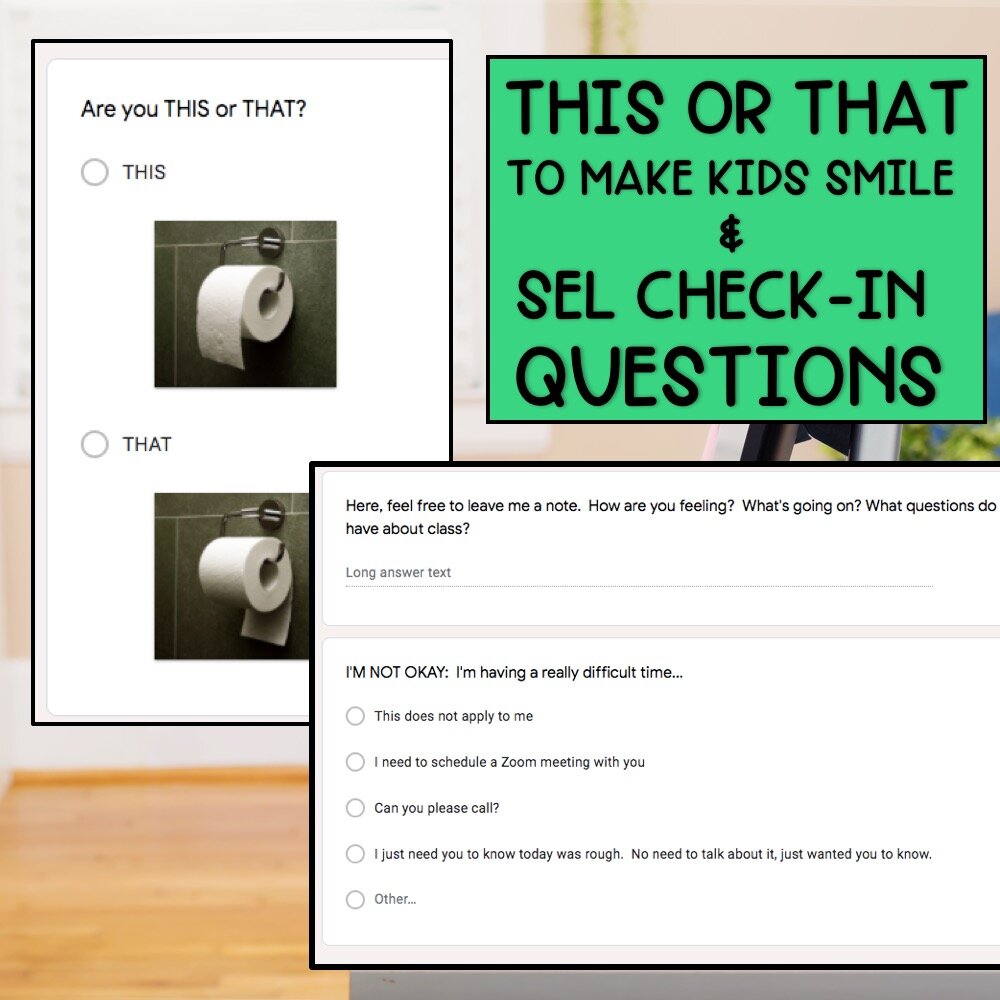
1. Google Forms: DAILY CHECK-IN
Using Google Forms, I have been able to check-in with my students daily, quickly, and with a bit of fun. Each day of online school (and most likely in live school once we return), my students check in with their name, class period, a response to a “this or that” question (ie: are you speakers or headphones?), and an open ended “how are things going?”. I have records of their responses for every single day and can use it to keep an eye on their well-being and take note of who is not engaging. Here’s a look at the one I’m using.
2. Kami: GROUP DOCUMENT ANNOTATION & ANALYSIS PRACTICE
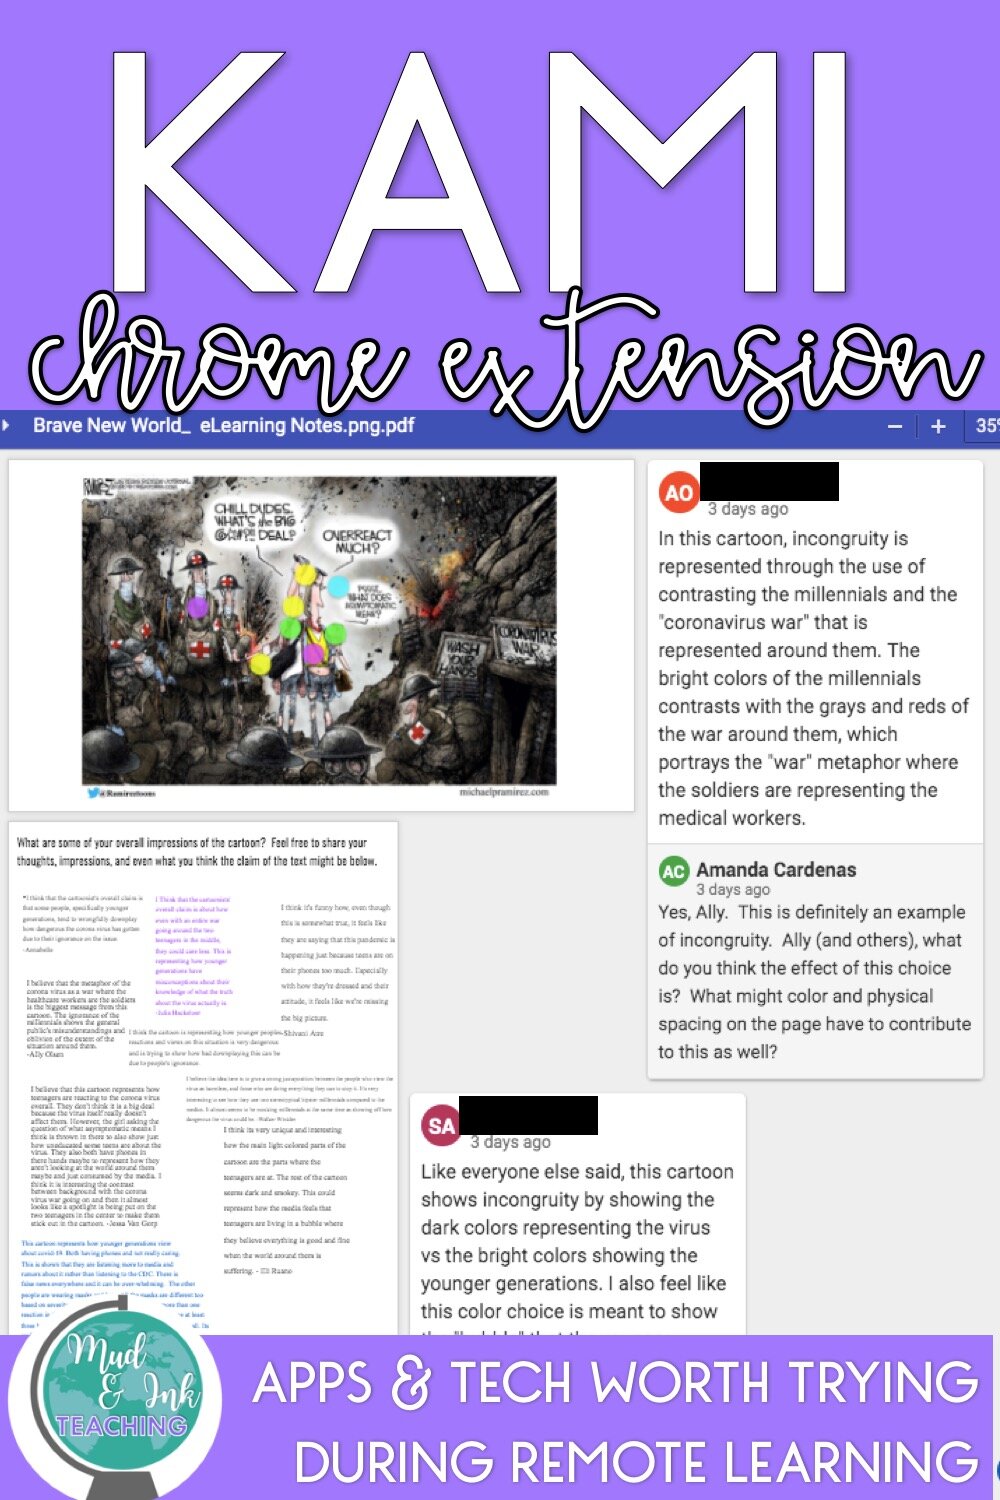
Kami is one of those things that I’m not sure about implementing for the first time without being able to help students in person, but since my students had practice with it before schools shut down, I’ve been using it almost twice a week! Kami is an easy to use Chrome extension that allows you to open a PDF and annotate in a huge variety of ways. I demonstrate my use of Kami in my Instagram story highlights and have been using it with my AP Lang students to do visual rhetorical analysis. Students can annotate/comment on one collective PDF so it’s almost like we’re having a discussion in-person! Kami also integrates with Google Classroom (as if there' weren’t already enough reasons to be in love), so you can create assignments directly through that function. Kami customer service is great and they also have a troubleshooting Facebook group that can help with questions that come up.
Imagine the possibilities — any document you have can be uploaded and then annotated by students. I’ve been loving doing satirical political cartoon analysis, but easily you could do close reading of a passage, teach a poem, and so much more!
3. Google Classroom (and Rubrics!): DAILY DISSEMINATION OF LESSONS & WRITING

I don’t know where I would be with out Google Classroom, and I felt like that long before we had to teach from home. It is the only technology that I use daily and it is what keeps my digital classroom life SANE. Besides the obvious features that make me love Google Classroom, I’ve lately begun to be more intentional about the way I organize information in my Classwork section. The morning routine I’ve created consists of a daily post under a Topic called “eLearning”. Each day, I post a Material titled with the day’s date and include our calendar (it’s the same doc, I just reattach it every day), our daily video, and our daily check-in on Google Forms.
If you have any writing assignments coming up, assigning them through Google Classroom is the way to go — especially if you can take advantage of their new Rubrics feature! When we wrote our choose your own ending narrative project with freshmen, I was able to give the assignment, collect it, AND grade it with Google Classroom. And their writing was so cool!
4. Loom: DAILY RECORDED VIDEO
As a Screencastify user for years, I stumbled upon Loom from one of our district tech coaches. I can’t tell you exactly why I adopted Loom so quickly and completely abandoned Screencastify, but I think it has something to do with the adorable little circle for my face and the ease of storing and organizing folders of my videos for students. In my new morning routine, I sit down at my computer, pull up the day’s agenda, and hit record. It’s that simple. I record myself talking through the day’s work, give a glance over the big picture, and then either wrap it up or launch into a bit of direct instruction. What’s nice is that students can watch whenever they want and the video will always be there. Here’s an example of a video recorded for my AP Lang students.
5. Actively Learn: READING ASSIGNMENTS & DATA COLLECTION
This is not a sponsored post, but I’m not going to pretend like I haven’t been trying to get a job working for Actively Learn because I just love the platform so much! They’re a little tech company out in Seattle and you bet the minute they post a remote job, I’m all over it! Anyway, back to the tech. Actively Learn is a platform that allows you to assign readings to students electronically. You can assign articles from their library, uploaded PDFs of your own, websites you want students to look at, novels and plays from their library, and even video! Simply login, create your classroom (yes, they sync with Google Classroom!), and start assigning. With the PRO version (free right now during COVID 19 school closures), you’re able to see HOW LONG each student spent on a text. Yes. So when you assign a worksheet of some sort that a student turns in, but somehow they only read the article for ONE MINUTE, you can check in with your student and gently (or not so gently!) remind them that actually reading the article is helpful in writing a summary. It’s Big Brother at it’s educational finest! All of the texts you assign can be PRE-ANNOTATED and PRE-LOADED WITH QUESTIONS. It’s seriously unreal what Actively Learn can do for your classroom.
My students read A Raisin in the Sun and The Great Gatsby using Actively Learn during first semester, and they’ve come to love reading online. Academically, there have been so many benefits, especially for my struggling readers. Now that they can immediatley look up or hear a word they don’t know, mark a section for extra help (that notifies me immediatley), and keep categorized annotations for their final project or paper, it’s hard to imagine what an effort this whole process used to be before AL.
6. Parlay Ideas: ONLINE DISCUSSION FORUM
![Pinterest Pins for TpT [Autosaved].jpg](https://images.squarespace-cdn.com/content/v1/56f2c68022482eb8ffb71e44/1586527698238-7M4XYR8O4U72BLOKSXMP/Pinterest+Pins+for+TpT+%5BAutosaved%5D.jpg)
I first discovered Parlay in January of 2020 - and what lucky timing that was! My students had a few practice rounds using Parlay before remote learning officially began, but I’ve heard from many teachers that getting kids started with Parlay has been pretty simple to implement. Parlay has several features that I especially like (over Google Classroom or other online discussion platforms). First, Parlay allows students to create anonymous responses (you can see who’s responding, but the students see “secret identity names” for their classmates). This frees students up from the fear of being judged or students only engaging with their friends. Parlay offers fully customizable discussions as well as a Universe of pre-created discussion boards that teachers can simply copy and assign. We are currently using Parlay to discuss The Catcher in the Rye one week at a time as we read through the novel together.
Here’s a YouTube collaboration I did with Timm Freitas during the spring of 2021 demonstrating how I used Parlay with the play A Raisin in the Sun. Hope you find this helpful!
I hope these ideas have brought you some inspiration today. Remember, what’s most important is staying true to your classroom routines and creating a predictable, comfortable structure for students — no matter where we are teaching from!
Want to hear more thoughts on eLearning? Check out Season 1 Episode 4 of the Brave New Teaching Podcast!
LET’S GO SHOPPING
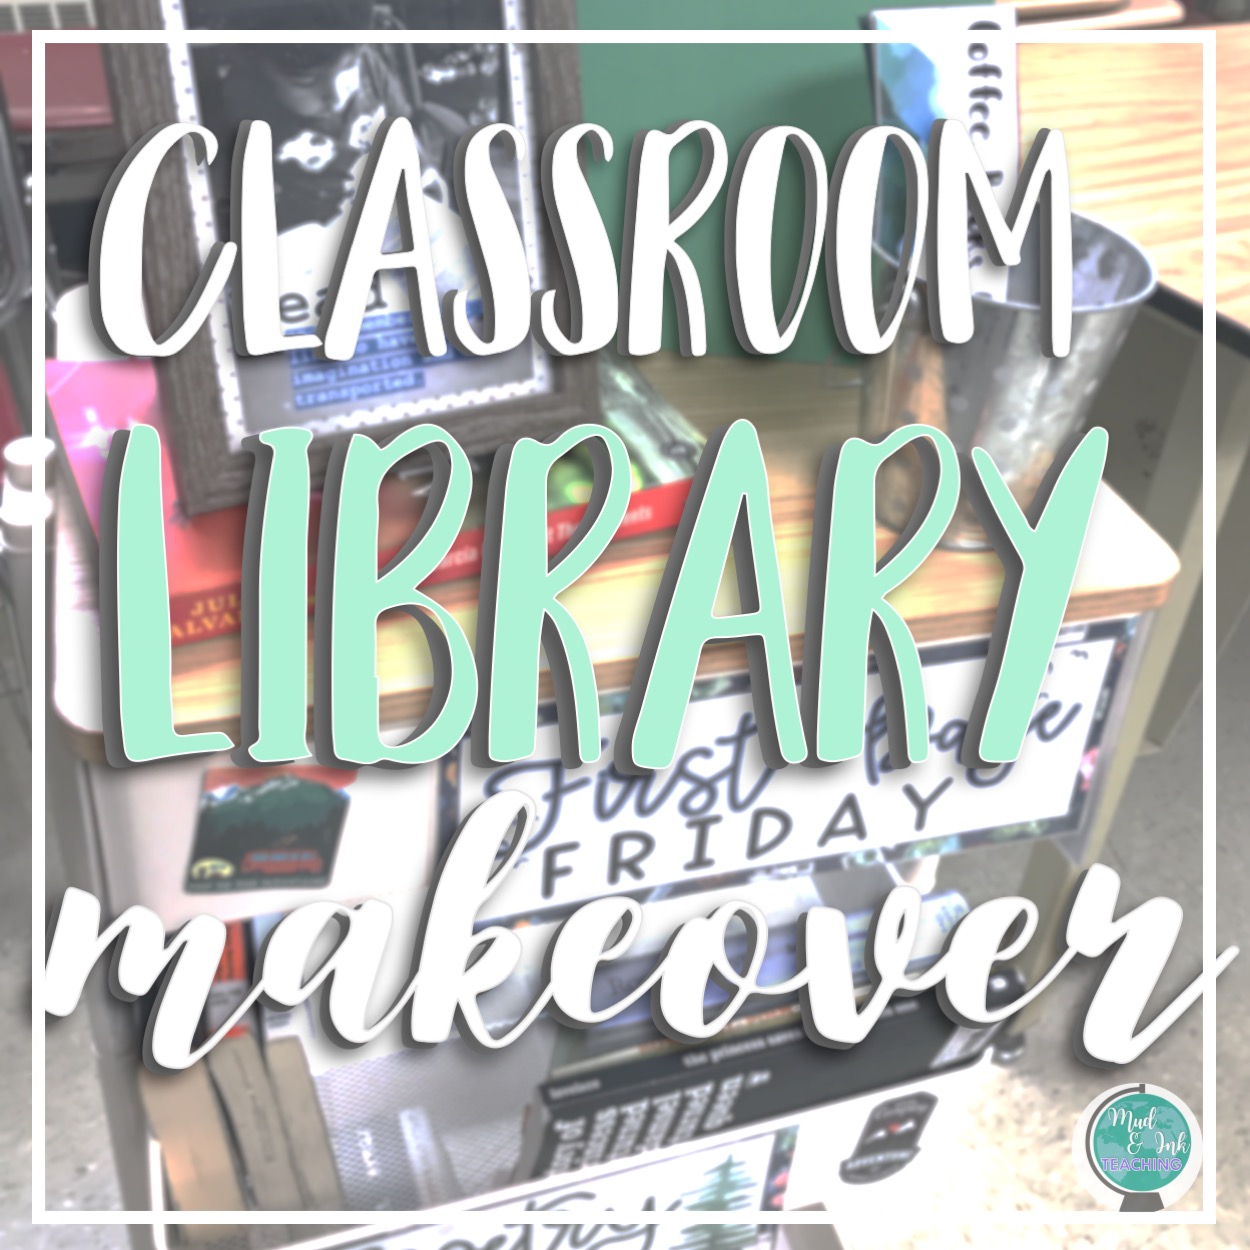
My Classroom Library Makeover: Downsizing & Prioritizing
In my own classroom, the library has never really functioned the way I wanted it to in my dream scenario. The time, effort, and focus that it takes to truly run the library the way it deserves to be run never really seemed to be worth it. I am already dedicating so much time to other things that the classroom library feels like a chore. That corner of the room is always a disaster. I never know what’s there -- it seems like all of the good, favorite books disappear and I’ll I’m left with are the random books from garage sales that I’ve never read (and no kids want to read either!). But when I was a young teacher, I believed that MORE BOOKS meant a BETTER LIBRARY. I have decided that this simply cannot be true.
The power of the classroom library cannot be ignored (I hear you, NCTE), but, I admit, for a long time I haven’t been a huge fan. Something about their popularity on social media always rubbed me the wrong way. So often I see new teachers posting, begging, and desperate for ideas for how to collect enough books for their libraries, and I’m frustrated that there’s just one more thing on our plate to take responsibility (not to mention, more money!). I see pictures of color coordinated, gorgeous spaces in August followed up by pictures of the same area covered in construction tape come November, and I can’t help but wonder, what’s the point?
I can remember this panic as a first year teacher: how on earth was I going to get enough books to fill my classroom library? Then, I scoured garage sales and Goodwill to find titles to fill the random shelves left in my classroom from the retired teacher who “lived” there before me. Fast forward about three years and those shelves and the dream classroom library scenario that I had imagined was a hot mess. I never actually found time to catalog anything. We had a “go grab something to read” policy that wasn’t fostering a love for books. Nothing was organized, and as I’m sure many veteran teachers can remember, there were quite a few other things on the table that took precedence over maintaining order over the classroom library. I tried putting students in charge, I tried tending to it one day a week, but without dedicating serious time and energy to the library, it just became more and more frustrating to maintain. What WAS working, however, were BOOK TALKS. Conversations about literature between me and my students, between the librarians who visited my classroom and the students, and other adults in the building sharing their love of reading: that was time well spent. Alphabetizing and reorganizing the mess in the back? Not so much.

The library clutter right around June 1st…
Then, after ten years in that school, it was time to move. And guess what? There was NO WAY I was moving all of those books. I kept the ones that were nearest and dearest to my heart and gifted the rest to students and the teachers who would inherit my classroom. It was time for a new approach.
I’d like to share with you today how I revamped my classroom library and gave it a total makeover. From the physical space to the philosophy and purpose behind the library itself, I’ve done a lot of renovation to create something that will be effective and practical in my busy teacher life.
CLARIFYING PURPOSE
For me, the purpose of a classroom library is not really about access to books. For my teaching career, I’ve worked in schools with incredible librarians and school libraries that are well stocked, diverse, and engaging with students. Because of this, I needed to define the exact purpose of my CLASSROOM library. Why have my library if the one down the hall is incredible? The answer to this question is the driving purpose behind each of the decisions I made in my library makeover: to share a passion and love of stories and to pique curiosity.
THE PHYSICAL LIBRARY

So, if my goal is to share my passion and love of stories and pique curiosity along the way, there’s no need for a massive library space. We don’t do silent sustained reading, my kids aren’t looking for cute reading furniture (that’s just not how my 50 minute high school periods go!), so I was focused on finding one furniture item that would allow me to house the books that would accomplish my purpose.
Enter: the three tiered rolling cart.
I love this cart for so many reasons. It was easy to put together, it’s portable (hello wheels!), and it’s naturally sectioned off for me to create categories.
I really like this one on Amazon, or even this one as a cheaper option (it would be so cute with some Dollar Tree bins!)
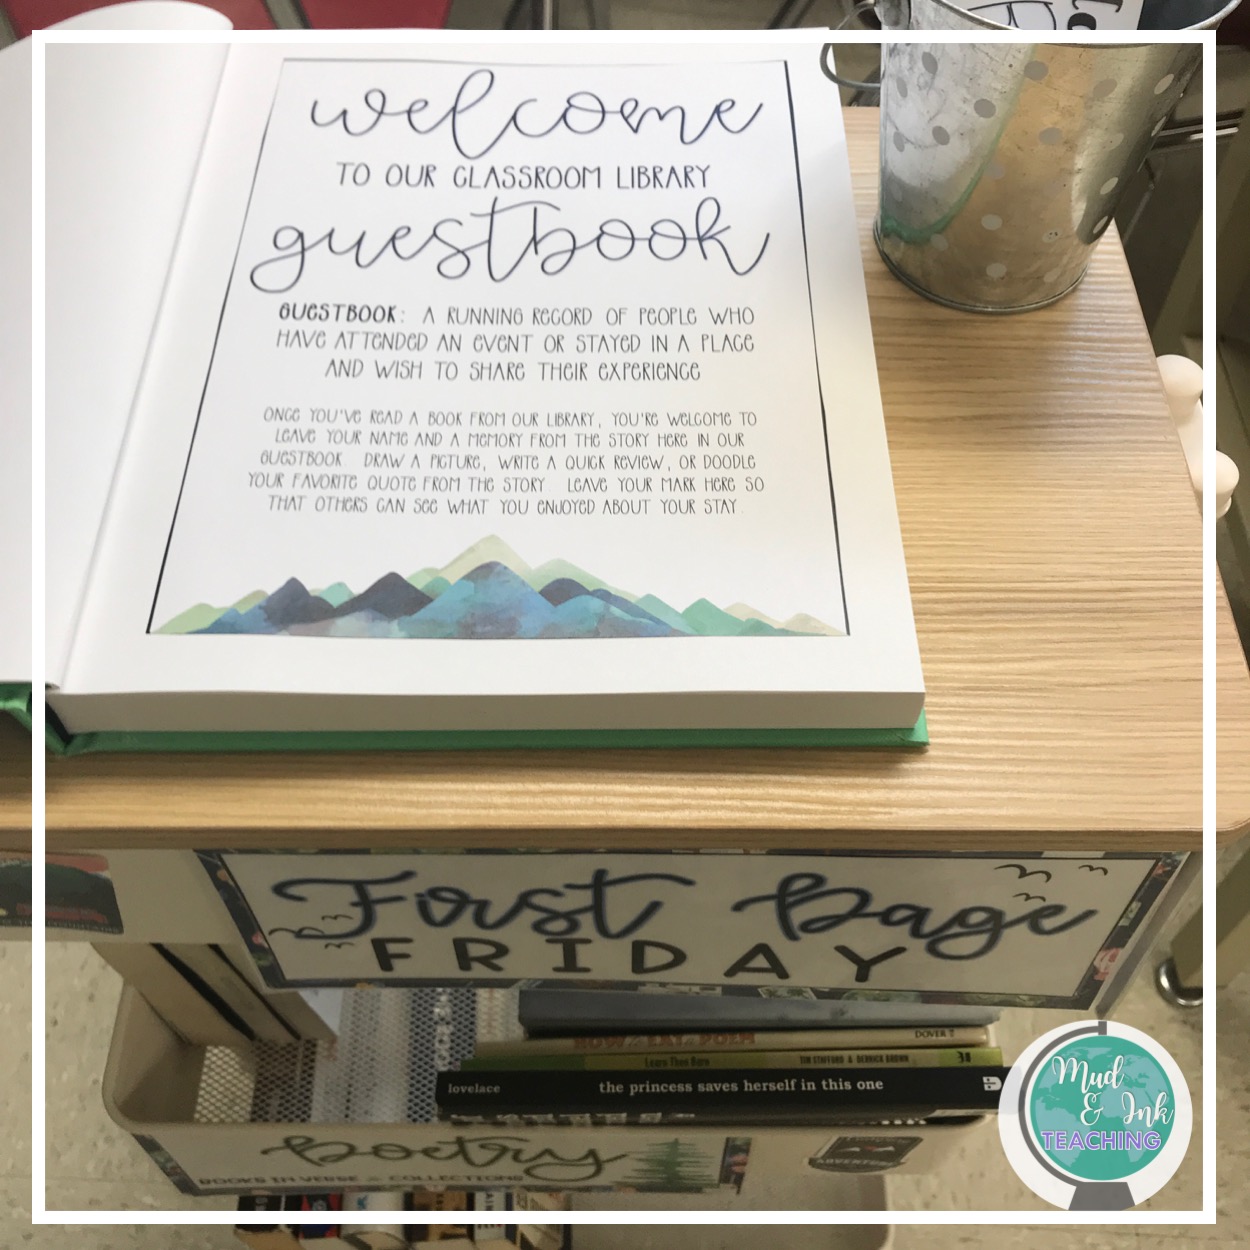
Since I wanted to pique curiosity, I will be implementing a shortened version of the First Chapter Friday practice with my own First PAGE Friday. I want the book that I read from to be easily visible for students, so I opted to pick up this cart topper so that the top of the cart was more like a shelf. Then, the next Friday, I can toss the book(s) from the previous week into the top bin and move on to the next book!
FIVE STAR BOOKS ONLY!
My dear friend Ashley Bible is the queen of all things tidy. She hosts a Clean Classroom Challenge through her Instagram account a few times a year, and when I read through the challenge, this idea stuck with me: five star books only. Ashley made a decision to cut the clutter in her classroom library by only affording shelf space to the best books in her collection. The others were given away or donated. Read all about her system here.
So, with that in mind, my library will take on the same attitude. Again, my purpose is to pique curiosity and share passion, so what better way to do that than with the books that I’m seriously crushing on and that I know kids are drooling over? I used to think that if I didn’t spend my summer weekends scouring garage sales, writing grants, and creating donors choose drives, I would never be able to replenish my library. I’m done with that! All that time I now spend working on other things that more tangibly affect the overall growth of my students and their literacy skills. Also, I spend more time on ME relaxing and taking care of myself before the next school year rolls around.
Any books that don’t fit in my small little library either are at my house or in a closet at school. Students will still be able to see that I own them by accessing our DIGITAL library. More on that in a bit!
ORGANIZING THE SYSTEM

QR codes are seriously my friend. I use them for everything, especially now that our school is 1:1 with chrome books. With QR codes, my little portable library gives students access to the extra books I have at home (using the app Libib), the books in our school library (just links to their online digital catalog), the books in our school ebook library (again, organized by my fabulous librarians!), as well as a YouTube playlist of book recommendations, trailers, and reviews (grab that playlist here). To display these QR codes, I simply created some templates (I used a mountain/outdoor theme to match my classroom), printed, backed on cardstock, laminated, and attached them directly to my cart!


Teaching Annotation with Google Keep
Over a decade of teaching, I feel like I’ve heard it all! This year, however, I feel like I’ve found a new and sustainable way of reframing how I look at annotation. Yes, it does involve some tech, but don’t be intimidated! It’s a low-tech approach and works on multiple devices.
Teaching annotation to high school students is an ongoing struggle for so many teachers. It’s one of those skills and I find myself continually reinventing ways to teach it and explore it with students. I have faced so many different roadblocks on the path to teaching annotating. Do these scenarios sound familiar?
Students can’t write in their books - they are library copies
I have three classes and only one class set of novels
Students complain about annotating taking too long
Students refuse to mark in their books
Students lose the annotation bookmark I’ve given them to focus their notes
Students “fake” their annotations just to get credit when I “grade” them
Any other good ones? Over a decade of teaching, I feel like I’ve heard it all! This year, however, I feel like I’ve found a new and sustainable way of reframing how I look at annotation. Yes, it does involve some tech, but don’t be intimidated! It’s a low-tech approach and works on multiple devices.
What is Google Keep?
Google Keep is an app I’ve used forever, but only really for personal to-do lists. It’s a sticky-note type of app that allows you to create notes, color code them, check off items on a list, and even share notes with others. Google Keep is connected to all of your other Google products (slides, drive, docs, etc.), so all it requires for your students is a Google login.
Getting Started with Annotation Focal Points
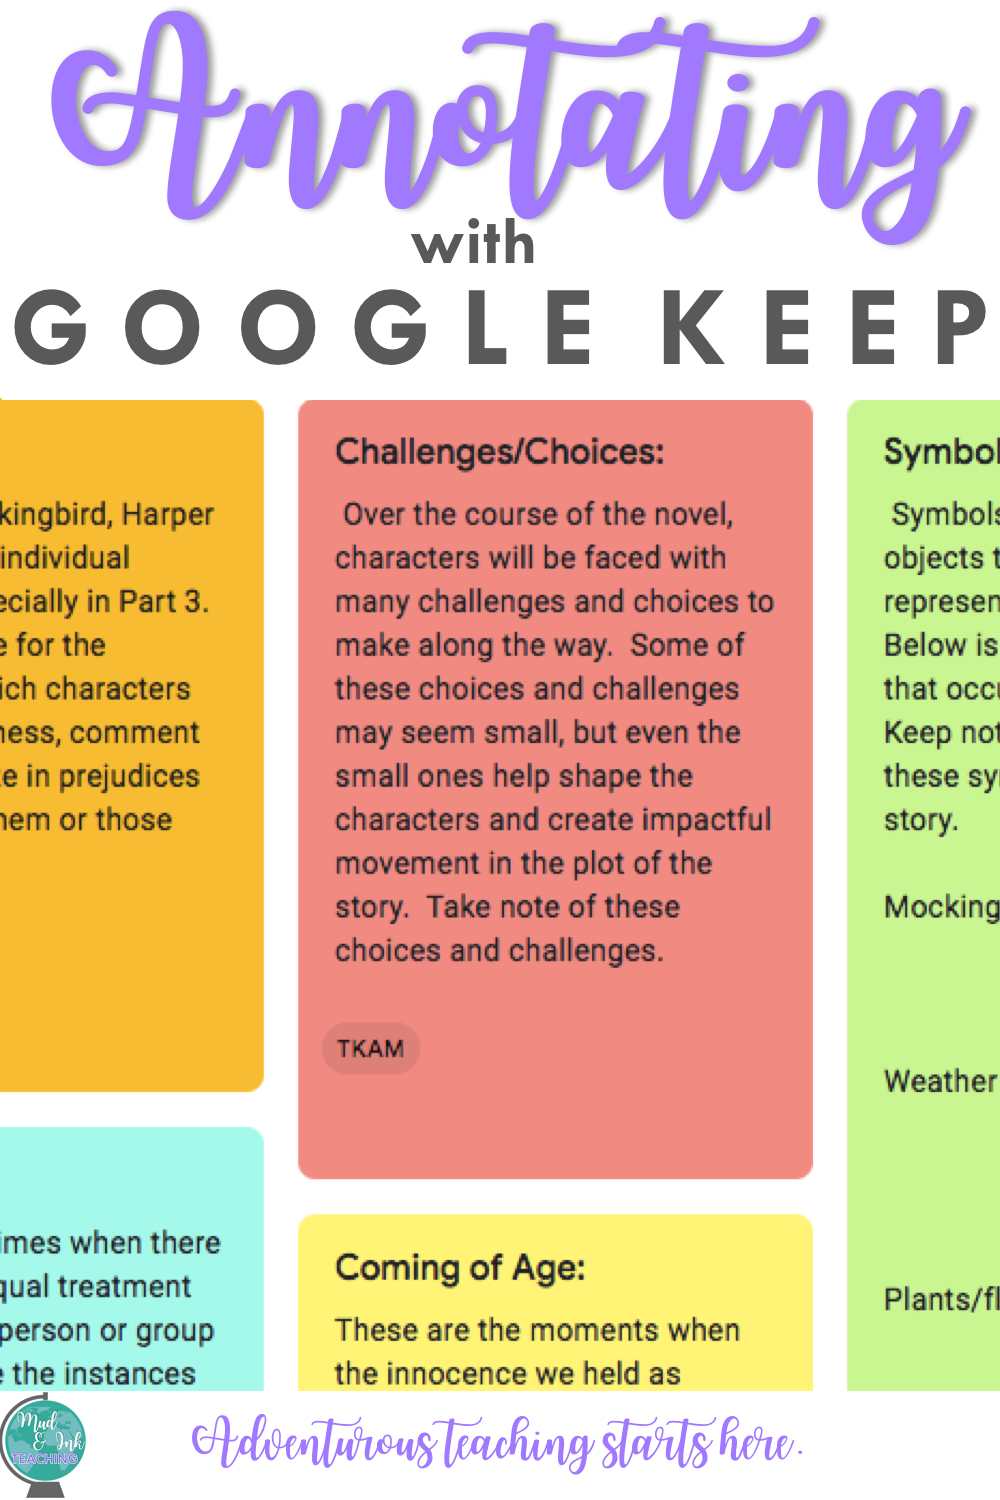
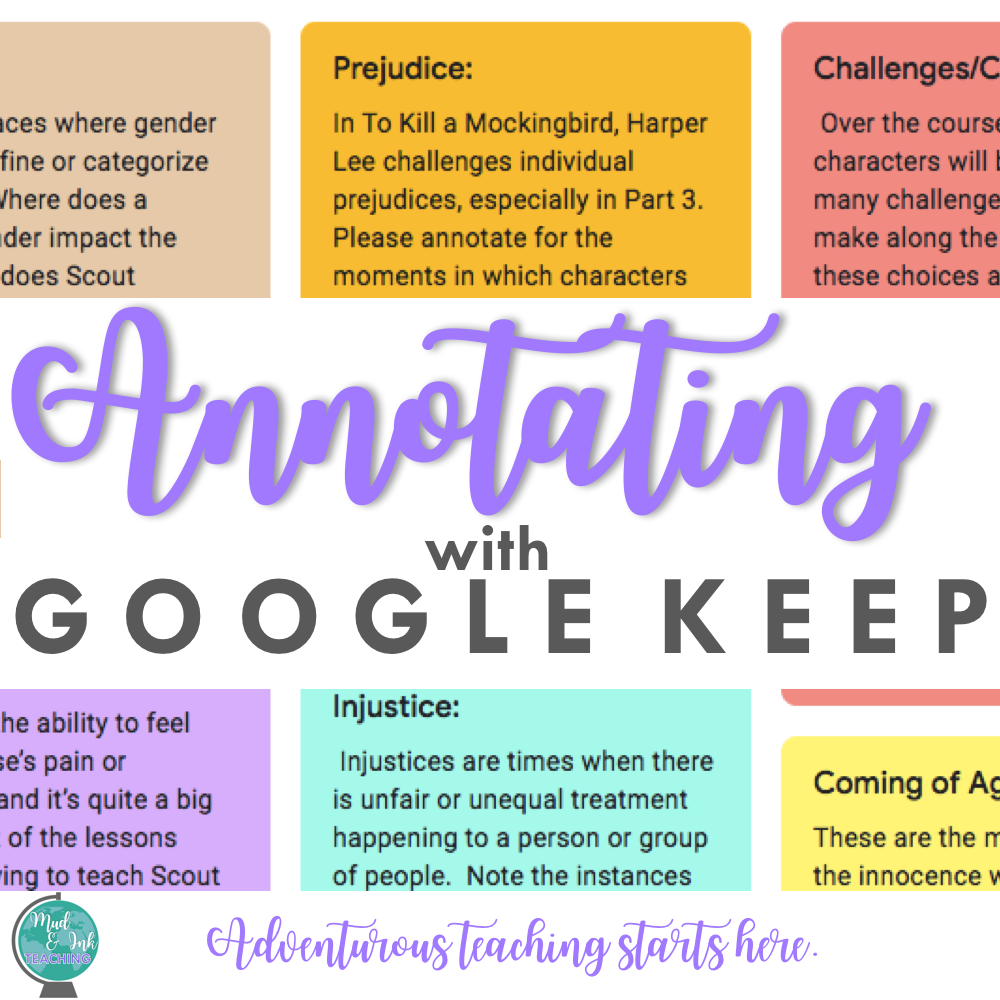
This may seem obvious, but when it comes to annotating, students should have a direct, clear purpose for doing so. Yes, it’s nice to have students mark “C” when they notice a characterization trait, but is that what you’re assessing at the end? For example, when my students are annotating in To Kill a Mockingbird, it’s for major topics (for which they will later create theme statements). On their annotation guide/handout, I tell them to focus on: coming of age, prejudice, empathy, gender roles, and symbolism. That’s it. Those are their Annotation Focal Points.
Using Google Keep to Track Annotations

Now that students have their Annotation Focal Points, they will create as many Google Keep notes as you have focal points (if you have four focal points, they’ll have four Keep notes).
Send students to keep.google.com
Make sure students are logged into their student Google accounts
On the left hand side of the screen, have students click EDIT LABELS. There, they will create a new label titled with whatever book you are studying.
Click on that new label so that it is highlighted on the left hand side of the screen. You are now creating notes under that label, so they will be nicely sorted when students need to access them later.
Where it says “Take a note”, have students copy and paste (or type) their first Annotation Focal Point into the note. The Title can just be a one-word topic and then the note can be the longer version of the focal point that you gave them.
Have students repeat this step for each focal point.

Now, their notes are ready! Every time they read or every few lessons, students can stop here to add to their notes.
Personally, I like to encourage students to annotate for general items in their books as well as these focal points. I tell the students that we are using Google Keep as a highlight reel of the BEST pieces of evidence that match up with our focal points. Good annotating means consistent interaction with the text, so I want them to practice that as well, but as we discussed earlier, sometimes, that’s just a pipe dream. Google Keep is a great alternative that offers an organized, focused approach to monitoring important concepts while reading, but it’s not the perfect solution, either.
Assessing Student Annotations
Since each student is keeping track of their own annotations, there are a few ways you could collect or assess the annotation on Google Keep.
Create an assignment on Google Classroom. Have your students:
Take a screenshot of their Keep notes and submit that image.
Copy and paste the notes they have for one of the categories that YOU select
Give students question that requires they use their notes from Keep - no books allowed!
There are lots of other ways you could assess their annotations, but these are a few that I’ve tried and liked so far. My favorite part? I will NEVER collect books to check-in annotation ever again!!
How else have you used Google Keep in the classroom? Share your strategies with us below in the comments! I’m actively using this while teaching my Great Gatsby and To Kill a Mockingbird units and loving it so far!
Don’t forget - if you love trying new ideas and getting inspired by others who are adventurous just like you, join our Adventurous Teaching Academy on Facebook!
SHOP THE MUD AND INK STORE:

A Cell Phone Policy that Actually WORKS!
Every school and every teacher has a different philosophy with student cell phones, but with classroom management as a whole. Whether you are on the FORBIDDEN end of the spectrum or on the “do what you want, it’s your grade” end, I just might have a solution that will help in your classroom.
Every school and every teacher has a different philosophy with student cell phones and with classroom management as a whole. Whether you are on the FORBIDDEN end of the spectrum or on the “do what you want, it’s your grade” end, I just might have a solution that will help in your classroom. Setting clear expectations and routines around this policy during the first two weeks of school will take practice, but is critical to establish as it can easily be the number one classroom management problem you will face at the middle and high school level.
A Disclaimer
This post comes with a HUGE disclaimer: cell phone behavior is changing constantly and so is the way that teachers and administrators need to respond to this behavior. The suggestions in this blog post are tried and true, but that doesn’t mean that when you’re reading this, it might be something that’s not right for your situation. Officer Gomez, an SRO that speaks in-depth about discipline issues he faces in his position, argues strongly for full-banning practices in schools. The bullying, social-media addiction, and other unsafe exchanges that happen on cell phones need to be taken seriously - especially at the middle school level. School-wide policies that respect the best interest of student-learning and safety are the best situation, but for those of you facing a “handle it yourself” classroom situation, then I’m here to offer my story and my success.
The Cell Phone Charging Station
I’d first like to point out what I’ve named the policy - The Cell Phone Charging Station. It’s not “Phone Jail” or anything negatively connotated. The goal of using a charging station is to incentivize responsible behavior before punishment is even necessary. This is a lot like what I’ve learned to do as a parent. I know for a fact that my toddler’s mood between 4:30pm and 7:00pm is demonic…like unrecognizable, monster human status. Do I schedule playdates or haircuts during this time? HELL NO. I try to create situations that foster the kinds of outcomes that I desire long before I’m stuck handing out consequences, and this is critical for us in the classroom, too.
These are the kind of things that are so important when setting up your high school classroom: trust me, the Dollar Spot has its temptations, but if you don’t have FUNCTIONALITY in your classroom design, it won’t matter HOW sparkly that unicorn is. We must have a goal of creating a classroom environment that is safe, comfortable, and prime for academic success. Figuring that out needs to happen before anything else (and if you need help with that, I’m here for you).
Here’s what I tell the kiddos in the first week of school:
So here’s how cell phones work in our class: sometimes we need them to look something up quick, but most of the time, you know they’re a major distraction to your education. And that’s what you’re here for after all, right? Well, the bottom line here in this room is that I don’t want to see them out and being a distraction, but I also want you to learn how to control your own behaviors and be able to use them at appropriate times.
So here’s what we’re going to do: if you know that you can’t handle the distraction for the day, drop your phone off at the charging station. Plug it in, turn the ringer off, and just forget about it for the class period. You won’t even be tempted to look, plus, when class is over, you’ll probably be back to a full charge! For those of you who choose to take your chances and I have to ask you more than once to put your phones away, the second time I see the phone I’ll simply ask you to walk it over to the charging station since you couldn’t follow the first warning.
And that’s it. It’s that simple. From about day four, I had more students choosing to put their own phones at the station than I’ve ever had to reprimand. In the first semester of trying this system, I had one student (out of 125!) refuse to put his phone away and I was able to handle him separately.
A note: I’ve seen a lot of teachers have success with caddies in desk clusters, too.
The Benefits:
There will never be a perfect policy, but this approach certainly created a few things in my classroom:
An atmosphere of adult trust. Students are treated like adults with a choice, not children with rules (see class contract below)
An opportunity to self-assess and build self-monitoring skills. By putting the responsibility on them for knowing their own habits, I hope to be building a behavior that will strengthen over time and into their adulthood.
A community of caring. The tone of our room is one where we care about each other and care about learning - I don’t spend day after day nagging students about this annoying behavior!
Want to see my complete first two weeks of school plans? I’m here to walk you through step by step in my course:
The Setup:
Here’s what you’ll need to create your Cell Phone Charging Station:
A visible place at the front of the room. I have mine on the front board so that I can always see who is up there and keep an eye on any funny business.
A clear shoe hanger. I bought mine on Amazon for about $8.
A power strip that has USB ports. I bought mine on Amazon and this one has room for 14 devices to be plugged in at once. I never have this many at once, so it’s worked out great! Students do have to have their own cord in order to plug in - but most of them live with a plethora of cords in their backpacks so that hasn’t been a problem either.
A few dry erase markers. I ask the students to put their name on the pocket where their phones are so that there are no mix-ups or if they leave and forget the phone I know who it belongs to.
A sign or place on the whiteboard for you to write your rules for using the station.
I’d love to hear how this has helped in your classroom and how you tweaked it to fit your school. Establishing this as a routine in my classroom has become an essential part of the first two weeks of the school year. We need to practice this routine and actually test it in action a few times before we get it down. This is also a cornerstone component of the class contract that we sign together at the start of the year. I’d love to share a copy of the contract with you — feel free to adapt and change for your needs!
LINKS TO PRODUCTS
(some may be affiliate links which means I will be partially compensated for your purchase)


EASY Grading with Macros in Google Docs
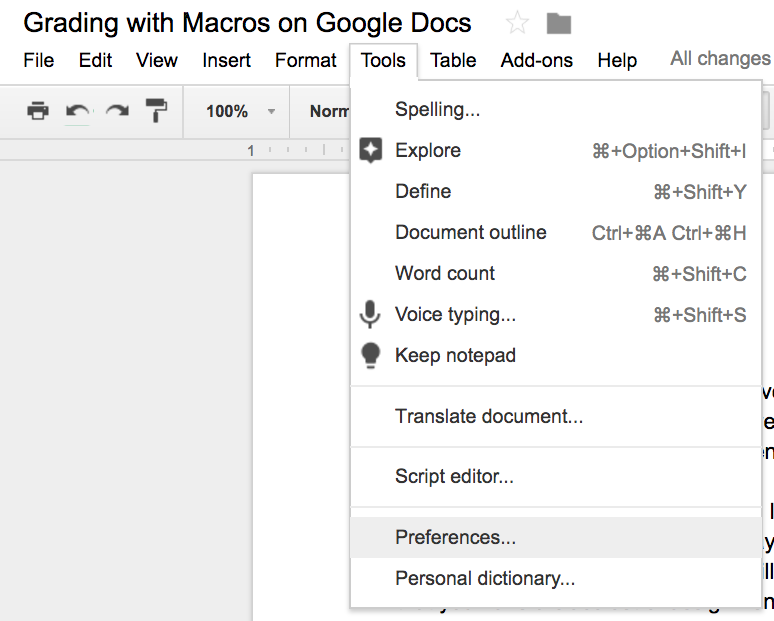
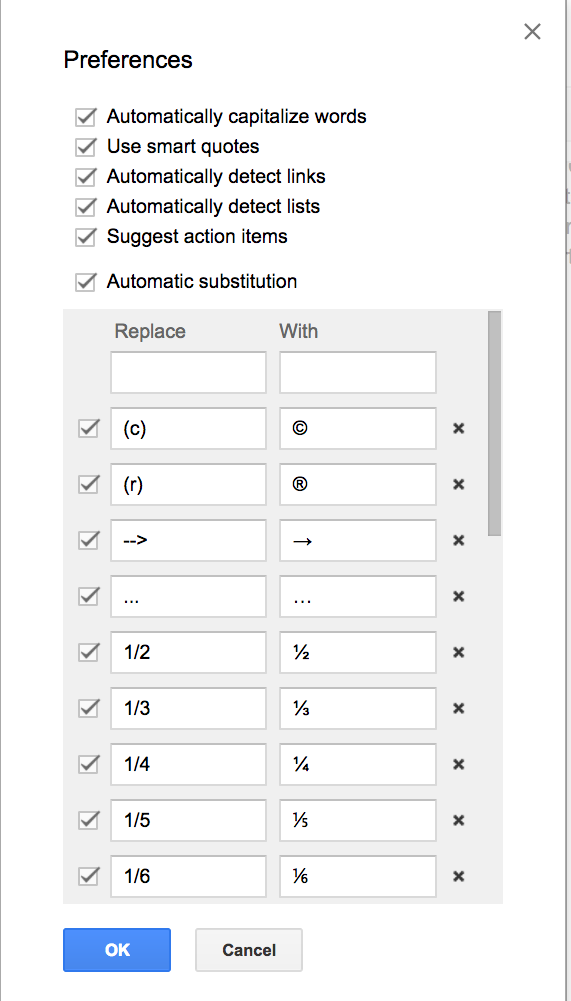
Macros are little shortcuts that you give to your computer. When you’re inside a Google doc, simply click “Tools” and then “Preferences”. Here, you’ll see the macros shortcuts that are already set up. For example, when you type ( C ) without spaces, your computer will automatically change it to the copyright symbol © . We want to make these shortcuts work for us as graders!

This is by far the least sexy title I’ve ever given to a blog post, but that’s exactly what I’m going to talk about: an unsexy name for a very efficient and amazing shortcut you can use while doing your online grading and commenting.
We’re going to skip a few steps here: I’m not going to address collecting work through Google Classroom (that post is for another day or someone else already wrote it) and I’m not going to address Doctopus of Goobric (but I will -- eventually!). We’re just going to assume right now that you have a class set of assignments on your Google Drive. You’re staring at them and thinking holy crap...this is so much work. I’m also going to assume you have a rubric ready to go. So let’s start grading.
What are MACROS?
Macros are little shortcuts that you give to your computer. When you’re inside a Google doc, simply click “Tools” and then “Preferences”. Here, you’ll see the macros shortcuts that are already set up. For example, when you type ( C ) without spaces, your computer will automatically change it to the copyright symbol © . We want to make these shortcuts work for us as graders!
What are the common errors?
Many teachers find that as they grade and as they comment they keep writing the same things over and over again. This is exactly what macros should help you do more quickly. If I’m grading an essay in English, the one biggest error I see at the beginning of the year is students giving shallow analysis of evidence they’ve included. So, instead of writing “After you use evidence, make sure the analysis is deep and explanatory. SHOW me how this evidence is relevant and important!”, I could just set up my macros to be “WA” (and I know that means “weak analysis”). Now, every time I type “WA” my computer will recognize that code and change my text to the full two sentence comment that I really wanted to make.
Getting started!
It’s really that simple! You’ll want to get started by making a list for yourself of the codes that you want to use and the text that they’ll be replaced with. Make this cheat sheet, then go and insert them in your preferences, and finally print out a copy for yourself. Eventually, after using it enough, you’ll memorize your codes, but for the beginning, you’ll want a cheat sheet to look off of.
Share in the comments below: what codes are you using for your subject area? What is working for you so far?
I'm Amanda: high school ELA teacher, passionate traveler, and mommy raising a bilingual baby. Read more about loving this crazy, beautiful adventure:
shop resources

Back to School: Tech Talk Week!
It's time to head back to school with The Secondary Series! We are so excited to share a whole entire week of broadcasting with you all. This Back to School: Tech Talk Week series will focus entirely on edtech tips and tricks for any secondary educator to bring back into his or her classroom.

It's time to head back to school with The Secondary Series! We are so excited to share a whole entire week of broadcasting with you all. This Back to School: Tech Talk Week series will focus entirely on edtech tips and tricks for any secondary educator to bring back into his or her classroom.
Why watch?
You mean, you need another reason other than exceptionally fun and free professional development? Well, we're offering out TWO TpT $50 gift cards to our viewers as well as printable certificates for professional development. Depending on your state and district, you may be able to use these certificates to redeem toward your certification (you'll have to ask your supervisor about this, but we'll hand over the proof that you were trained!).
Where do I go?
Join us in our Secondary Series Facebook group every night the week of July 30th - August 5th from 7:00pm - 7:30pm CST. We will broadcast there LIVE, but you can always catch the replays there in the group by clicking on the tab VIDEOS. Here's a look at the lineup:
Sunday July 30th:
7:00pm - Kick Off! Meet your Teacher-Broadcasters
Module 1 @ 7:20pm - 6 Ways to Use Snapchat in Your Classroom with Amanda C.
Monday July 31st:
Module 2 @ 7:00pm - Grading with Macros in Google Docs with Amanda C.
Module 3 @ 7:10pm - Make Using Multiple Sites Painless: One Tab with April C.
Module 4 @ 7:20pm - EdPuzzle with April C.
Tuesday August 1st:
Module 5 @ 7:00pm - Sli.do with April C.
Module 6 @ 7:10pm - Zip Grade with April C.
Module 7 @ 7:20pm - Prezi with Kim C.
Wednesday August 2nd:
Module 8 7:00pm - Autocrat with Tziri L
Module 9 @ 7:20pm - Google Suite/Classroom with Erin C.
Thursday August 3rd:
Module 10 @ 7:00pm - Canva with Meredith D.
Module 11 @ 7:10pm - Quizizz with Tziri L.
Module 12 @ 7:20pm - StoryBoardThat with Kim C.
Friday August 4th:
Module 13 @ 7:00pm - Legend with Kim J.
Module 14 @ 7:10pm - Spark Video with Kim J.
Saturday August 5th:
Module 15 @ 7:00pm - PowToon in the Classroom with Amanda W.
7:10pm - Gift Card Winner Announced!
Enter our TpT Gift Card Raffle and Qualify for Your PD Certificate!
For every broadcast that you attend, you'll be eligible to enter our raffle AND qualify for a PD certificate. All you need to do is tune in, listen for the EXIT TICKET question, and respond to the question here. The raffle will take place on August 5th 2017 (the last day of broadcasts), so entries after that date will not be eligible for the gift card. You may, however, continue to respond to exit ticket questions to qualify for your PD certificate up until September 5th. After September 5th, no more entries will be accepted.
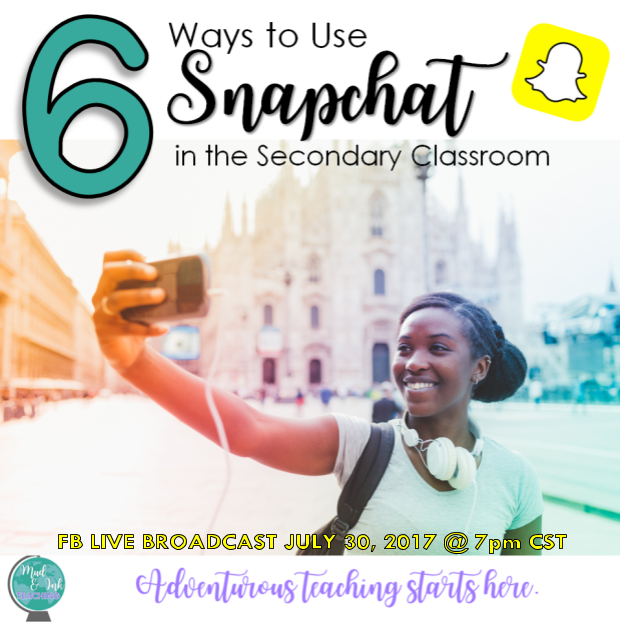
6 Ways to Use Snapchat in the Classroom
I’m a teacher in my 30s, so I’m by no means a “Snapchat native”. I actually grew up with card catalogs, Dewey Decimals, and World Book Encyclopedias, so no excuses here teachers! You can learn ANYTHING! And before you write off Snapchat thinking social media does not belong in the classroom, try to see if there’s value here for your classroom, no matter how intimidating it might feel! Plus, you'll probably have a lot of fun along the way :-)

*If you need to know the basic ins and outs of Snapchat first, check out YouTube for some great tutorials for beginners! You do not need to be a Snapchat expert to use it in your classroom - most of your students already ARE experts! Let them teach YOU what you don’t know, and I’ll try to provide the rest here in this post!
I’m a teacher in my 30s, so I’m by no means a “Snapchat native”. I actually grew up with card catalogs, Dewey Decimals, and World Book Encyclopedias, so no excuses here teachers! You can learn ANYTHING! And before you write off Snapchat thinking social media does not belong in the classroom, try to see if there’s value here for your classroom, no matter how intimidating it might feel! Plus, you'll probably have a lot of fun along the way :-)
Why Snapchat?
Before we get too far into this post and tutorial, I want to be very clear that there are good times and bad times to use social media in the classroom, so use these tips at your own discretion. Snapchat hasn’t replaced any part of my classroom, but it sure has enhanced lessons and homework assignments!
How do you use Snapchat in the classroom?
Snapchat is mostly known for its social aspects, but that’s actually not how I use it most often. What I like about Snapchat is the ability to adapt, modify, and play with images. Essentially, Snapchat allows you to pull up an image (or take a picture), then annotate that picture with stickers, highlighting, doodles, and text. There are other apps that do this, too, so if you’re not comfortable with Snapchat, let me know in the comments and I can make other suggestions. You can also do most of these activities using Google drawings if your students have Chromebooks and you’d prefer not to use Snapchat. I use Snapchat because my beginning of the year survey tells me that about 98% of my students are on it actively!
The basic steps to use Snapchat in the list below follow this pattern:
Decide on an image or picture that you want students to work with. This could be a picture of a page in a book, a selfie (reaction to learning), a picture of a student handout, etc.
Either YOU provide the picture for students to download (you can post the picture on Classroom and students can save it to their phones) or direct the students to take a picture of something (a math problem in their text book).
Open the Snapchat app and select that image from the camera roll.
Now, students can annotate the image however you want them to (highlight, sticker, text, underline, etc.)
Finally, students save the image to their camera roll (no need for them to share it socially on their stories) and then submit that image to you in a variety of different ways.
Are you starting to see the vision? Let’s get started! Here are the 6 ways to use it in the classroom!
Download a FREE Checklist of these 6 Tips!
1. #BookSnaps

This was actually my first introduction to using Snapchat in the classroom. My great friend Tziri Lamm shared about #BookSnaps in a Facebook group and I knew I just had to try them! Think of #BookSnaps as a new and updated way of assigning annotation for homework. Students in ANY subject can take a picture of their reading, react to it, and submit that annotation back to you easily and with a lot more engagement than standard annotating practices. Check out creator Tara Martin’s website about how students across the world are reading, snapping, annotating, learning, AND sharing socially!
2. Book Talks
Similar to BookSnaps, Snapchat also allows users to record ten second videos. Give students your criteria (why you chose the book, the best part, your favorite character, your rating/recommendation), and have them record a ten second video for each of the criteria. Students could record themselves or possibly parts of the book or any other setting that appropriately matches what they’re talking about. To turn in, students would save each video to their camera roll and then you could either teach them how to edit the four smaller videos together OR for a really low-tech option, have the students insert the videos into a Google slide. When you hit present, you’ll be able to watch each video! If you’re a librarian, you might have everyone in a class do a ten second book talk and then compile them all together for a 260 second video (depending on how many students, obviously!) of all the books read by an entire class (Check out Nikki D Robinson’s website for ideas)! There are lots of options and they’re all pretty low-tech!
3. Writing Stories
This idea is similar to Book Talks. If you’re not a reading teacher (or someone who would be having students do Book Talks), students could easily emulate the same process as described above, but with a different topic. Maybe you want students to explain a process in math or science or even demonstrate a physical skill in PE - whatever the case may be, students could make quick ten second videos and then either stitch them together in video editing software or submit via a Google slide. It’s engaging for them, requires mastery (for the most part), and is easy to collect and grade. That’s a win!
4. Raise Awareness
In my class, we do a massive service learning project called Challenge to Change. One of the things students need to do as part of their giving back to the community is to raise awareness and educate others about their social justice issue. Using Snapchat, students were able to create and build stories to share socially and raise awareness amongst their peers on topics ranging from homelessness to bullying. Using Snapchat, students could also track their engagement with their audience by reporting back how many VIEWS their story got. If their story wasn’t viewed as many times as they set a goal for, this could encourage a conversation about the QUALITY of the story and prompt revision. Yes, I know, win, win, WIN!!
5. Vocabulary Practice
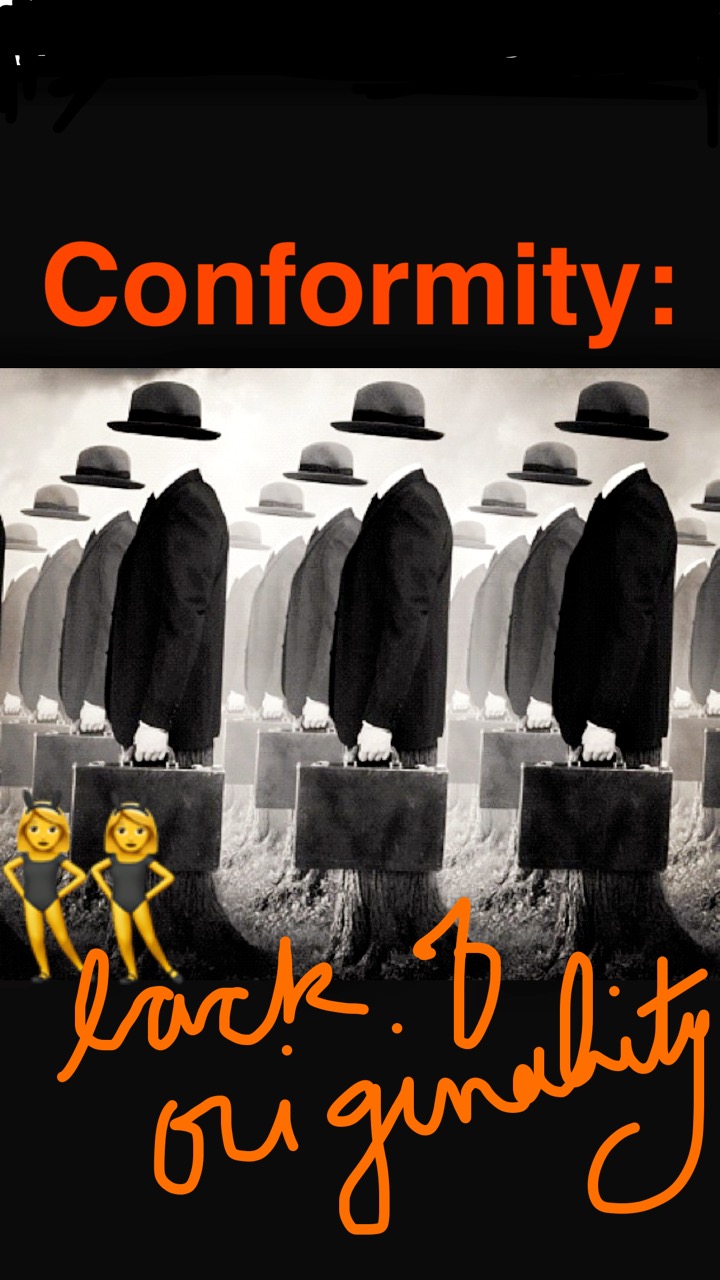
Every high school teacher has a responsibility to explicitly teach vocabulary. Yep, I said it. Every single one of us. Every content area has a specialized vocabulary that desperately needs to be taught to our students, so why not do it with Snapchat? Students could take a picture of a “scene” or moment that depicts one of their vocabulary words. Students could take pictures of seeing the word used authentically in the world OR a video of some friends using it in a conversation. Combine all of the snaps from your class into a Google Slideshow and distribute to everyone for studying purposes.
6. Revision
One of the most important things I’ve been learning as a veteran teacher is finding more and more ways for learning to continue. One of these important classroom habits is that of revision. I try to instill in my students the value of learning and that it never ends: just because you’ve been tested or written a paper, that doesn’t mean you’re done learning. We make learning cyclical and important to revisit using revision. Using Snapchat, we’ve had students:
Take a picture of their grammar error, mark it with the “pen” function, then write the correction in the text box and submit
Take a picture of their old quiz, then type their revised answer in the text box and submit
During peer review, students will “snap” pics of their favorite lines or moments in a partner’s paper. We share the highlights with one another as we look for ways to improve.
For reflection, students take a picture of a moment they’re proud of and comment about why they felt successful in that moment (in an essay or on a test)
While it sounds like taking pictures of exams and essays would encourage cheating or copying, we’ve had the opposite experience. We’ve seen that most students (there are always a few that push the limits!) value the authentic feedback experience that comes with using Snapchat and their revisions.
Getting Started!
Start small. Teach yourself Snapchat (its really not hard!) and play around. Maybe make an account and share it only with a trusted friend so you can try it out and make mistakes. Then, choose one simple tool and give it a shot. Lay the groundwork for your expected behaviors (just like with all other technology) and try one thing. If it doesn’t work for you right away, that’s okay! Trying new things is what makes us all #adventuousteachers and that’s an attitude and mindset that students and colleagues respect.
If you find a technique and are feeling really successful, be sure to snap a picture and post it on Instagram using #edtechteacher! Every month, the #edtechteacher crew gives away $100 to a teacher using technology in innovative ways in his or her classroom - let’s see what you’re up to!
How to Work with Words Without a Workbook
In order for our students to succeed across subject areas, we must all acknowledge the critical importance of vocabulary instruction. There are so many best practices out there, so many specialists, and so many approaches, it can feel daunting to choose a streamlined and effective strategy for your classroom. No matter your favorite method or style, I have a thoughtful yet efficient strategy for you to try in your class this year.

How to Teach Vocabulary Effectively and Efficiently at the High School Level
In order for our students to succeed across subject areas, we must all acknowledge the critical importance of vocabulary instruction. There are so many best practices out there, so many specialists, and so many approaches, it can feel daunting to choose a streamlined and effective strategy for your classroom. No matter your favorite method or style, I have a thoughtful yet efficient strategy for you to try in your class this year.
Let’s start with the routine: bell work. Most high school teachers have seen the merits of implementing bell work and I’d argue that this is the best and most consistent way to have daily vocabulary practice without having to give up tons of class time. When the bell rings, you need something that students can do independently, quietly, and quickly. Why not have them try using the Vocabulary Digital Interactive Notebook?

Here’s how it works: you provide students with your list of words at the beginning of the unit. Then, daily, students take out their 1:1 devices (should be Google-ready), open their Vocabulary Digital Interactive Notebooks, they choose a vocabulary activity (there are eight of ‘em pre-loaded), they work on the selected activity for 4-5 minutes, and then you’re ready to move on with the rest of class!
Here’s how to get started:
1. Create your Vocabulary Units
The first thing you’ll need to do is decide on your word lists. Some of you may already have pre-selected words for your units, and others of you might have more flexibility, but either way, you are the one responsible for deciding on the words and the length of each unit. When you’ve got your word lists ready to go, we can introduce the Vocabulary Digital Interactive Notebook!

2. Train Students on the Routine
To use this notebook effectively, students should be trained on the bell work routine that you have determined to be the most efficient. In my room, that means when the bell rings, students are in their seats with Chromebooks open. At the front of the room, I display (from my computer) whatever specific directions I have for the day and the students know to check there and then begin. They open up their Vocabulary Digital Interactive Notebooks, follow the directions, and in 4-6 minutes, they’re done with that day’s vocabulary practice.
3. Model and Practice Each Activity (and add your own!)
Inside the notebook, you’ll find eight different practice activities for students to use with one or multiple words from the word list. At the beginning of the year (or when you implement this activity) it’s critical that you model and practice each of the graphic organizers and activities in the notebook. Oftentimes, during Unit 1, teachers spend time teaching each of the activities one by one before making the bell ringers and independent activity in Unit 2. Don’t forget: since this notebook is completely editable, you can add any of your other favorite quick vocabulary activities that you want before you assign it to the students!

4. Add Your Own Assessments
Vocabulary study requires all different kinds of assessments, and this particular post and product don’t provide this part. Make sure that you and your team decide on appropriate formative and summative assessments to use along the way.
5. Keep it Fresh
There are lots of ways to keep this activity fresh throughout the year. Here are just a few things teachers have tried:
Pick a few days a week to have students work with a partner. This gives students a chance to talk about the words and word meanings rather than always working solo. Marzano (and other vocabulary experts) have made it abundantly clear that students need multiple exposures to words in order to fully learn them. Partner and small group work make this possible!
In a given week, divide the list into parts. Ask students to focus on the same 3-4 words ONLY but go through every activity. This ensures mastery of the words, not just practice. The next week, students could rotate to the next grouping of words.
If you’re assigning this notebook through Google Classroom, you will automatically have access in your Drive to each student’s notebook. Occasionally, project a few notebooks from students that have done exemplary work. This ensures students know what quality looks like and helps them to not get lazy with the routine. You can also print out notable work directly from their Google slideshows!
Ready to get started? Then what are you waiting for! Pick up your own digital, edible copy of the Vocabulary Digital Interactive Notebook today!
Teacher Truth or Dare: Show us your morning routine!
I've been asked to share my truth: what's your morning routine? And I did it using Adobe Spark Pages.

My Morning Routine:
The True Diary of a Workaholic, Trying-to-have-it-all English Teacher
I have to admit...I’ve watched my fair share of “morning routine” videos on YouTube. They crack me up: so many of the teenage girls making them could be my students and the things the YouTubers include in the videos are both endearing and totally random!
I certainly don’t have it all together when it comes to my morning routine. Actually, I’d hesitate to even call it a routine, but the masses called for my TRUTH and my truth I shall share! And to do so, I’ve enlisted the help of Adobe Spark.
Adobe Spark Pages: For Teachers
The videos of these morning routine videos are gorgeous. I did not have the time or even the knowhow to create one of these, but what I do know how to do is create a gorgeous Adobe Spark Page. Take a look at my morning routine page here!

Nice, isn’t it? There are so many things I enjoy about pages: primarily, I love the simplicity of the technology and the beauty of the design. I did no coding, minimal font choosing, and was just relieved to just insert my pictures and go.
I’ve used Adobe Spark pages for a few other situations: my family Christmas card and a webquest for gaining background knowledge before reading the novel In the Time of the Butterflies. My next project? I plan to try using Spark Pages to create virtual field trips!
Adobe Spark Pages: For Students
As you can imagine, Spark Pages has amazing potential for student learning and publishing in the classroom. With pages, students could do so many things:
Publish a photo essay
Create a character profile
Create a mock website for a business/product
Create an introduction of themselves
Present research on virtually any topic
Using Adobe Spark Pages in the Classroom: A Tutorial
Want to try Adobe Spark pages in your own classrooms? I made a tutorial video for you! Check it out below and be sure to share with other teachers that would love using this tech tool!
About the Author:
My name is Amanda Cardenas and I’m the author behind the website mudandinkteaching.org I love blogging and participating in the Secondary Series Facebook Live crew on Thursdays! You can also find me on Instagram @mudandinkteaching, Twitter @mudandink_, or directly via email mudandinktpt@gmail.com.


The YouTube Scavenger Hunt
Right about now, everyone's turned to the "leggings only" mentality: not only have we decided to stop putting together Instagram-worthy outfits and Pinterest-perfect lessons and procedures, but we're starting to cut corners and cover them all up with a nice, flowy dress.

Right about now, everyone's turned to the "leggings only" mentality: not only have we decided to stop putting together Instagram-worthy outfits and Pinterest-perfect lessons and procedures, but we're starting to cut corners and cover them all up with a nice, flowy dress. This is teaching in the doldrums of winter.
Have you reached the elastic-waistband version of yourself as a teacher? If so, I'm with you. All. the. WAY! For these last few days before break, I want to do right by my kids, teach great content, but the above and beyond-ness of my normal school gig will just have to wait until after the holidays.
This post, however, will not get you to the break. You're on your own. What I'm here today to give you is your POST break solution. Once you've made it to break, relaxed on your break, there's something else that you still need to do: GO BACK TO SCHOOL AGAIN! And as exciting as it is to start fresh in the new year, it can be a bit of an adjustment getting back into the swing of things. So, from my classroom to yours, here is the only lesson you need to get you through the first one to three class periods when you return from break.
The YouTube Scavenger Hunt
1. Decide on content and topic
Are you in the midst of a novel unit right now? Starting? Finishing? Are you working on a research project? Would you like to introduce your students to poetry? Once you've chosen your topic, read on!
2. Choose your outcome
What do you want your students to be able to do by the end of the scavenger hunt? To answer a synthesis question? To present their findings? To discuss their revelations Socratic seminar style?
3. Create your handout
Keep it simple or just use mine and modify to your liking. The handout should be a simple, open guide for students to take notes as they scour through your YouTube playlist. Ask a few pointed, but strategically open-ended questions and leave room for ideas, scribbles, notes, textual evidence, etc. You might include (at the end) the finished product or activity they will do or participate in the following day so that students are prepared.
4. Create your YouTube Playlist
Here is the beautiful part. No matter your topic or current unit of study, there are hundreds of connected and relevant YouTube videos that will help students understand your objectives more clearly. For example, when my students are in their Slam Poetry unit, guess what kinds of videos I stash on the YouTube playlist? My (and student's) absolute favorite slam poems. Reading a novel with some complicated history? Add it to the playlist. Exploring a controversial issue? Add videos from both sides of the argument to the playlist (and a few in between!) Working on rhetorical analysis? Get some commercials ready to go!

A YouTube Playlist Scavenger Hunt might sound like a cop-out, but consider these delightful details:
It's completely student-centered
It offers student choice
The questions can be scaffolded for an appropriate amount of rigor
The activity expands background knowledge
Students are actually working on LISTENING skills
Students are hardly distracted on YouTube when their assignment is to watch YouTube.
Here's one of my favorite playlists to use for this kind of activity: it's a Social Justice Poetry Slam playlist! Feel free to take it and use it with the handout attached above.